Allegro? Design Entry HDL User Guide
Product Version 16.6 October 2012
4
Design Entry HDL Editing Environment Design Entry HDL enables you to make changes in the editing environment according to your preferences. The following topics are described below:
Setting Up Defaults
Basic Editing Tasks
Displaying Information
Using the QuickPick Browser
Basic Navigation in Design Entry HDL
Running Commands with Strokes
Support for Fonts
Uprev of an Existing Design
Single Mode operation in DE-HDL
Constraint Manager and DE-HDL
Usability Enhancements in Design Entry HDL
Windows Mode
Reorganized Menus
Design Entry HDL Options Dialog Box
Support for Keyboard Operations
Bounding Box on Components
Changes in the Global Navigate Window
New-Look Properties Window
Showing Unconnected Pins on Components
Wire Selection
Anchor Point Stretch
Alignment and Distribution
Selection Filters
Object Visibility Layers
Page Search Toolbar
Enhanced Find/Search/Navigate
Quick Find and Detailed Find
Team Design Enhancements
Setting Up Defaults
This section covers the following information:
Setting Up Design Entry HDL Editor Options
Defining a Default Text Editor
Setting Up Design Entry HDL Editor Options
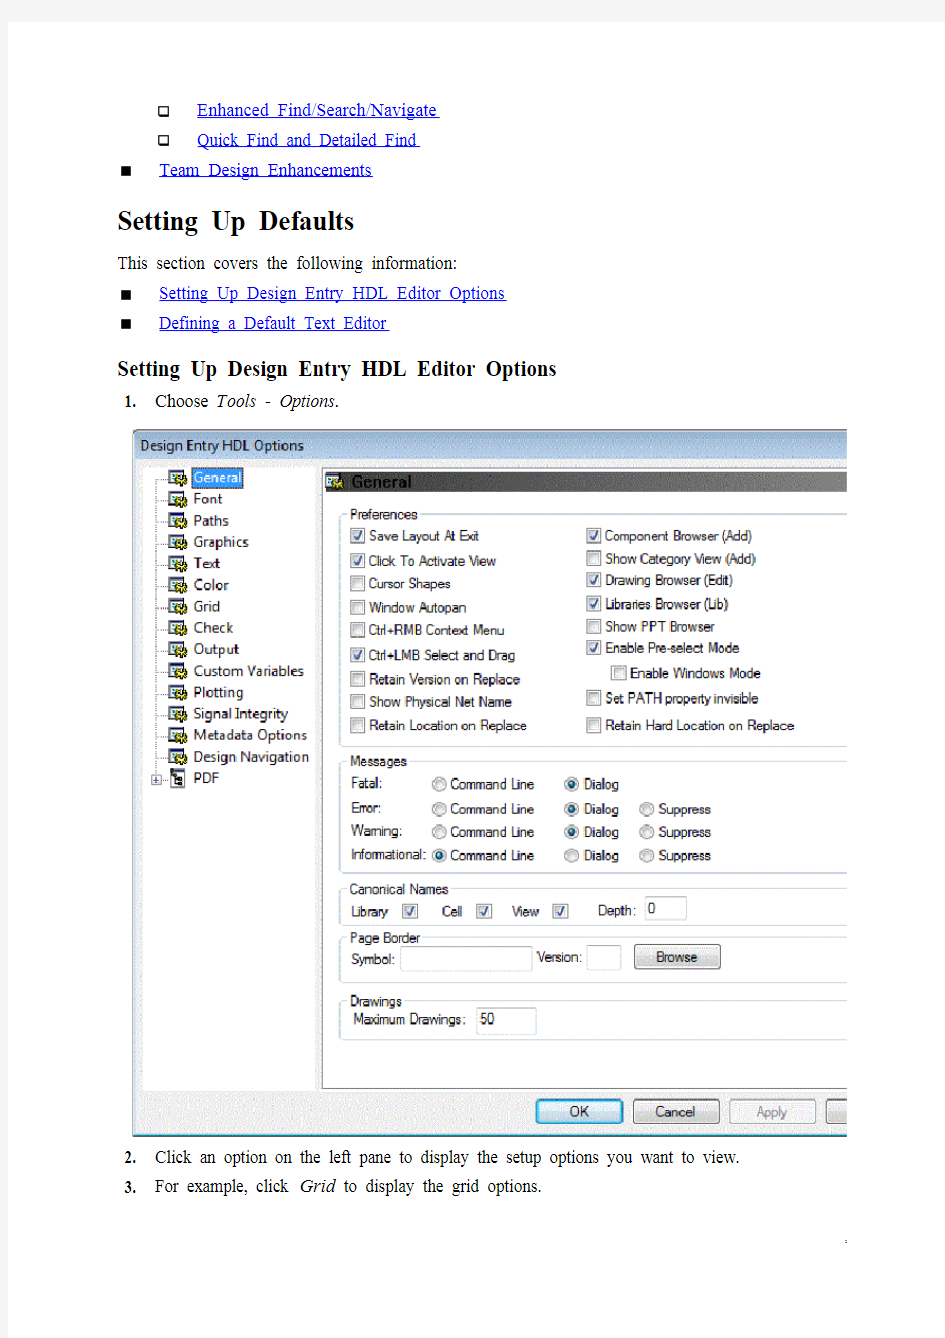
1. Choose Tools - Options.
2. Click an option on the left pane to display the setup options you want to view.
3. For example, click Grid to display the grid options.
4. Click OK.
Enabling the Pre-Select Menu Use Model
The post-select menu use model is the default model. Y ou can set the preferred menu use model to the pre-select use model.
1. Choose Tools - Options - General.
2. Select the Enable Pre Select Mode check box.
Note: Clicking the Enable Windows Mode option at this point enables the features available under this new mode of Design Entry HDL.
If you customize Design Entry HDL menus in pre-select mode, the
changes are not reflected in the post-select mode. Similarly, changes
made in the post-select mode are not honored in the pre-select mode.
3. Click Apply.
4. Click OK.
Now, for operations on schematics, select the object first, and then the menu option for the operation you want to perform.
For example, to rotate a component using the pre-select model, first click on the component and then choose the menu option Edit - Rotate.
Note: In the new Windows Mode of Design Entry HDL, these operations are much easier to handle. See Usability Enhancements in Design Entry HDL for more details.
1. Select the component.
2. Choose Edit - Rotate.
OR
Choose Edit - Component - Rotate in the Windows Mode.
Note: Design Entry HDL supports the pre-select mode only through menus; the pre-select mode is not supported through Design Entry HDL commands. For example, in this mode if you first select an object, and then type delete in the console window, the object is not deleted.
Setting Automatic Page Borders
To automatically set a page border for a new schematic:
1. Choose Tools - Options - General.
2. In the Page Border section:
a. Specify the name of the page border you want to add in the Symbol field.
b. Specify the version of the page border in the V ersion field. By default, the version is
1.
3. Click Apply.
4. Click OK.
Defining a Default Text Editor
If you open a text file in Design Entry HDL, the default text editor is used to display and edit the file.
To set the default text editor for a project:
1. Open Project Manager.
2. Click on the Setup icon.
The Project Setup dialog box appears.
3. Select the Tools tab.
4. Specify the Default Text Editor Path.
The default text editor is vi on UNIX and write on Windows. These default settings are read by Project Manager from
5. Click Apply.
Basic Editing Tasks
This section covers the steps to be performed in Design Entry HDL to complete basic editing tasks, such as undo, copy, paste, delete, and so on.
Note: Before you perform these basic editing tasks, ensure that the CTRL+LMB Select and Drag check box is selected in the General page of the Design Entry HDL Options dialog box.
Undoing an Operation
Moving Objects
Copying Objects
Deleting Objects
Changing the Color of Objects
Drawing an Arc
Drawing a Circle
Splitting Overlaid Objects
Displaying the Console Window
Editing Text in Dialog Boxes and the Console Window
Copying Parts of a Schematic Across Pages, Designs, and Projects
Undoing an Operation
To undo an operation:
1. Choose Edit - Undo.
2. Continue choosing Edit - Undo to back out of operations progressively.
3. You can reverse an undo operation by choosing Edit - Redo.
4. If you have moved objects between drawings and want to undo the operation, you must
choose Edit - Undo once in each of the drawings.
Note: You can also run the undo command using the following stroke pattern:
For more information on strokes and a list of available stroke patterns, see Running Commands with Strokes.
Reversing an Undo
To redo an operation:
1. Choose Edit - Redo.
2. Continue choosing Edit - Redo to reverse undo operations progressively.
3. You can reverse the redo operation by choosing Edit - Undo.
Moving Objects
To move text, wires, or an unwired component
1. Select the object.
2. Move the object to a new location and click again.
OR
3. Choose Edit - Move.
4. Click on the object.
Note: When moving a wire, select the middle of the wire. Selecting the wire at the end stretches it.
5. Move the object to a new location and click again.
To move a wired component
1. Ensure that Auto Route on Move is checked in Tools - Options for Graphics.
2. Choose Edit - Move.
3. Click on the wire nearest to the component you want to move.
The following three cases can occur depending on where you click the mouse button and which button you click:
Click LMB near the open edge of the wire.
Only the wire moves, the component attached to it does not move.
Click LMB on the wire segment near the component pin.
Both the component and the wire attached to it move.
Click RMB and select the context menu item Change Attachment.
There are three possible states of the move operation:
The first time selection of the Change Attachment menu item moves the component
along with all the wires connected to it. The attached wires are directly routed.
The second time selection of the Change Attachment menu item disconnects the wire
segment from the pin of the component and moves the wire segment.
The third time selection of the Change Attachment menu item moves just the wire
segment while keeping it connected to the component pin.
Note: You can also run the move command using the following stroke pattern:
For more information on strokes and a list of available stroke patterns, see Running Commands with Strokes.
To move multiple objects
1. Hold down the left mouse button and drag the mouse to select multiple objects, or use
Ctrl+click or SHIFT+click to select multiple objects.
To exclude components, properties or wires from the selected objects, click the right mouse button and choose Exclude to exclude components, properties or wires from the selected objects.
2. Click on one of the selected objects.
3. Move the objects to a new location and click again.
Copying Objects
To copy an object:
1. Choose Edit - Copy.
To copy an object with its properties, right-click and choose All from the pop-up menu.
2. Click an object.
You can also use keyboard command Ctrl+c to copy and Ctrl+v paste
in the Windows Mode.
The object is attached to the cursor. Y ou can place the object on the drawing.
3. To place several copies of the object without specifying the object again, right-click and
choose Retain Selection from the pop-up menu.
4. Click in the same drawing or in another window to place the copies.
5. If you chose Retain Selection from the pop-up menu and you are done placing copies but
wish to remain in the Edit - Copy mode, choose Terminate Selection from the pop-up
menu. To exit the Edit - Copy entirely, choose Done from the pop-up menu.
Note: You can also run the copy command using the following stroke pattern:
For more information on strokes and a list of available stroke patterns, see Running Commands with Strokes.
To copy an object and its properties:
1. Choose Edit - Copy All.
2. Click an object.
The object is attached to the cursor. Y ou can place the object on the drawing.
3. To place several copies of the object without specifying the object again, right-click and
choose Retain Selection from the pop-up menu.
4. Click in the same drawing or in another window to place the copies.
5. If you chose Retain Selection from the pop-up menu and you have placed copies but wish
to remain in the Edit - Copy All mode, choose Terminate Selection from the pop-up menu.
To exit Edit - Copy All entirely, choose Done from the pop-up menu.
Note: You can also copy properties when you choose Edit - Copy or Edit - Array, right-click, and choose All from the pop-up menu.
To make multiple copies of an object:
1. Choose Edit - Array.
2. Type the number of copies you want to make in the Array Size box, and click OK.
3. To copy an object with its properties, right-click and choose All from the pop-up menu.
4. Click in the same drawing or in another window to place the copies.
Objects copied in the array are offset from each other by the same distance as the first object in the array from the original.
5. To place another copy of the array without specifying the array again, right-click and
choose Retain Selection from the pop-up menu.
6. Click in the same drawing or in another window to place the array.
A copy of the selected object remains attached to the cursor. Y ou can place the copy in several unrelated places on the drawing.
7. If you selected Retain Selection from the pop-up menu and you have placed the array but
wish to remain in Edit - Array mode, choose Terminate Selection from the pop-up menu.
To exit Edit - Array entirely, choose Done.
To copy multiple objects
1. Hold down the left mouse button and drag the mouse to select multiple objects, or use
Ctrl+click or SHIFT+click to select multiple objects.
To exclude components, properties or wires from the selected objects, click the right mouse button and choose Exclude to exclude components, properties or wires from the selected objects.
2. Click the right mouse button and choose Copy, Copy All or Array.
The objects are attached to the cursor. Y ou can place the objects on the drawing.
Note: For more information about copying and pasting parts across schematic pages and designs, see Copying Parts of a Schematic Across Pages, Designs, and Projects .
Deleting Objects
To delete an object:
1. Choose Edit - Delete.
You can also press the Delete key to delete an object in the Windows
Mode.
2. Click on the objects you want to delete.
To reverse a deletion, choose Edit - Undo.
Note: You can also run the delete command using the following stroke pattern:
For more information on strokes and a list of available stroke patterns, see Running Commands with Strokes.
To delete multiple objects
1. Hold down the left mouse button and drag the mouse to select multiple objects, or use
Ctrl+click or SHIFT+click to select multiple objects.
To exclude components, properties or wires from the selected objects, click the right mouse button and choose Exclude to exclude components, properties or wires from the selected objects.
2. Click the right mouse button and choose Delete to delete the objects.
Changing the Color of Objects
To change the color of an object:
1. Choose Edit - Color.
2. Click on the objects whose color you want to change.
Drawing an Arc
To draw an arc:
1. Choose Edit - Arc.
OR
Choose Place - Arc in the Windows Mode.
2. First click in the schematic, then move the cursor to approximately the diameter of the arc
and click again.
These first two points define the endpoints of the arc.
3. Click a third time between the two points.
The curvature of the arc is defined by how close to the first two points you click. Y ou can also draw a circle from an arc.
Drawing a Circle
To draw a circle:
1. Choose Edit - Circle.
Choose Place - Circle in the Windows Mode.
2. Click in the schematic.
This defines the center of the circle.
3. Size the circle by dragging the cursor away from the center.
To draw a circle from an arc:
1. Choose Edit - Arc.
Choose Edit - Arc in the Windows Mode.
2. Click in the schematic, and move the cursor to mark the desired diameter of the circle and
click again.
3. Right-click and choose Done from the pop-up menu.
Splitting Overlaid Objects
1. Choose Edit - Split.
2. Click the overlaid objects.
3. Click a clear location nearby to place the overlaid object(s).
Displaying the Console Window
Choose View - Console Window.
The console window appears. The next time you display the View menu, you'll see a check appears next to Console Window.
Editing Text in Dialog Boxes and the Console Window
Note: On Windows, you can also use commands from the pop-up menu to edit text in dialog boxes. These commands are not available on UNIX platforms.
Copying Parts of a Schematic Across Pages, Designs, and Projects
Design Entry HDL provides support for industry standard copy and paste feature, which enables you to copy and paste parts of a schematic from one design to another. In addition, you can copy text and bitmaps from text editors and graphics editors, respectively, to the schematic canvas. Y ou can also paste previously entered commands in the console window for repeated execution.
You can open multiple projects in Design Entry HDL and select a few components, wires, notes, or page border in one project. When you select the Copy, Copy All, or Cut commands from the Edit menu, the selected objects are placed in the clipboard. Y ou can then paste the contents of the clipboard onto another schematic page, design or project.
To copy part of a schematic, such as a component, wire, border, or a block:
1. Select the part on the schematic.
2. Choose Edit - Copy.
Alternatively, you can right-click the portion to be copied and choose Copy from the pop-up menu.
3. Go to the desired page in the design or in another design.
4. Choose Edit - Paste and click at the target location on the schematic canvas. Alternatively, you can right-click at the target location and select Paste from the pop-up menu.
5. Click repeatedly if you want to place multiple instances of the copied part on the
schematic.
6. Right-click and choose Done from the pop-up menu.
Note: You need to inactivate the Paste command by pressing Done from the pop-up menu in the target schematic page to remove the copied part from the Clipboard. This is recommended if you want to copy another schematic part across schematic pages or designs or run any other command.
Copying Components
If you copy a component, all the visible properties of the component are copied and pasted. Packaging properties are copied only if you choose the Copy All command.
The RETAIN_HARDLOCATION_ON_COPY directive when set to OFF, in the project cpm file, ensures
that the value of the LOCATION property is reset to ? when you copy an instance with a hard location. This directive is set to ON by default because of which the value of the LOCATION property is retained when a component is copied.
Copying Wires
When you copy a wire, all the visible properties of the wire are copied. While pasting wires, you can choose between the Paste or Paste Special options. If you choose the Paste option, the wire is placed at the target location on the schematic. If you choose the Paste Special option, you can change the signal name before pasting the wire at the desired location.
Using Paste Special
1. Right-click choose Paste Special from the pop-up menu.
The following dialog box appears where you can paste copied parts on to the schematic by selecting the Paste Schematic option or change signal names of selected parts and then copy them on to the schematic by selecting the Change Signal Names option.
2. To change signal names, select the Change Signal Names option and click OK.
A two-column dialog box containing current signal names and Design Entry HDL-recommended signal names appears.
l
You can choose to edit these signal names or leave a signal unnamed. Y ou can add a prefix
or a suffix to the existing signal name also.
3. To edit signal names, enter new value in the New Signal Name field and click OK.
The signal names are changed and the copied part appears selected with the mouse cursor.
4. Click at the target location on the schematic canvas.
5. Click again to invoke the Paste Special dialog box and repeat steps 2 to 4 for another
paste special operation.
Copying Blocks
If the block you are copying is present in the local libraries, performing the paste operation would be the same as instantiating the block in a schematic. If the required libraries are not included in the cds.lib file, a warning is displayed.
Copying Page Border
When you copy a Page border, the placeholders for custom variables added to the symbol or on the canvas are also copied. If a user-defined custom variable that is not defined in the new project is pasted, it becomes a dangling property.
Note: An error message is flagged in the following cases:
A non-standard page border is used such that the border is not included in the project
A primitive is not defined in any library
A user-defined block is not included in the local libraries of the project
Copying Text from a Text Editor to a Schematic
When you copy text from a text editor such as W ordPad, Notepad, or from HTML or Acrobat Reader files, it is added to the schematic as a note.
To copy a piece of text from a text editor:
1. Select the text in the text editor.
2. Choose Edit - Copy.
Alternatively, you can right-click on the text and select copy from the pop-up menu.
3. Click the location on schematic canvas where you want to place the text.
The selected text is placed on the schematic as a note. The casing is all upper case characters. To retain original text casing, make changes in the Design Entry HDL Options - Text page.
4. To display text setup options, click Tools - Options and select Text in the left pane.
5. To retain original text casing, clear the Upper-case Input check box in the Design Entry
HDL Options dialog box.
6. Click again to paste another copy of the text.
The note is copied in original casing. However, the original text size is not retained. The
size of the input text depends on the size specified in the Size spin box in the Design Entry
HDL Options - Text page. The default font, Concept Font is used when placing a piece of
text on the schematic.
7. Right-click and select Done to complete the operation.
Based on the nature of the copied text, Design Entry HDL processes it as shown in the table below:
When you copy a ...Design Entry HDL ...
Table Copies text in plain format. The formatting of the table is not retained and
text formatting information, such as indentation, lists, bullet lists, and
paragraphs are ignored while copying text. Every paragraph of text is added
as a separate note.
Hyperlink Copies it as an active link in the form of a note. If you double-click on this note, the appropriate link would open in a W eb browser.
Special character Copies it as a note.
Copying a Group
You can also create a group of components on the schematic and then copy the contents of the group to another page or design.
To copy a group:
1. Create the group.
2. Choose Group - Copy [group_name] or Group - Copy All [group_name].
3. Right-click the target location on the schematic and choose Paste or Paste Special from
the pop-up menu.
Note: A warning may appear if all the required libraries are not included in the cds.lib file
of the target project
4. Right-click and choose Done from the pop-up menu.
Copying Previously Executed Commands in the Console Window
In addition to copying and pasting to and from the schematic canvas, you can copy previously executed commands in the console window. This saves you the trouble of re-entering the frequently used commands in the console window. Y ou select a piece of text appearing in the console window and copy and paste it for executing it again. If Design Entry HDL correctly resolves the pasted text to an existing command, it is executed. Otherwise, an error message is displayed.
To copy a previously executed command in the console window:
1. Select the command/text in the console window that you want to re-execute.
2. Press
3. Go to the next line in the console window and press
The command is executed again.
If you have customized the
combinations for the Edit - Copy and Edit - Paste menu commands,
respectively, you cannot use the key combinations in the console
window for copying text to re-execute a previously entered command.
Note: You can also copy commands from other text editors. V alid commands terminating with Enter are executed.
Copying Bitmaps to the Schematic Canvas
In addition to copying text and previously executed commands, Design Entry HDL also supports copying of .bmp and .jpeg format bitmaps from an external graphics editor to the schematic canvas. Y ou can use this functionality to paste a company logo to a page border.
To copy a bitmap from a graphics editor to the schematic canvas:
1. Open the bitmap to be pasted in a graphics editor and select it.
2. Select Edit - Copy from the main menu of the graphics editor or select Copy from the pop-
up menu.
3. Go to the desired page on the schematic canvas.
4. Right-click the target location on the schematic canvas and select Paste from the pop-up
menu.
The bitmap is attached to the cursor.
5. Click at the target location.
The bitmap is pasted on the schematic canvas.
l
6. Right-click and choose Done from the pop-up menu.
Note: When you paste an image, the resolution of the image is set to 72 dots per inch (dpi). The dpi value defines the resolution or the pixel density of the image pasted on the schematic canvas. If you increase this value, the size of the graphic reduces resulting in sharper images. To change the value, you need to add the IMAGE_DEFAULT_DPI directive in the project.cpm file. For example, to change the value to 150, add IMAGE_DEFAULT_DPI
'150'.
You can paste logo images to the page border symbols. These symbols
can be saved in a library for future component retrieval, inclusion, and
browsing.
Example
In addition to adding logos, you can add datasheets into schematics. While it is possible to copy text within a datasheet on to a schematic, the table-based formatting would be lost in the text paste operation. Y ou can grab an image of the datasheet and then paste it on a schematic page. An example of datasheet copied as an image is shown below.
l
You cannot paste a combination of image and text from a text editor to
the schematic canvas. If you copy a piece of text and graphic together
from a text editor such as Microsoft W ord, the image part is lost and
only the text is available for pasting on the schematic.
Alternative Ways of Inserting an Image
You can also import an image by clicking the Insert Image icon on the Add toolbar.
To insert an image:
1. Click the Insert Image icon on the Add toolbar
The Open dialog box displays.
2. Select the image that you want to place on the schematic canvas.
You can also preview the image in this dialog box.
3. Click Open.
The image gets attached to the cursor.
4. Click at the desired location.
5. Right-click and choose Done.
The Image - Insert menu
Another way of inserting an image in a schematic is using the Edit - Image - Insert menu command. Alternatively, you can choose Image - Insert from the pop-up menu that displays when you right-click a schematic or a symbol. This action opens the Open dialog box from where you can select the image that you want to insert.
Scaling an Image
After pasting an image on the schematic canvas, you can scale its height and width according to your specifications. The Image Scaling dialog box provides you the option of scaling the height and width of an image.
To scale an image:
1. Right-click on the image.
2. Choose Properties from the pop-up menu.
The Design Entry HDL - Image Scaling dialog box appears.
3. Specify the desired values in the Height and Width fields.
4. Click OK.
The image is scaled according to the values that you specify.
Note: You can also stretch an image by choosing the Edit - Image - Stretch menu item. Capturing an Image on Schematic Canvas
You can also capture the image of a part of a schematic. Use the Image - Capture menu item from the pop-up menu to capture screen shots of a selected part on a schematic. When you capture an image, it is copied to the clipboard from where it can be pasted into any graphics editor or a graphics-aware text editor such as Microsoft W ord.
To capture a screen shot of any part of a schematic or symbol:
1. Right-click the schematic canvas or symbol.
2. Choose Image - Capture from the pop-up menu.
A rectangular cursor appears
3. Drag a rectangle to select an area of the schematic you want to capture.
The selected area is copied to the clipboard.
4. In a graphics editor (or a graphics-enabled text editor), choose Edit - Paste or Paste from
the pop-up menu.
The captured screen shot is pasted in the editor.
Displaying Information
This section covers the following information:
Displaying Schematic Information
Displaying Toolbars and Other Parts of the Design Entry HDL Window
Highlighting Objects
Turning Off Highlighting
Opening the Markers Control Window
Displaying the Markers Toolbar
Displaying the Error Status Bar
Displaying Schematic Information
Design Entry HDL lets you highlight selected objects in drawings, between drawings, and between Design Entry HDL and other tools.
Design Entry HDL also displays information about these items:
Choose Display - Attachments.
Attachments display in red.
Note: Choose Window - Refresh to clear your selections or any Design Entry HDL display information.
Displaying Component Information
1. Display the console window.
2. Choose Display - Component.
Component information is displayed in the console window.
Displaying the Color of Objects
1. Display the console window.
2. Choose Display - Color.
Component information is displayed in the console window.
Displaying Wire Connections
Choose Display - Connections.
An asterisk appears at each wire connection.
Note: Choose Window - Refresh to clear your selections or any Design Entry HDL display information.
Displaying Coordinates
1. Display the c onsole window.
2. Choose Display - Coordinates.
3. Click in the schematic.
The x.y location of a point is displayed in the console window.
Note: The point you specify will clear with your next menu selection.
Displaying the Current Directory
1. Display the console window.
2. Choose Display - Directory.
The current directory is displayed in the console window.
Displaying the Distance Between Points
1. Display the console window.
2. Choose Display - Distance.
3. Click at one point in the schematic and then at a second point.
The distance between them is displayed in the console window.
Note: The points you specify will clear with your next menu selection.
Displaying the Drawings Read Into Design Entry HDL in the Current Session
1. Display the console window.
2. Choose Display - History.
Drawing names are listed in the console window.
Displaying Function Key Assignments
Choose Display - Keys.
Function key assignments are listed in a message box.
Displaying Modified Drawings
1. Display the console window.
2. Choose Display - Modified.
Drawings that were modified but not saved are listed in the console window.
Displaying Nets
1. Choose Display - Net.
2. Click a wire (net).
The selected net is displayed in red.
Note: Choose Window - Refresh to clear your selections or any Design Entry HDL display information.
Displaying Origins of Objects
Choose Display - Origins.
An asterisk appears at the origin of all objects in the schematic.
Note: Choose Window - Refresh to clear your selections or any Design Entry HDL display information.
Displaying Pins
Choose Display - Pins.
An asterisk appears at all pin locations in the schematic.
Note: Choose Window - Refresh to clear your selections or any Design Entry HDL display information.
Displaying Pin Names
1. Zoom in on the component whose pin names you want to display.
2. Choose Display - Pin Names.
3. Click the component.
Pin names appear next to each of the pins.
Note: Choose Window - Refresh to clear your selections or any Design Entry HDL display information.
孤岛余?——任务攻略 游戏介绍: 在公元2009年,你作为?名医?在?个未知的岛屿上进?科研活动。这?将发?什么事情呢?这和那个奇怪的梦又有什么联系?未来和过去的谜团,等待你来揭开!最新?机游戏|?机游戏下载|?机?户交流 操作?法: 游戏中对应按键分别为: 上下左右分别为2,4,6,8。同时你可以使?PA D键辅助移动,功能和数字键盘?样。5键或者中间键为确定键,?于与?物对话或者进?活动。如攻击或者拾取物品。 左软键:打开?囊。 右软件:打开游戏菜单 当你进??个新的区域,游戏将?动保存。或者你也可以回到休息室,睡觉保存。 游戏界?介绍: 在N P C的头顶出现??感叹号时,代表TA有任务给给你。 绿?感叹号,代表你已经完成TA的任务, 红?感叹号,代表你还未完成TA的任务。 常?物品介绍以及获得办法: 急救包(?,?),?于恢复?命,可有散落在各地的箱?得到,也可以购买 铁铲:码头的商?或者园丁处购买,?于挖掘?蚁巢?,得到鱼饵来复枪:教授给与,?于配合飞镖使?。对付恐龙的利器。 斧头:教授给与,?于看到树?得到时光穿梭机的燃料 锋利的斧头:后期可在码头商?处购买,?于劈开某些难缠的树?。。。。。 主线任务: 第?章 1.从梦中醒来,听到外?嘈杂的吵闹声。我迷迷糊糊?出休息间。想去看看外?发?了什么事。 下楼梯看见我亲爱的格蕾丝,过去得到消息说吵闹声来?搬运?批货物。我很好奇,格蕾丝建议我去找索恩将军了解更多。我往北去。前往索恩将军的办公室。
2.来到索恩的办公室。索恩要我去【西边的码头】接收货物,经过?番争吵。我还是不得不接受这个命令。前往南边的码头接收货物。2 3.来到西边码头,和研究?员对话,得知货物和教授都已经在【实验室】了,前往实验室. 4.从实验室出来,拿着教授给的【安全卡】,来到仓库查看。 5.我被仓库中的卫兵赶了出来,他们说这?是禁区?回到教授的研究室,教授告诉我那个神秘的事物其实是他的交通?具-时光穿梭机。并告诉我他因为穿越时空,造成了?体D N A的损坏。我提出帮忙恢复他的健康。然后回到休息区休息。 第?章完成。 第?章 1我在床上听到爆炸声,赶快出来查找原因。好像是从仓库传来,于是前往仓库。 2.在仓库看到倒地的警卫和被破坏的时光机,我得赶快去通知教授。前往研究室。 3得到消息的教授很惊讶,急忙和我来到仓库查看。教授说道时光机还可以修复,我想起我之前的研究可能对教授有所帮助,于是前往实验室去收集【D N A样本】 4.实验室【D N A样本】(也就是红?的?瓶?)分别是左边两个(内部房间?个),右边?个。收集完毕后将实验后的【时空旅?配?】交给教授。 5.来到仓库,教授提议我??试验【时光旅?配?】,并告诉我,我暂时只能去?个时代。同时给我【?醉来福枪】【斧头】和【**x0】 6去园丁那使?【斧?】砍倒树?,得到时光机的燃料【?头】,(每次时光穿梭消耗?头1,请多备些?头)回到仓库,乘坐时光机,探索恐龙时代。 7,穿越时空,来到恐龙时代,时光机却出现故障,我不得不收集散落的【时光机零件】,以便?后修复它。(收集完毕后,此时可收集?些恐龙的遗物如【??】,后?实验室要使?。并尽可能的带回?个【琥珀】(看树有?定?率得到)。但是不建议?量收集植物种?和恐龙蛋,因为收集带回去的都是损坏的。等到后?就可以收集了) T I P S:各种恐龙出现的时间是不同的,可以在以后实验室中?查看。如果此时你带有【铁锹】,可以去偷窃?草龙的蛋。注意:偷窃是会被?草龙发现并追杀的。只要是你偷窃过?种恐龙的蛋,以后它都会主动攻击你 第?章结束 第三章 1与教授对话,得知【化学同位素】可以修复时光机,建议我去找东码头的J商了解情况。2.找到东码头的J商,在这?可以买卖弹药,急救包和?头。?300元买了【同位素】,回去交给教授。教授完成时光机的修复,此时可以前往未来探索。3.来到未来2011年,发现惊天秘密。?岛的?都
《孤岛余生》攻略-绝境求生手册 故事的源起: 一艘在行驶中的船,遇到了海啸,有些生幸存流落到了一个神秘的孤岛,接下来在此究竟会发生怎样的事情呢,我们一起来寻找吧。 任务说明: 人物头顶出现感叹号表示可与其交谈,不同颜色感叹号有不同含义。 黄色——可以对话或者接任务; 绿色——交付任务已完成; 游戏心得: 1.在每次行动中,看到食物和物品就捡起来,这样在后面的任务中就能节省很多时间了;
2.可以同时接几个任务,这样也可以省掉很多来回跑的时间; 3.要学会善用大地图功能,打开大地图,点你要找的人,人物就会自动跑到他身边,非常方便; 4.先赶快把弓箭升级到3级,杀蛇卖了,这样能很快的赚到珍珠; 人物介绍: *汤姆:32岁,汤姆是一位成功的汽车销售人员。他对生活中的任何事情都会竭尽全力-而且每次都很成功。在完成一个大型交易后,汤姆决定需要一个必要的休假,所以登上了这艘船。 *约翰;40岁,约翰是一位通晓多国语言的人考古学家。像所有的科学家一样,性格比较温吞。他已经学习古代文献很长时间了。学院决定将他送到大洋洲的研究中心,正好登上了这艘船。 *奈克:28岁,奈克是船上的厨师。他是一个孤儿,至少他是这样认为的。从他很年轻的时候他就是一名水手。奈克喜欢开玩笑,他认为自己是一个非常受女生喜爱的人。 *麦克:48岁,麦克是一个地道的美国人,在这之前从来没有离开过他的家乡。这次他想乘船看看世界,因此开始了他的航行,没想到船就遇事了。 *尼科尔:30岁,尼科尔是一位和蔼可亲的人。她是一位将自己的一生奉献给儿童的儿科医生。她也在女童子军队方面花费了许多时间。尼科尔碰巧上了船,当她的朋友在她生日时让她乘船 浏览。 *艾米,35岁,艾米是一位自由艺术家带有对世界的浪漫主义的想象力。她也是一位天才的园艺爱好者。 *斯蒂夫,10岁,艾米的女儿,活力充沛并且勇敢的女孩。不像她的母亲,斯蒂夫是理智的,并且对于事情有一个现实的看法。有时她更能理解生活,尽管她比艾米年轻;
熹妃传菜谱做法汇总(包含橙色)熹妃传菜谱做法汇总(包含橙色),熹妃传菜谱怎么做?熹妃传橙色菜谱做法,下面和小编一起来看看吧! 此菜谱为网友分享。根据菜谱将菜都做了一遍,完全正确,分享给大家!!! 1.炒青菜油盐 2.开水白菜水水盐 4.松鼠鲈鱼油盐醋糖 5.酸辣汤水水盐醋酱油 6.番茄炒鸡蛋油盐醋糖 7.豆腐鲫鱼水水油盐盐 8.番茄肉片水水酱盐 9.弹涂鱼盐油酱水水 10.红烧肉油糖酱水盐 11.水煮鲈鱼盐油水水酱 12.雪里红梅盐油糖醋 14.园林香液鸡水水盐酱 15.醋溜黄瓜醋糖酱油 16.麻婆豆腐油盐油糖 17.茄汁石斑鱼油水盐糖 18.沙锅王鱼头水水油盐 19.蟹粉狮子头油酱盐 20.剁椒鱼头油盐酱 21.回锅肉油糖酱盐 22.青椒肉丝油盐酱醋糖 23.香煎茄片油盐油酱 24:鱼香肉丝:油盐醋酱糖 26.地三鲜油盐糖 27麻辣香锅油油盐酱糖
28.香辣鳕鱼块油盐酱 29.宫保鸡丁油盐糖酱醋 30.菌菇煲水水油盐 31.湘西酸肉油盐酱 32.杭州煨鸡水水油盐糖 33.贵妃鸡翅油盐酱糖 35.鲶鱼炖茄子油盐酱糖 36.神仙煲油盐酱 37.马哈鱼炖肉油盐酱糖 38.番茄汁鳕鱼油盐糖水 39.咕噜肉油酱醋糖油 40.木耳西兰花油盐糖 41.糖醋鳕鱼丸油油糖醋 42.番茄炖牛腩油水盐酱 43.一品豆腐羹水盐水 44.沙锅三味水油盐 45.鱼香牛肉丝油盐酱醋糖 46.西兰花炒河豚油盐酱 47.红油猪手油盐酱水 48.油焖春笋油盐酱
补上6个橙色菜谱属性
熹妃传手游鸿门宴中楚霸王甲级高分搭配,男版华服大赛搭配攻略。熹妃传手游鸿门宴中楚霸
孤岛余生 应用介绍 ★温馨提示:请您注意该游戏需下载数据包★ 游戏感觉有些像鲁宾逊漂流记,客轮失事后,玩家将扮演的主角流落到一座岛屿上,为了生活做着这样那样的事。。。。不同的是,这并非无人岛。。。。 一艘远洋客轮遇上了风暴,在海洋中遇难了。一群人设法用救生艇逃脱并达到了最近的热带岛屿。他们几乎没有时间来作出决定下一步做什么,神秘的事情开始发生。其中一人在沙滩上发现了一个古老的碑文。作为一个古典语言学者,他理解为:它不能被一个漂流者笑话。碑文说,他们在岛上并不孤单 ... Tom Allison深入岛内找出隐藏在这个被遗忘的地方的秘密。为了在充满了危险的野生动物和自然灾害的岛屿生存,你将不得不去寻找食物,收集水果和种菜。学习钓鱼和追逐野猪,抓蛇,发现的珍稀植物。探索神秘的岛屿,寻找线索,解决超过150个不同的任务。你能否生存和回家?投身于一个非常令人上瘾的模拟游戏—孤岛余生的冒险世界中吧! 数据包下载地址: 数据包安装路径:将数据包解压后,复制到sdcard/Android/data/目录下即可 【基本信息】 作者:G5 Entertainment更新时间:2012-05-16 版本:1.1系统:Android 2.1.x以上 语言:中文 数据包: 1. 全机型数据包大小:125.81MB 适用机型:全机型 注意事项:该游戏和部分机型不兼容
孤岛余生下载:https://www.doczj.com/doc/ff14071233.html,/ku/ 孤岛余生礼包领取:https://www.doczj.com/doc/ff14071233.html,/ka/关注便玩家手游网官方微信公共账号(shoujiyouxilibao)免费赢取礼包!
内购修改《艺术大亨》无限金币领取《艺术大亨Art Mogul》是一款解谜游戏,这款游戏集隐藏物品游戏、策略游戏和商业模拟游戏于一身,你将接替一位艺术大亨的职位,展开一段激动人心的冒险之旅。 游历世界各地,参加扣人心弦的拍卖会、参与竞标,揭露赝品、辨出真品,获得价值连城的收藏珍品。寻找一千多个物品,开设专属于你的美术馆,建立一个经得起时间考验的艺术品帝国。 免费试玩,然后在游戏之中解锁完整的冒险游戏! 小编今天给大家带来的是艺术大亨修改内购攻略,教大家如何修改游戏里面的金币数量,轻松获取免费道具!这个教程非常的简单,我们使用的是八门神器修改方法! 以下是小编给大家整理出来的具体的修改步骤,此方法可以通用大部分游戏! 准备工具: 八门神器修改器(需要你的设备以机构越狱或者是root才可以使用哦) 详细金币修改步骤: 1、首先运行八门神器以及游戏,然后我们进入游戏的商店,看一下当前的金钱数量,比如我们现在的金币数量为1000; 2、然后再切换到八门神器; 3、点击“请选择一个需要被修改的程序”,我们选择亡灵杀手; 4、在八门神器的搜索框内输入1000,然后点击搜索,这个时候会显示搜索到很多个数据; 5、那现在我们再次切换回游戏界面,随便买点东西,使金币的数量发生一点变化就行;(比如买一个金币价格为500的道具,买后剩余的金币为500) 6、然后重新切换到八门神器,在搜索框输入现在的金币数500,再点搜索; 7、这个时候你会发现搜索的结果就只有一个了,请注意,如果你搜索的结果为多个,那就必须得再切换回游戏再买点东西使金币数变化,然后再搜索一次,直到结果只有一个; 8、这个时候你再点击搜索结果,将数值的地方改成你想要的数值,比如我们在这后面加个“5”,那数值就会变为5005; 9、之后将操作里面的选项改为“存储”; 10、现在我们切换回游戏的话,就会发现我们的金币已经不是500了,而是变成了5005,修改
画面非常精致《孤岛余生》游戏流程攻略 《孤岛余生The Island: Castaway》游戏的可玩性本就非常高,画面的精致,篝火,海浪,动物,花草,树木,赞的没的说,再加上现在汉化了,剧情的精彩也来了,整个游戏勘称完美唯一不足我所认为,就是人物有些呆板。 第一章
游戏从主角的噩梦开始,主角惊醒以后三个同伴陪在身边,美女希望主角帮忙找三根浮木,就是海边的那种细枝,来回绕几圈,就捡了大把。这里建议多捡。和中间的那个人对话的到苹果,黑人请你帮忙找到钓线和钓钩。向西走的木箱是钓线,再向西走的木箱是钓钩,有地图可看的。回去交了得到初级钓竿,黑人的又给了了个任务是五个浮木。交了对话,得知西海岸那有人,去看下吧,梦中的美女出现了,不过可惜是已婚的。 (这里说一下,黄色感叹号是有任务或有对话,红色感叹号是未完成的任务,绿色是已完成的任务,这个地图上也看的到。) 地上的贝壳捡捡吧,那就是钱啊。 已婚美女口渴,要喝水,去营地取水给她,直接和黑人对话,得到水,取给她后,剧情,与带帽子的对话接到任务,和火旁的美女对话的到铲子,这样就可以挖鱼饵啦,圆那里按五,挖到主角说话换地。 钓鱼有些麻烦,鱼咬钩慢慢来,线成大红的就要断了,鱼挣扎的时候千万不要拉,一拉就容易变红,鱼不动时狂按五,线要断时立刻停,等他自动恢复。 任务完成后烤鱼,在与火旁边的美女对话,得知她药剂不见了,向西再向西的北方洞穴里可以发现,回去交给她,第一章结束。 第二章 第二章主角成了咸蛋超人,和黑人对话打开灌木进去,里面除了野猪和蛇,都不会主动攻击。这里记得多捡迷迭香,等下有个任务要六个。到林边空地找到美女的女儿,把她送回去。分别和小女孩带帽子的对话,接到任务,和黑人对话要斧头,进森林和小孩说话得到初级弓,打猎很容易,不多讲,两个禽肉就成。和他进村,西南方的男子可以换到斧头,把烤肉卖了就行,和两个女的对话,一个是六个草,一个是杀蛇,草交了得到十个种子。去东北播种下玩玩,顺手砍砍树,每根树出水果和三个硬木。砍些去打蛇吧。第一次容易死,没事,挂回营地而已。六个蛇的任务得到一百个贝壳和黑人对话的接到任务十五个硬木,交后得知可以去加工点加工。一个浮木三把箭,一个硬木五十,顺手交了带帽子的任务,烧出清蒸鱼。营地也开出了一个农场用来种东西。去和黑人对话,第二章结束。 第三章 和黑人对话,任务九根硬木,和小女孩对话,找她妈妈。先把黑人的任务交了,再去找到药剂的地方,见到两人,且不管两人的古怪,回营地交差,再和美女对话帮她去问酋长。两次对话后与下放那位对话,她带你去了一个地方,从那里向东是危涯区,在上方的山洞能找到他儿子,得到一百五十枚贝壳。回去和带帽子的对话,接到任务,四个肉,两个鸡和一对土豆萝卜。完成得到海路比萨的配方,带帽子的去采水果,和美女对话黑人不见了,已婚要去找带帽子的,闪人了,在森林东方见到黑人,得知饮水中有毒,第三章结束。
孤岛余生2特殊物品和稀有物品收集点 作为一款拥有独特的游戏设定的冒险游戏,在孤岛余生2中你可以打猎、钓鱼、种植、贸易甚至是学习魔法,而游戏中每一章都有一个特殊物品,只有在这一章才能找到,并且错过之后就无法再寻找到了,游戏中同样有着很多稀有物品,通过下面这篇孤岛余生2攻略,我们一起将这些孤岛余生2特殊物品和孤岛余生2稀有物品收藏起来吧。 第一章中的孤岛余生2特殊物品:草人 这件特殊物品只要跟着主线剧情进行就可以自动获得,但是注意获得草人后要和柯杰交谈草人才会保留下来。 第二章中的孤岛余生2特殊物品:木锤 修好被水淹没的农田后,在姆库里玛的小屋后面可以找到,见到木锤后去和瓦萨尼对话,他会将木锤送给你。 第三章中的孤岛余生2特殊物品:吹枪 当你学会猎杀野猪之后,在栋古大陆传送点上方的灌木丛中可以找到,找到吹枪之后和博马尼对话即可保留该物品。 第四章中的孤岛余生2特殊物品:酒桶 在“背后的阴谋”这一任务中,当穆兹从陌生人手中购买酒桶之后就消失了,你可以在岛屿北 部(栋古大陆)找到这个酒桶,在一个泥坑里的野猪后面,注意一定要在关卡结束前找到穆兹,不然和吉乐斯谈话后酒桶就会消失。 第五章中的孤岛余生2特殊物品:布娃娃 在你帮助姆多古库做好野猪标靶后,等这一章节快要结束时,你会发现姆多古库不在野猪标靶附近,这时我们在野猪标靶那里会找到碎布娃娃,找到娃娃之后立即去找姆多古库,否则关卡结束后娃娃会重新回到姆多古库手中。 第六章中的孤岛余生2特殊物品:吉勒斯的围巾 在“已逝之人”任务中,听到惨叫声后立即去沼泽林地,会在沼泽林地中部找到围巾。 百度攻略&当乐网提供,更多精彩攻略访问https://www.doczj.com/doc/ff14071233.html,1
口袋总结:G5游戏合集介绍所有G5游戏大全好货来啦!小编这次给大家总结的是所有G5游戏合集介绍,这次所有G5游戏大全里面包含了61款G5游戏出品的游戏,G5的粉丝在哪里?快来看看你喜欢的哪一款游戏是不是子啊里面把,小编坐等提问啊! G5解谜游戏:点击进入>> G5所有游戏合集:点击进入>> G5游戏内购破解教程:点击进入>> G5游戏限免:点击进入>> 所有G5游戏大全: 布拉格传奇 探寻现代布拉格中部超自然的王国! 当伊娃抵达布拉格继承遗产时,她发现自己被卷入了可怕的历险。一群邪恶的炼...
正义杀戮2: 诗人杀手的复仇 与纽约警局固执的探员 Erica Dean 联手,一起追踪危险的“诗人杀手”。仔细检查纽约市一系列谋杀案,每个案件都... 双月完整版 在这惊悚的寻物历险中,揭开过去那些令人震惊的秘密,并拯救未来。与世隔离的双月研究所研究员杰克,自一场车祸... 超市管理2 你玩过这一精彩历险游戏的前传吗?不要错过 Supermarket Management ——拿起你的 iPad 和 iPhone! 玩家期待...
天使在哭泣 G5解谜新作,解开修道院内的惊天秘密。 红鸦之谜:军团 令人心跳加速的历险,将人类可怕的命运中拯救出来! 飞行者兄弟2 中文版 兄弟再度出击,看飞哥飞弟如何救回被绑架的猫咪。
幻景:睡魔珍藏版 G5解谜游戏中出色的作品,故事生动扣人心弦。 浪漫罗马 和马库斯一起周游罗马,经历他生命中最大的冒险吧。罗马帝国的古老神器失窃了,国王宣布谁能找回丢失的神器,谁... 邪恶之城:吸血鬼探险HD 游戏采用了3D的第一人称视角,通过解谜和冒险的方式来进行游戏。在这个惊险的游戏之中,你会乘坐星光飞机去救你... 邪恶之城 开着星光飞机去解救你爱的人,打败眼前的一切敌人!
孤岛余?——?线任务攻略 ?线?:研究院花园的园丁,园丁告诉我能在他这买到【铲?】【铲??于在公元65000年挖掘?蚁巢?得到【鱼饵】并且还告诉我,可以在这?使?斧头砍伐树?,得到【?材】【?材?于时光机穿梭的燃料】 ?线?:?族馆洛林。洛林告诉我,可以在这?出售我所钓的鱼,并且她愿意提供我鱼饵。得到【鱼竿】和【鱼饵10个】,同时教我钓鱼技巧。
?线三:?族馆的码头,让我帮忙寻找沼泽巨兽存在的证据,任务奖励【?钱660】。道具【沼泽巨兽的?齿】获得攻略:此任务在?族馆屋?右边往下?,出门后可以接到。在第五章买了重斧到地图的最右边的怪兽之家具体位置:当你进?此地图时,往右??点,会看到下?有条路,往下??段,你眼睛看?机画?的右边的沼泽,往沼泽中间浅绿??域?,??下?,你会看到剧情,那怪兽从??伸出来,好象蛇,?就往后退,你只要闪开那蛇的?炮即可。你在第七章之前会遇到,之后救?也有。嫌?烦的话,到救?再杀也可以。 在西边码头,得到?线任务,【寻找丢失的安全卡】回去实验室与教 授谈话即可完成。
?线四:实验室东在实验室收集D N A样本的时候,触发任务,?【急救包?】救治伤员。得到【急救包?】
?线五:研究院北?名科研?员要我帮他寻找?个【恐?龙的?齿】。在恐龙时代可以完成?线任务。任务奖励【急救包?】X3,后续任务【赖索托龙的鳞?】,任务奖励【?钱100】,后续任务【?尔盗龙的?齿】,任务奖励【?钱250】,后续任务【?盗龙的鳞?】,任务奖励【?钱500】,后续任务【晓龙的??】(信号灯后可完成),任务奖励【?钱1000】。 ?线六:仓库门??名?兵要我帮忙搜集【?头10个】。完成得到【?钱340】 ?线七:仓库左边?名?兵要我帮忙寻找【琥珀5个】。完成得到【?钱750】 ?线?:仓库右边?名研究员要我帮他寻找【常春藤种?3株】【橡树龙??1个】【夏威夷蕨种?1株】【恶灵龙?齿1个】【蕨类种?2株】完成的到【?钱1100】 逗游?——中国2亿游戏?户?致选择的”?站式“游戏服务平台