
Boot from USB drive
First you have to prepare the USB drive
If you are installing from one USB drive onto another USB drive it can occur that the BIOS will be unable to find any boot device. In this case, just start the installation without inserting the second USB device. After the welcome screen appears, connect the second USB device and IPFire should complete the installation without any problems.
Installation
After a few seconds you will be presented with a screen where you may decide the language for the installation and the web interface. Use the arrow keys to move around the available languages and the enter key to select one. Choose between German, English and Danish. If you want to translate IPFire into another language, please contact the developer-team at “entwickler@https://www.doczj.com/doc/f27787130.html,”.
On the next screen you will see a welcome screen in your chosen language. You'll be informed that if, at one of the following screens, you press “Cancel”, the setup will be aborted and the PC will be restarted.
Format & Copy
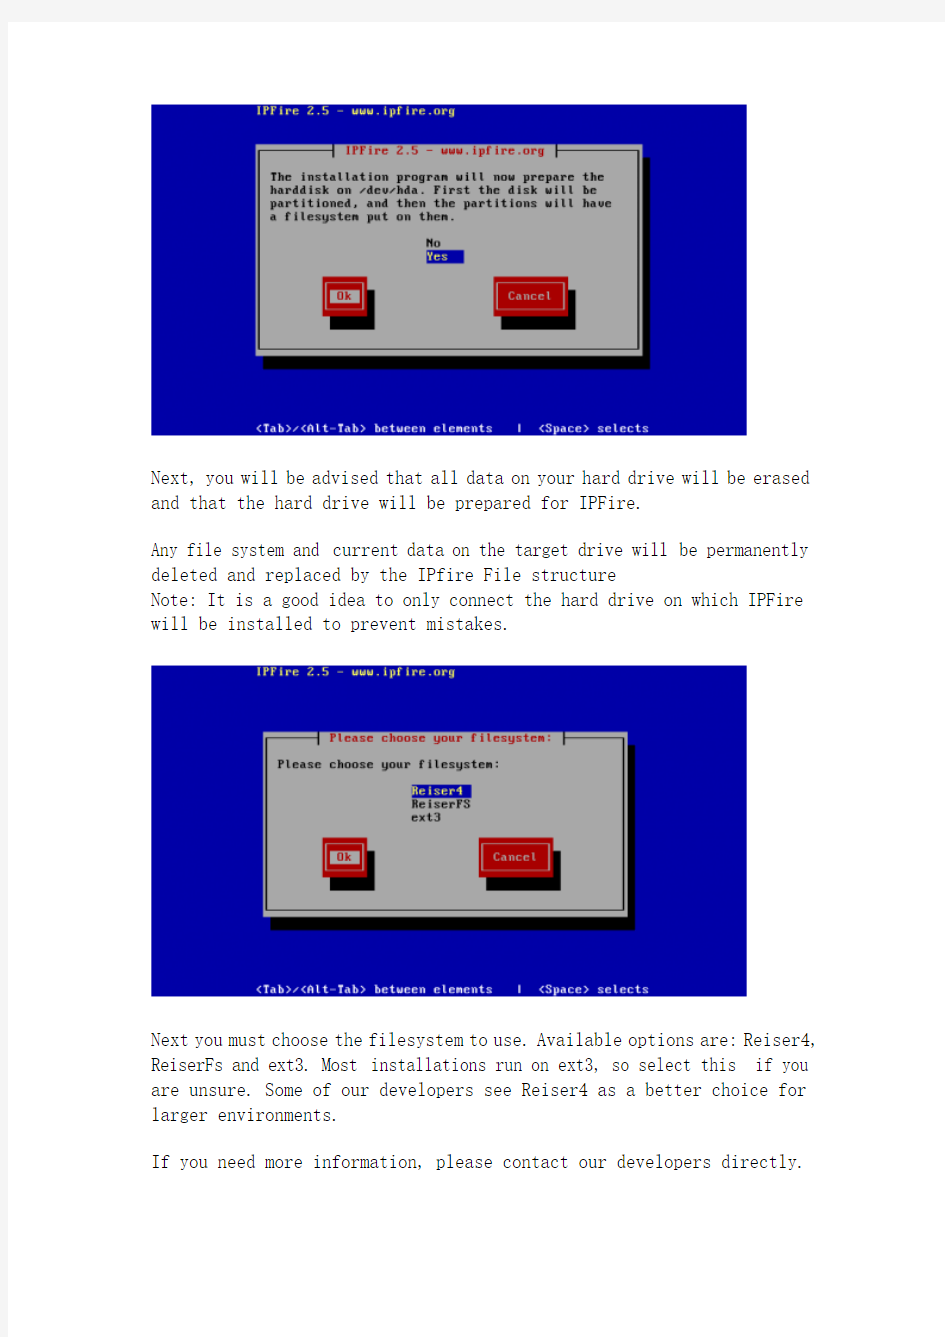
Next, you will be advised that all data on your hard drive will be erased and that the hard drive will be prepared for IPFire.
Any file system and current data on the target drive will be permanently deleted and replaced by the IPfire File structure
Note: It is a good idea to only connect the hard drive on which IPFire will be installed to prevent mistakes.
Next you must choose the filesystem to use. Available options are: Reiser4, ReiserFs and ext3. Most installations run on ext3, so select this if you are unsure. Some of our developers see Reiser4 as a better choice for larger environments.
If you need more information, please contact our developers directly.
If your target drive is small the install process will give you advice but will continue. Be carefull because the install will continue and might be aborted at any time (leaving incomplete tasks or a very small swap that may harm perfomance) if you run out of space
Now the hard drive is being partitioned and formatted for real. This process can take several minutes depending on the size of the hard drive. After this, the system files will be unpacked on the hard drive.
After the copy process has completed the CD is ejected and should be removed from the drive.
Local Settings
On the next screen the keyboard layout and the timezone need to be selected. In a german setup the default settings will be “de-latin-nodeadkeys” and “Europe/Berlin” and should be left that way.
Hostname & Domain
When the keyboard layout and timezone have been chosen, continue with configuring the “hostname”. This is the name IPFire will be known by on the network.
If your network will be working with VPNs, it is necessary to use a different name for each IPFire machine.
The name “gateway” is reserved and can not used.
Since you must have a domain-name, this is being asked for on the next screen. In a default installation this is “localdomain”. If you own a domain, please enter it here.
Passwords
Once you have finished this, continue on setting the passwords.
Here you are asked for the root password. You have to write it twice to confirm it is ok.
Be careful, if you're new to *nix systems, it is a common behavior that writing the password makes no echo on the screen(you can't see the * * * * or - - - - that tell when you pressed a key)
Usually this is not the same as the Admin password and for security reasons better not be.Even if you'll be the only manager of IPFire box, that may change on the time, and giving the root password to anyone is not the smartest thing talking about computer security
You will be asked for admin password in the next screen.
For an explanation of the different passwords, please read here. Network
Number Of Networks
Now we are coming to the heart of IPFire, the setup of the network. As described in the preparations, you should already know how your own network will be set up in the following steps.
In a standard IPFire installation it is Green+ Red, which means 2 Networks. Typically you have one network for your home computers, your Green network, and then an Internet connection for the other network, your Red network.
A maximum of 4 networks is possible - namely Green, Blue, Orange and Red.
Red WAN External network, Connected to the Internet
Green LAN Internal/Private network, Connected locally
Orange DMZ Unprotected/Server network, DeMilitarized Zone
Blue WLAN Wireless Network, Seperate network for wireless clients Assigning the NICs
Next, all of the previously chosen networks must have a network interface card (NIC) assigned. In some cases, you may not have a NIC to assign to Red, for example when using a dialup modem. For more information about the different linktypes, see here. If you know what MAC address is related to which NIC you can assign them here.
In the simplest network, Red and Green, you basically have a 50/50 chance. The easiest thing is just assign one to each, if you can't ping out from your IPFire installation, change the network cables and try again. Keep in mind that you may have to reset your ISP's equipment (cable modem, etc.) before it will recognize a new device. A different NIC counts as a different device.
Network Addresses
Now addresses must be assigned to your network interfaces. Any valid IP address reserved for a LAN will work here (192.168.*.*). It is standard practice for the interface to be on .1 of the range for a local network. Here you must configure your networks and subnet masks. A standard setting for a Green interface would be 192.168.0.1 with a subnet mask of
255.255.255.0.
Don′t use IPs twice! Also, the IPs of the different interfaces must not be in the same subnet. As an example: Red=192.168.2.X, Orange=192.168.1.X, Green=192.168.0.X)
This warning can be ignored when installing from a physical CD, since you are not yet connected to a network. You will have to take care when modifying networking settings afterwards from a remote shell using the command “setup”.
The “Red” interface is special because its configuration depends on your ISP and the way it configures your external connection (your Internet connection).
Depending on your connection type you must setup your corresponding details. If you are unsure, try DHCP. If necessary, get the required settings from your ISP, like which type of authentication is required and what authentication credentials (if any) you will have to provide.
DNS and Gateway Installation
In addition to specifying your connection type you might have to set up your Gateway (the next hop after your IPFire) and most probably your preferred DNS (Domain Name Service) servers. If you've selected DHCP in the previous step, then these values will be configured automatically, so no need to specify them here.
DHCP Server
The last thing to configure is the DHCP (Dynamic Host Configuration Protocol) Server for the green interface. You just have to enable the DHCP server by enabling the tick within the brackets and enter the start and end values of your desired IP range. A widely used range is 192.168.0.2 and 192.168.0.254 so type it into the corresponding fields unless you prefer another IP range. You can not use the IP Address of your Green Interface and also the last IP of your green network range. P.e. for your 192.168.0.0/24 network it is 192.168.0.255 you can not use. You can narrow always it down to a smaller range if you do not plan to use that many PCs in your green network, or to reserve space for static IPs. These settings can always be changed later using the command line program “setup”.
You have now reached the end of the installation procedure.
You are not done yet, but you have completed the largest part of the configuration.
Installation on a USB device
If you install IPFire on a USB Stick or on a USB harddisk, the installer will recognize the device as sd(X). After a reboot it can happen that udev just renames the device to ub(X), which is very unlucky because neither grub.conf nor fstab are correct at this point. If this problem occurs,
first take a note of the new name of the USB-device (mostly uba). After that, you can take the easy way and start the installation once again and before you reach the point where the installer prompts you to reboot, press ALT+F2 to change to the console. In /harddisk you should still be able to see the current target-harddisk. Now rename all entrys sd(x) to ub(x) in the file /harddisk/etc/fstab. Repeat this for the file
/harddisk/boot/grub.conf (can also be done with edit at boot-time). Now, change back to the installer and reboot normally.
The faster and a “little” harder way is to start the installer but to abandon a new installation. Instead, mount the target harddisks with the console (ALT+F2) and apply changes just as described above under fstab and grub.conf (you should have some experience using mount and umount).