
3. HP-UX 11.31
3.2 Boot Disks
3.2.1 Mirrored
3.2.1.1 on SAS Controllers
Overview
SAS controllers use a different addressing scheme than parallel SCSI like U320 or SCSI-2.
Where SCSI ID and therefore disk slot numbers were important, SAS uses a unique address of the disks themselves to identify the disks as part of a LUN (logical unit) or an HP-UX
special device file like /dev/dsk/c0t0d0. You can take a disk out of one slot (referred to as
bays) and put it in a different slot or bay. The controller finds it and presents the disk to the
O/S with the same special device file. This does complicate the procedure needed for
replacing a failed disk. !
When a disk fails, and a new disk is put into the same bay that the failed disk came out of, the SAS controller knows it is a different disk by its SAS address. The O/S driver assigns the next available target for the hardware path (viewed with ioscan) and special device file if insf -e is
executed.
If the customer used a legacy devicefile (e.g. /dev/dsk/c2t2d0) in his LVM configuration, you have to make sure that the new disk will get the old legacy file again.
This can be done by sasmgr(1M) with the “replace_tgt” option. Even this will result in an
Error that the file is still busy, a consecutive “io_redirect_dsf” on the corresponding persisten
file will round up the move, and result in the old legacy/persisten name pair as before.
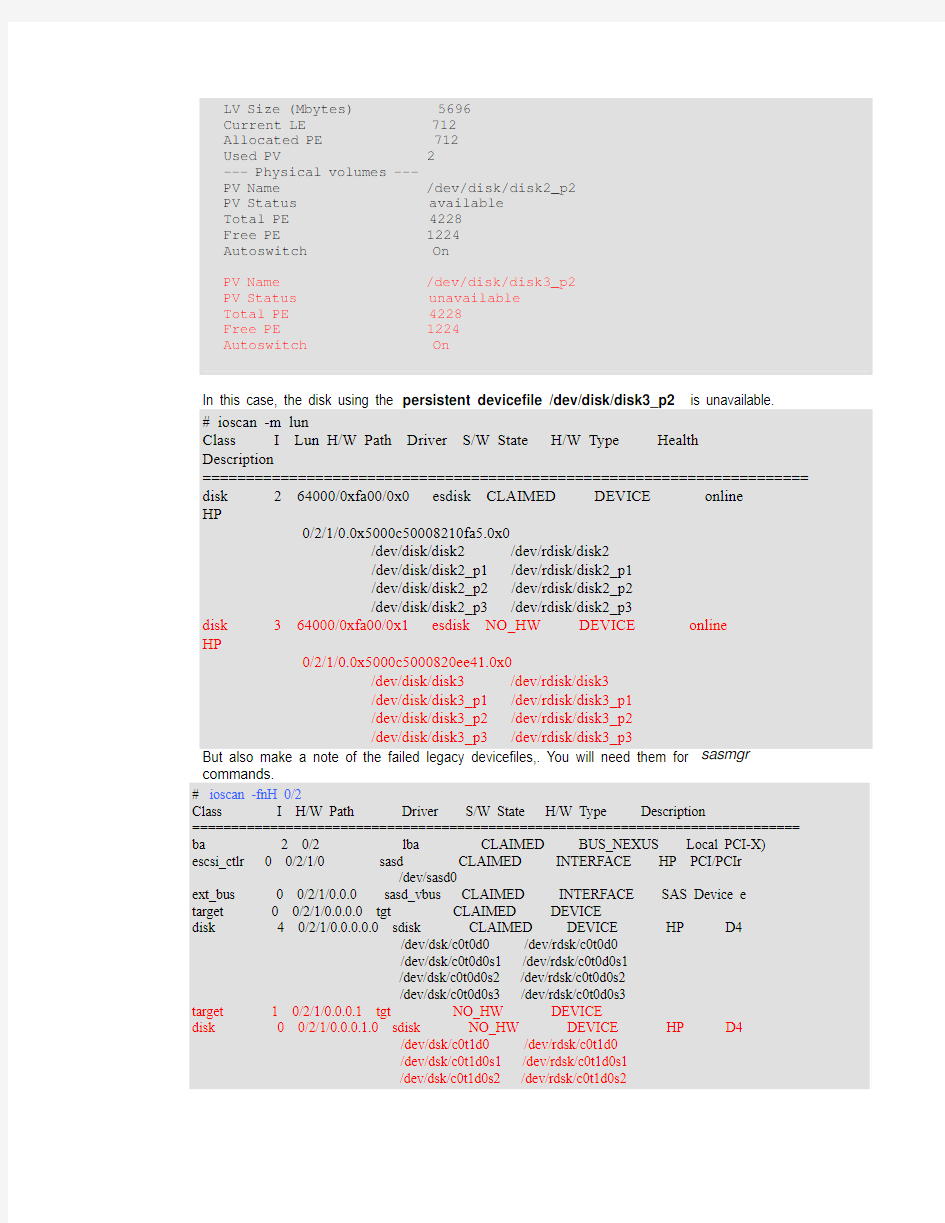
If the customer used a persistent devicefile (e.g. /dev/disk/disk5) in his LVM config, you
have to make sure that the new disk uses the same persistent devicefile again. Ich you
don′t care about the new created legacy dsf and only use the persistent one, just only use
“io_redirect_dsf(1M).
Both methods, sasmgr replace_tgt and io_redirect_dsf, are very simple as long as there are
no I/O’s pending or no I/O drivers that have the special device file open for reading/writing.
This is rarely the case however, and LVM will continue to try to access that special device file waiting for the failed disk to return.
You must stop all access to the special device file first by executing “pvchange –a N” to
deactivate that physical volume.
Once the new disk is inserted, create the EFI partitions, and vgcfgrestore the LVM
information.
As an alternative, you can unmirror the volume group and vgreduce the bad disk from the
volume group. Following is the procedure using pvchange and vgcfgrestore to replace a
mirrored boot disk in vg00.
1. Check which disk has failed and which devicefiles are in use
The SAS controller still sees the disk and has no Raids configured. We have a JBOD disk
that, when replaced with a new one, surely will result in new legacy and persistent devicefiles
Failed disk New disk
Type SAS-JBOD SAS-JBOD
HW Path 0/2/1/0.0.0.1.0T.B.D.
LunPath 0/2/1/0.0x5000c5000820ee41.0x0T.B.D.
Legacy Devicefile /dev/dsk/c0t1d0T.B.D.
Persistent Devicefile /dev/disk/disk3T.B.D.
3. Turn on the disk’s locator LED of disk Bay 2 to ensure the correct disk is removed:
4. Replace the Disk
At this point the disk in bay 2 is pulled out of the server .
a new disk is inserted in the same bay. The server should not be rebooted or taken down
between the time the disk fails and the time the new disk is inserted
Failed disk highlighted in red (State NO_HW)
mirror of that disk in blue (still operating, CLAIMED and untouched)
New replacement disk is in green. (Got a new target ID “2” by SAS Controller !!!!)
5. Check for new created devicefiles
In this case the customer uses persistent devicefiles, so we don’t care about the new legacy
devicefile, but instead check whick new persistent device the system has created for it:
# ioscan -fnH 0/2
Class I H/W Path Driver S/W State H/W Type Description
============================================================================== ba 2 0/2 lba CLAIMED BUS_NEXUS Local PCI-X Bus Adapter (122e)
escsi_ctlr 0 0/2/1/0 sasd CLAIMED INTERFACE HP PCI/PCI- X SAS MPT Adapter
/dev/sasd0
ext_bus 0 0/2/1/0.0.0 sasd_vbus CLAIMED INTERFACE SAS Device I nterface
target 1 0/2/1/0.0.0.0 tgt CLAIMED DEVICE
disk 1 0/2/1/0.0.0.0.0 sdisk CLAIMED DEVICE HP DG 146ABAB4
/dev/dsk/c0t0d0 /dev/rdsk/c0t0d0
/dev/dsk/c0t0d0s1 /dev/rdsk/c0t0d0s1
/dev/dsk/c0t0d0s2 /dev/rdsk/c0t0d0s2
/dev/dsk/c0t0d0s3 /dev/rdsk/c0t0d0s3
target 0 0/2/1/0.0.0.1 tgt NO_HW DEVICE
disk 0 0/2/1/0.0.0.1.0 sdisk NO_HW DEVICE HP DG 146ABAB4
/dev/dsk/c0t1d0 /dev/rdsk/c0t1d0
/dev/dsk/c0t1d0s1 /dev/rdsk/c0t1d0s1
/dev/dsk/c0t1d0s2 /dev/rdsk/c0t1d0s2
/dev/dsk/c0t1d0s3 /dev/rdsk/c0t1d0s3
target 1 0/2/1/0.0.2.0 tgt CLAIMED DEVICE
disk 1 0/2/1/0.0.2.0.0 sdisk CLAIMED DEVICE HP DG 146ABAB4
/dev/dsk/c0t2d0 /dev/rdsk/c0t2d0
# sasmgr get_info -D /dev/sasd0 -q raid
Thu Dec 14 14:59:28 2006
---------- PHYSICAL DRIVES ----------
LUN dsf SAS Address Enclosure Bay Size(MB) /dev/rdsk/c0t0d0 0x5000c50008210fa5 1 1 140014
/dev/rdsk/c0t2d0 0x5000cca000101799 1 2 140014
# ioscan -m dsf
Persistent DSF Legacy DSF(s)
========================================
/dev/rdisk/disk2 /dev/rdsk/c0t0d0
/dev/rdisk/disk2_p1 /dev/rdsk/c0t0d0s1
/dev/rdisk/disk2_p2 /dev/rdsk/c0t0d0s2
/dev/rdisk/disk2_p3 /dev/rdsk/c0t0d0s3
/dev/rdisk/disk3 /dev/rdsk/c0t1d0
/dev/rdisk/disk3_p1 /dev/rdsk/c0t1d0s1
/dev/rdisk/disk3_p2 /dev/rdsk/c0t1d0s2
/dev/rdisk/disk3_p3 /dev/rdsk/c0t1d0s3
/dev/rdisk/disk5 /dev/rdsk/c0t2d0 <- new disk !
# ioscan -m lun
Class I Lun H/W Path Driver S/W State H/W Type Health Description =============================================================================== disk 2 64000/0xfa00/0x0 esdisk CLAIMED DEVICE online HP
0/2/1/0.0x5000c50008210fa5.0x0
/dev/disk/disk2 /dev/rdisk/disk2
/dev/disk/disk2_p1 /dev/rdisk/disk2_p1
/dev/disk/disk2_p2 /dev/rdisk/disk2_p2
/dev/disk/disk2_p3 /dev/rdisk/disk2_p3
Collect your data now :
Failed disk New disk
Type SAS-JBOD SAS-JBOD
HW Path 0/2/1/0.0.0.1.0 0/2/1/0.0.0.2.0
LunPath 0/2/1/0.0x5000c5000820ee41.0x0 0/2/1/0. 0x5000cca000101799.0x0 Legacy Devicefile /dev/dsk/c0t1d0 /dev/dsk/c0t2d0
Persistent Devicefile /dev/disk/disk3 /dev/disk/disk5
6. Stop the LED (now using the new legacy devicefile)
7. Restore the IA64 Partitioning Scheme of the new boot disk
Note: As the tools to retain the old defvcefiles after disk replacement do only allow
replacement of disks with identical number of devicefiles, You have to make sure now that the
new disk has the same partitioning scheme as the failed one.
If you would try to move the disk5 to the old disk3 name, you will get an Error Message:
Example:
# io_redirect_dsf -d /dev/rdisk/disk3 -n /dev/rdisk/disk5
Number of old DSFs=8.
Number of new DSFs=2.
The number of old and new DSFs must be the same.
Be aware that you use the new created devicefiles at this time.
- Create a partition description file:
- Create the new device files for the new partitions (disk3_p1,_p2_p3)
# insf -e –Cdisk
# ioscan -m lun
Class I Lun H/W Path Driver S/W State H/W Type Health Description
======================================================================
disk 2 64000/0xfa00/0x0 esdisk CLAIMED DEVICE online HP
0/2/1/0.0x5000c50008210fa5.0x0
/dev/disk/disk2 /dev/rdisk/disk2
/dev/disk/disk2_p1 /dev/rdisk/disk2_p1
/dev/disk/disk2_p2 /dev/rdisk/disk2_p2
/dev/disk/disk2_p3 /dev/rdisk/disk2_p3
disk 3 64000/0xfa00/0x1 esdisk NO_HW DEVICE online HP
0/2/1/0.0x5000c5000820ee41.0x0
/dev/disk/disk3 /dev/rdisk/disk3
/dev/disk/disk3_p1 /dev/rdisk/disk3_p1
/dev/disk/disk3_p2 /dev/rdisk/disk3_p2
/dev/disk/disk3_p3 /dev/rdisk/disk3_p3
disk 5 64000/0xfa00/0x2 esdisk CLAIMED DEVICE online HP 0/2/1/0. 0x5000cca000101799.0x0
/dev/disk/disk5 /dev/rdisk/disk5
/dev/disk/disk5_p1 /dev/rdisk/disk5_p1
/dev/disk/disk5_p2 /dev/rdisk/disk5_p2
/dev/disk/disk5_p3 /dev/rdisk/disk5_p3
# ioscan -fnH 0/2
Class I H/W Path Driver S/W State H/W Type Description
==============================================================================
ba 2 0/2 lba CLAIMED BUS_NEXUS Local PCI-X escsi_ctlr 0 0/2/1/0 sasd CLAIMED INTERFACE HP PCI/PCI-X SAS MPT Adapter
/dev/sasd0
ext_bus 0 0/2/1/0.0.0 sasd_vbus CLAIMED INTERFACE SAS Device I nterface
target 1 0/2/1/0.0.0.0 tgt CLAIMED DEVICE
disk 1 0/2/1/0.0.0.0.0 sdisk CLAIMED DEVICE HP DG 146ABAB4
/dev/dsk/c0t0d0 /dev/rdsk/c0t0d0
/dev/dsk/c0t0d0s1 /dev/rdsk/c0t0d0s1
/dev/dsk/c0t0d0s2 /dev/rdsk/c0t0d0s2
/dev/dsk/c0t0d0s3 /dev/rdsk/c0t0d0s3
target 0 0/2/1/0.0.0.1 tgt NO_HW DEVICE
disk 0 0/2/1/0.0.0.1.0 sdisk NO_HW DEVICE HP DG 146ABAB4
/dev/dsk/c0t1d0 /dev/rdsk/c0t1d0
/dev/dsk/c0t1d0s1 /dev/rdsk/c0t1d0s1
/dev/dsk/c0t1d0s2 /dev/rdsk/c0t1d0s2
/dev/dsk/c0t1d0s3 /dev/rdsk/c0t1d0s3
target 1 0/2/1/0.0.2.0 tgt CLAIMED DEVICE
disk 1 0/2/1/0.0.2.0.0 sdisk CLAIMED DEVICE HP DG 146ABAB4
/dev/dsk/c0t2d0 /dev/rdsk/c0t2d0
/dev/dsk/c0t2d0s1 /dev/rdsk/c0t2d0s1
/dev/dsk/c0t2d0s2 /dev/rdsk/c0t2d0s2
/dev/dsk/c0t2d0s3 /dev/rdsk/c0t2d0s3
# ioscan -m dsf
Persistent DSF Legacy DSF(s)
========================================
/dev/rdisk/disk2 /dev/rdsk/c0t0d0
/dev/rdisk/disk2_p1 /dev/rdsk/c0t0d0s1
/dev/rdisk/disk2_p2 /dev/rdsk/c0t0d0s2
/dev/rdisk/disk2_p3 /dev/rdsk/c0t0d0s3
/dev/rdisk/disk3 /dev/rdsk/ c0t1d0 <- failed disk !
/dev/rdisk/disk3_p1 /dev/rdsk/c0t1d0s1
/dev/rdisk/disk3_p2 /dev/rdsk/c0t1d0s2
/dev/rdisk/disk3_p3 /dev/rdsk/c0t1d0s3
/dev/rdisk/disk5 /dev/rdsk/c0t2d0 <- new disk !
/dev/rdisk/disk5_p1 /dev/rdsk/c0t2d0s1
/dev/rdisk/disk5_p2 /dev/rdsk/c0t2d0s2
/dev/rdisk/disk5_p3 /dev/rdsk/c0t2d0s3
8. Redirect the IO from the new Device to the old Devicefile
- for the legacy devicefile:
What happened ? Since there is still an active mapping from “c0t2d0” to the persistent dsf
“disk5”, the system complains that you renamed one part of it. But, it alteady deleted the new
legacy dsf′s:
Now, let′s re-animate the persisten devicefile also:
- for the persisten devicefile:
- Verify it:
# ioscan -m lun
Class I Lun H/W Path Driver S/W State H/W Type Health Description
=================================================================== ===
disk 2 64000/0xfa00/0x0 esdisk CLAIMED DEVICE online HP
0/2/1/0.0x5000c50008210fa5.0x0
/dev/disk/disk2 /dev/rdisk/disk2
/dev/disk/disk2_p1 /dev/rdisk/disk2_p1
/dev/disk/disk2_p2 /dev/rdisk/disk2_p2
/dev/disk/disk2_p3 /dev/rdisk/disk2_p3
disk 5 64000/0xfa00/0x2 esdisk CLAIMED DEVICE online HP
0/2/1/0. 0x5000cca000101799.0x0
/dev/disk/disk3 /dev/rdisk/disk3
/dev/disk/disk3_p1 /dev/rdisk/disk3_p1
/dev/disk/disk3_p2 /dev/rdisk/disk3_p2
/dev/disk/disk3_p3 /dev/rdisk/disk3_p3
# ioscan -fnH 0/2
Class I H/W Path Driver S/W State H/W Type Description
========================================================================== ====
ba 2 0/2 lba CLAIMED BUS_NEXUS Local PCI-X
escsi_ctlr 0 0/2/1/0 sasd CLAIMED INTERFACE HP
PCI/PCI-X SAS MPT Adapter
/dev/sasd0
ext_bus 0 0/2/1/0.0.0 sasd_vbus CLAIMED INTERFACE SAS Device I
nterface
target 1 0/2/1/0.0.0.0 tgt CLAIMED DEVICE
disk 1 0/2/1/0.0.0.0.0 sdisk CLAIMED DEVICE HP DG146ABAB4 /dev/dsk/c0t0d0 /dev/rdsk/c0t0d0
/dev/dsk/c0t0d0s1 /dev/rdsk/c0t0d0s1
/dev/dsk/c0t0d0s2 /dev/rdsk/c0t0d0s2
/dev/dsk/c0t0d0s3 /dev/rdsk/c0t0d0s3
target 0 0/2/1/0.0.0.1 tgt CLAIMED DEVICE
Bingo ! The old dsf′s “c0t0d0 and “disk3” are operational again ! J
9. Initialize the EFI FAT Partition and fill boot areas:
contain a valid EFI filesystem. In this case efi_fsinit(1M) will be done automatically by the
subsequent mkboot(1M) command. But if you take e.g. an old UX 11.22 boot disk as mirror disk, mkboot will not automatically run efi_fsinit. As a result only 100MB of the 500MB EFI partition (s1) can be used.
- Use mkboot(1M) to format the EFI partition (s1) and populate it with the EFI files below
/usr/lib/efi/ and to format the LIF volume (part of s2) and populate it with the LIF files (ISL,
NOTE: Specify the -lq option if prefer that your system boots up without
interruption in case of a disk failure:
10. Restore LVM Configuration
Now the new disk is partitioned and equipped with boot headers, you can restore the LVM data to the OS partition “p2!
- Restore LVM access to the disk.
Reattach the disk by reactivating the volume group as follows:
NOTE: The vgchange command with the option can be run on a volume
group that is deactivated or already activated. It attaches all paths for all disks in
the volume group and resumes automatically recovering any disks in the volume
group that had been offline or any disks in the volume group that were replaced.
Therefore, run vgchange only after all work has been completed on all disks and
paths in the volume group, and it is necessary to attach them all.
Initialize/check boot information on the disk.
- Check if content of LABEL file (i.e. root, boot, swap and dump device definition) has been
- Primary Path
- HAAlternate Path
- Alternate Path
_____________________________________________________________________
Sources:
HP-UX System Administrator's Guide:Logical Volume ManagementHP-UX 11i Version 3 When Good Disks Go Bad: Dealing with Disk Failures under LVM
SAS Physical Disk Replacement Procedure With LVM Mirroring by Jay Duffield Software Recovery Handbook:Itanium Architecture:How to mirror the Boot Disk (ECU copy)
HP 8 Internal SAS Controller Support Guide
adapted for HW Recovery Workshop 2008 by Roland Luechtenberg