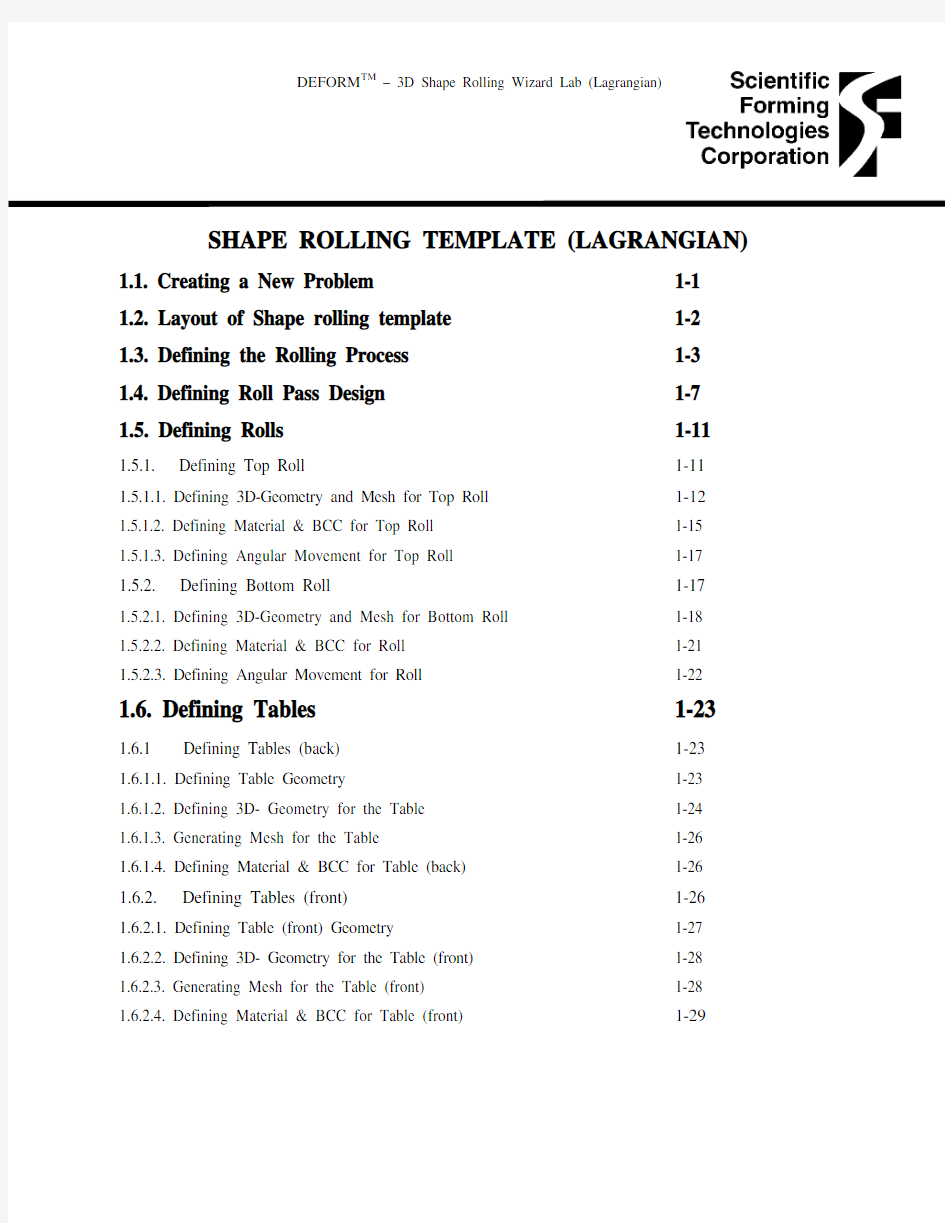

1.1. Creating a New Problem 1-1 1.
2. Layout of Shape rolling template 1-2 1.
3. Defining the Rolling Process 1-3 1.
4. Defining Roll Pass Design 1-7 1.
5. Defining Rolls 1-11 1.5.1. Defining Top Roll 1-11 1.5.1.1. Defining 3D-Geometry and Mesh for Top Roll 1-12 1.5.1.2. Defining Material & BCC for Top Roll 1-15 1.5.1.3. Defining Angular Movement for Top Roll 1-17 1.5.2. Defining Bottom Roll 1-17 1.5.2.1. Defining 3D-Geometry and Mesh for Bottom Roll 1-18 1.5.2.2. Defining Material & BCC for Roll 1-21 1.5.2.3. Defining Angular Movement for Roll 1-22 1.
6. Defining Tables 1-23 1.6.1 Defining Tables (back) 1-23 1.6.1.1. Defining Table Geometry 1-23 1.6.1.2. Defining 3D- Geometry for the Table 1-24 1.6.1.3. Generating Mesh for the Table 1-26 1.6.1.4. Defining Material & BCC for Table (back)1-26 1.6.2. Defining Tables (front)1-26 1.6.2.1. Defining Table (front) Geometry 1-27 1.6.2.2. Defining 3D- Geometry for the Table (front) 1-28 1.6.2.3. Generating Mesh for the Table (front) 1-28 1.6.2.4. Defining Material & BCC for Table (front) 1-29
1.7. Defining Workpiece 1-29 1.7.1. Defining Workpiece Geometry 1-29 1.7.
2. Generating Mesh for Workpiece 1-31 1.7.
3. Defining Material & BCC for Work piece/Stock 1-32 1.8. Defining Pusher 1-33 1.8.1. Defining Geometry for Pusher 1-33 1.8.2. Defining Mesh for Pusher 1-34 1.8.3. Defining Material & BCC for Pusher 1-34 1.8.
4. Defining Movement for Pusher 1-34 1.9. Defining Object Positioning & Inter-Object Relations 1-35 1.10. Defining Step Controls for Pass1 1-37 1.11. Defining a Second Pass 1-38 1.12. Defining Inter-pass heat transfer 1-41 1.13. Defining a Third Pass 1-42 1.13.1. Defining Main Rolls 1-44 1.13.2. Defining Side Rolls 1-45 1.13.3. Defining Pusher Movement 1-45 1.13.4. Object Positioning for Pass 3 1-45 1.14. Defining a Fourth Pass 1-46 1.1
5. Exiting Shape Rolling Wizard 1-47 1.1
6. Running the Simulation and Post-Processing 1-47
1. Shape Rolling Template
1.1. Creating a New Problem
On a Unix machine, type DEFORM3 to open DEFORM?-3D. On a Windows machine, go to the button an select DEFORM-3D from the menu. The DEFORM-3D MAIN window will appear. Make a new problem under “Problem” directory. The problem setup window will open as shown in figure 1.
Select the shape rolling guiding template and click.
Figure 1. The problem setup window.
Select under problem home directory, name the simulation SHAPE_ROLL_Lab1 (See Figure 2) and click Finish.
Figure 2. The problem setup window (Problem Name).
1.2. Layout of Shape rolling template
The layout of the interface can be seen in the Figure 3 below. The screen is distributed into four discrete sections. The display window is where the objects for the current operation can be viewed. The project list window is where the list of settings currently editable. Based on the selection in the project list window, certain values can be edited in the setting modification window. As information is provided to the interface, information will be printed in the project
record window such as saved steps.
Figure 3. The layout of the shape rolling template interface
1.3. Defining the Rolling Process
The process setting window, as shown in Figure 4, should appear on the screen. This window allows the user to insert operations into the process list. Add four rolling passes and one heat transfer operation (between four passes) to process (either drag rolling icon into project view or click “add to tree”.) You can set the default settings for rolling or heat transfer operation before
adding the operations to the project.
Figure 4. Process setting window
Close process setting window. Select SI units and click on the first operation in the project view dialog and click “open opr” button to open the operation (See Figure 5). Name operation “PASS1"
Figure 5. Operation Window
Figure 6. Operation Name Page
Select rolling type as “Lagrangian (incremental rolling)”. Click Next. In the thermal calculations page, select the "Calculate temperature in work piece and rolls (non-isothermal)" option.
Figure 7: The project view dialog with the rolling type selected.
In the thermal calculations page, select the "Calculate temperature in work piece and rolls (non-isothermal)" option (See Figure 8). Click Next.
Figure 8: Setting of type of thermal calculation
1.4. Defining Roll Pass Design
In the Model type and roll stand page, there are three models such as full, half and quarter model. In this lab, we will use full model option and one roll stand (See Figure 9). We will be using main rolls, tables and the work piece in this lab. (See Figure 10)
Figure 9: Model type and roll stand page
Figure 10: The Roll stand definition page.
Figure 11: Project list window for full model rolling setup.
Note: The shape rolling template supports the guided/open concept used by many DEFORM products. As seen in Figure 11 , at any time during the problem setup, the next or back buttons can be used to navigate to adjoining windows. In addition, the Project View highlights the current position in the setup at any time.
In “Roll stand page” we select to use primitives for main roll pass design (See Figure 10). Select Flat rolls with the following roll parameters to create the geometries of the top roll and the bottom roll (See Figure 12).
Roll Gap G = 80mm
Roll Radius R= 100mm
Width W= 120mm
Radius r1= 5mm
The geometry of the rolls looks as shown in Figure 13. Click on "Close" button to close the pop-up Roll Pass Design window.
Figure 12: Roll Pass Design window
Figure 13: The rolls defined by the selection of roll geometry.
1.5. Defining Rolls
1.5.1 Defining Top Roll
Specify a temperature of 40°C for the top roll (See Figure 14). Click Next to go to roll Geometry-2D page. At this point, the roll geometry could be edited, a different geometry can be imported or a different primitive can be selected (See Figure 15).
Figure 14: Setting of top roll temperature.
1.5.1.1. Defining 3D-Geometry and Mesh for Top Roll
As the roll geometry is already defined, and no changes are necessary, go on to generate the 3D geometry for the roll with 72 uniform layers as seen in Figure 16. 3D geometry of the roll looks like as shown in Figure 17. Click Next to go to mesh generation page.
Figure 15: 2D roll cross-section geometry page.
Figure 16: 3D roll geometry page.
Figure 17: Three-dimensional image of the roll geometry.
Use 100 elements in the 2D mesh for the top roll cross-section and generate the 2D mesh. For top roll 3D mesh, change the number of layers to 72, leave all the other settings as default and generate the 3D mesh (See Figure 18 and 19).
Figure 18: Roll mesh generation page.
Figure 19: Three-dimensional image of the roll geometry with mesh.
1.5.1.
2. Defining Material & BCC for Top Roll
In Material window, use import material from library option (See Figure 20) and import AISI-H-13 data from the DEFORM? library (See Figure 21).
Figure 20: Material page
Figure 21: Material selection window.
Click Next will take you to the BCC page.
In BCC Page, by default Heat exchange with environment is defined to all surfaces which is correct. When we select Defined option as shown in Figure 22, the top roll will appear as shown in Figure 23and thus indicating the Heat Exchange with Environment defined to all the surfaces.
Figure 22: BCC page
Figure 23: Default Heat exchange with Environment assigned to top roll
1.5.1.3. Defining Angular Movement for Top Roll
Figure 24: The display page showing the direction of assigned angular velocity.
Assign a constant angular velocity of 50 rpm for top roll. (See Figure 24) Click Next.
1.5.
2. Defining Bottom Roll
Specify a temperature of 40°C for the top roll (See Figure 25). Click Next to go to roll Geometry-2D page (See Figure 26). As the roll geometry is already defined, and no changes are necessary click next to go 3D- Geometry Page.
Figure 25: Setting of bottom roll temperature.
1.5.
2.1. Defining 3D-Geometry and Mesh for Bottom Roll
Generate the 3D geometry for the roll with 72 uniform layers as seen in Figure 27. 3D geometry of the roll looks like as shown in Figure 28. Click Next to go to mesh generation page.
Figure 26: Roll Geometry-2D page