
Smartbi电子表格版安装指南V 2.0 本文用于介绍Smartbi电子表格版本安装配置的相关步骤。文档索引参考下表。
一、下载安装包
进入电子表格下载网盘,会看到下面资源。
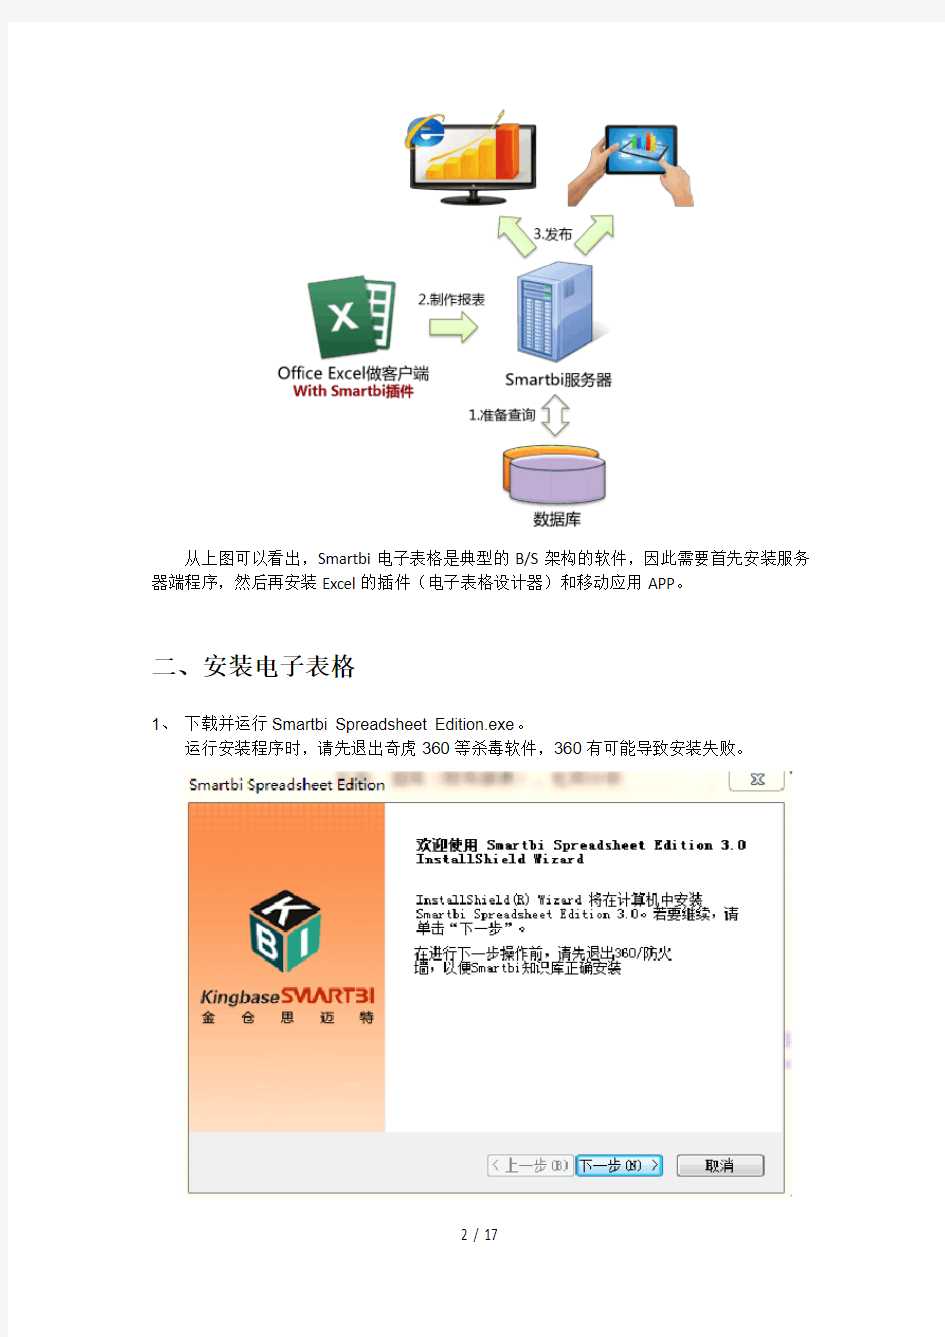
Smartbi电子表格的部署架构参见下图:
从上图可以看出,Smartbi电子表格是典型的B/S架构的软件,因此需要首先安装服务器端程序,然后再安装Excel的插件(电子表格设计器)和移动应用APP。
二、安装电子表格
1、下载并运行Smartbi Spreadsheet Edition.exe。
运行安装程序时,请先退出奇虎360等杀毒软件,360有可能导致安装失败。
2、安装包会安装一个开源数据库Mysql,检测以确保端口没有被占用。
3、系统的默认用户名和密码,进入系统时使用。
三、本机启动系统
1、点击“开始菜单—Smartbi Spreadsheet—启动应用服务器”。
2、随后会出现一个Dos窗口。使用过程中不用关闭,系统使用完后可以关闭窗口。
3、随后在开始菜单点击“访问Smartbi Spreadsheet”,打开浏览器,进入产品登录界面。
4
5、进入系统后,可以看到预置的多个示例报表。可以打开查看效果。
四、用Excel制作报表
1、下载并运行SmartbiExcelAddin3.0.exe,安装Smartbi for Excel插件。支持Excel
2007/2010/2013。
2、打开Excel,出现Smartbi面板。
3、点击“设置”,在”服务器URL”内输入服务器地址:http://localhost:28080/spreadsheet,
用户admin,密码manager。
4、点击“登录”,Excel右边出现Smartbi资源面板,双击目录中的报表,打开设计模板。
5、现在就可以使用Excel来设计报表了!
五、移动版安装配置
移动APP请到https://www.doczj.com/doc/cd4011508.html,或各大安卓市场、苹果市场下载。
电子表格支持在移动端进行浏览。浏览前需在PC端进行目录发布,把电子表格发布到浏览。
还需要在移动端下载安装应用程序。
下面我们分别以手机iOS系统和手机安卓系统为例,演示在移动设备上如何进行安装配置。iOS
1、下载SmartbiWeb_for_iOS.ipa并在iOS系统设置上安装。
2、在移动设备上点击设置按钮,进入"设置"界面。
3、在设置界面点击SamrtbiWeb程序,则进入SamrtbiWeb设置界面。
在此界面进行服务器地址设置。
目前支持设置三个服务器,可以设置默认选择的服务器编号。
4、在移动设备上点击smartbi的应用程序,则会进入登录界面。
5、在登录界面输入用户名和密码后进入到Smartbi页面导航界面,则可浏览相关资源。
安卓
1、下载SmartbiWeb_for_Android.apk并在安卓系统上安装。
2、安装好后,会出现一个smartbi的应用程序,点击此程序。则进入登录界面。
3、点击隐藏按钮或是下面的设置按钮,进入"设置"界面。
4、点击服务器地址,输入您要访问的Smartbi电子表格服务器的地址。点击服务器编号,
可以选择不同的服务器编号。
5、退出"设置"界面,回到登录界面。输入用户名和密码。
6、此时进入到Smartbi页面导航界面,可以直接浏览相关资源。
----本文结束----
DesignBuilder软件操作手册 注意事项: 1.安装时需要注意的问题:安装目录及整个路径须为全英文,不能出现中文字符,否则安装后不能正常打开。 2.关于证书:由于试用版只有三个月的试用期,因此软件使用三个月后可以将系统日期修改至有效期内以继续使用。 3.基本概念: 1)在DesignBuilder中将模型数据分为6个层次,分别为“场地”、“建筑”、 “块”、“区域”、“表面”、“子表面”。默认数据都是从上一层次 的数据所继承而来,如:“块”数据来自于“建筑”数据,而“区域” 数据则是来自于“块”数据等等,所以如果对上级层次中的数据进行了 变动,那么其下属层次中该数据都得到了修改。这一点可以让使用者输 入更少的数据,提高建模效率。 2)在层次分类中,可以将site看作一个小区,building是一栋建筑,block 可以看作一层楼,zone则是一个房间,这样方便理解。 1.开始界面: 界面左侧为最近使用过的文件,通过双击鼠标或者单击界面右侧“信息,帮助栏”中的“Open selected site(打开已选择的场地)”可以打开该文件。 也可以通过或者界面右侧“信息,帮助栏”中的“Create new site(建立新的位置)”来创建一个新的dsb文件。 1
2.引导界面: 当用户从“开始界面”开始一项新工作时会出现引导界面 从该界面可以修改新任务的文件名(Title),位置(Location),分析类型(Analysis type)。 3.界面:屏幕最上方为菜单栏,下面为工具条,屏幕中央从左至右分为导航界面、编辑界面以及信息板/模型数据界面。 2
3 3.1菜单栏(Menu ) 包括文件(File ),编辑(Edit ),进行(Go ),视图(View ),工具(Tool ),帮助(Help ) 将鼠标停留在菜单栏上的选项上,单击鼠标左键,出现功能下拉菜单。 3.2工具栏 (Toolbar) 包括“新建” ,“打开”,“保存” ,“打印”,“建筑 模型选项”,“将已选择物体的属性回复至默认值” (可以将属性清除至块(Block )级,区域(Zone )级,表面(Surface )级,洞口(Opening )级),“从模板下载数据” ,“选择”,“增加一个新块” ,……“画构造线” ,“测量长度、角度和面积” ,“移动”,“复制”,“旋转”,“拉伸”,“删除”,“旋转观看视角”,“放大/缩小”(也可以通过鼠标滚轮实现缩放操作),“适应屏幕” , “平移”,“窗口缩放”,“导出数据”,“汇编报告”。 3.3导航界面(Navigator Panel) 导航板可以实现“场地”、“建筑”、“块”、“区域”、“表面”、“子表面”等各层之间的切换。 3.4编辑界面(Edit Screen) 使用者通过该区域进行建模,修改模型等操作。 界面上方为模型数据标签:包括“设计(Layout ),活动(Activity ),构造(Construction ),门窗洞口(Openings ),灯光(Lighting ),供热通风与空调工程(HVAC ),计算流体力学(CFD ),选项(Options )。 界面下方为屏幕标签:编辑(Edit ),可视化(Visualise ),供热设计(Heating design ),空调设计(Cooling design ),模拟(Simulation ),计算流体力学(CFD )。 3.5信息板(Info Pane )/模型数据(Model Data ) 当学习模式开启时为信息/帮助板,当学习模式关闭时(可以通过菜单栏Tools 选项中的Program Options ——Interface Style 中将Learning 前面的勾去掉即可)则为模型数据板。
产品说明书范文英文版 电子产品说明书——媒体音响英文说明书范例(中英) 便携式多媒体音响 Portable Multimedia Acoustics 使用说明书User’s Manual 专注于完美音质的追求?? Concentrate on perfect sound pursuit? 感谢您使用本公司出品的数码产品,为了让您轻松体验 产品,我们随机配备了内容详尽的使用说明,您从中可以获 取有关产品的介绍,使用方法等方面的知识。在您开始使用 本机之前请先仔细阅读说明书,以便您能正确的使用本机, 如有任何印刷错误或翻译失误望广大用户谅解,当涉及内容 有所更改时,恕不另行通知。 Thank you for using this digital product of our company. In order to let you experience the product swimmingly, detailed instruction is provided which you can find the product’s introduction, usage and other information. Before using this product, please read the manual carefully, so that you can correctly use it. In case of any printing or translation error, we apologize for the inconvenience. As for the content change, we are sorry for no further notice. 一、产品概述 General Information 本机是一款外观小巧,设计精美、携带方便多媒体小音响, 适用于家居、户外旅游、办公室等场所,随时随地享受音乐
...../ ...../ SAP生产业务配置及操作手册
目录
SAP生产业务配置及操作手册Overview 业务说明 概念 计划策略介绍 SAP的策略包括: 按库存MTS:40,30,10,11,52,63; 按单M T O:50,60,20; 计划组件:70,59; 带有变量配置的:25,26,55,65,56,89,54; 装配订单:82,81,89。 Table
Configure Master data Define BOM Usages Define BOM Status-OS23 OS23 Define Item Categories BOM中的每个行项目都必须指定一个Item Category,因为有一些行项目是需要进行库存管理,而有一些则只是一些说明性的文档,所以需要对Item Category进行定义。 Define Allowed Material Types for BOM Items 可以指定每个BOM的用途指定允许的物料类型,可以分别指定允许哪些父物料和子物料。 Define work center category
Define control key Define capacity categories Production Planning Define Strategy Define strategy group Material Require Planning Maintain the Plant Parameters Copy the parameters from plant 0001. OPPQ Check the Setting,if the setting is “To maint.”, it must be maintained.
ARGOS 操作手册 (操作者用) Mania Pacific Limited 2003年8月
第一章进入、退出Argos系统 1、开机 1、打开机台电源。启动电脑。 2、登陆用户名和密码分别是: user:aoi passward: barco1 3、启动完成后双击桌面Argos图标,随即进入Argos系统。等待系统初始化。 4、此时注意有无异常声响。 2、关机 1、退出Argos,在主界面状态下 单击Tools按钮(图一)——单击Exit Argos(图二) 图一
图二
第二章Argos的基本操作1、读取资料 首先读取比较需要的资料 单击Jobs按钮(图三)――选择需要的料号名称(图四) Argos将自动读取资料并将资料显示 图三
图四 新资料 1、在第一次读入时,将出现一个对话框(如图五),提示创建新参数,击 YES; 3、通常选择与检测板基材名称相同的基材参数(见图六)。完成后单击OK键。
图六 2、设定检测参数 1、检测参数 图七显示的是一个检测料号的基本参数,从上到下分成四个区域。 1、区域一: 区域一中的参数主要是描述线路板的。 参数英文名称参数中文名称设定方法建议设定值Maximum Defects Per Panel 每块最大缺点数100~150 Minimum Defect Size Reported 最小报告缺点的大小 安质量部门的要求 值设定 通常不要小 于1 Maximum Ink Marks Per Panel 每块板最多Ink Marks 的点数 100 Auto Review Defects Delay 进行缺点确认等待的时间 1 s Panel Thickess 板厚用千分尺测量 Defect Review Motion 错误显示等待的时间 1 s
Excel培训教材 目录 1 Excel简介 5 1.1 Excel界面简介 6 1.2 输入和编辑数据8 1.2.1 选定操作区域8 1.2.2 定位的使用9 1.2.3 复制、移动和删除9 1.2.4 撤消和恢复10 1.2.5 查找和替换10 1.2.6 在单元格中输入数据11 1.2.7 其他填充方式12 1.2.8 简单的计算13 1.2.9 相对引用和绝对引用14 1.2.10 名称的使用15 1.3 添加、删除单元格、行和列15 1.4 改变列宽和行高16 1.5 设置工作表的格式17 1.5.1 单元格的格式设置17 1.5.2 数据表的美化18 1.5.3 样式的使用和设置19 1.5.4 格式的复制和删除19 1.5.5 条件格式的设置19 1.5.6 隐藏行和列19 1.5.7 拼音的设置20 1.5.8 自动套用格式20 1.6 改变字体21 1.7 设置页面属性、预览和打印22
1.7.1 打印预览22 1.7.2 页面设置22 1.7.3 设置打印区域26 1.7.4 打印选项27 2 Excel的自定义功能 27 2.1 启动选项27 2.2 设置Excel选项28 2.3 自定义屏幕29 2.3.1 调色板的使用30 2.3.2 使用全屏视图30 2.3.3 储存当前工作簿中的视图30 2.4 录制和使用宏31 2.4.1 定义宏的键盘快捷键31 2.5 保存自定义工具栏的布局32 2.5.1 创建常规自定义工具栏32 3 EXCEL先进的浏览和选择功能33 3.1 移动浏览33 3.1.1 知道所处的位置33 3.1.2 键盘浏览33 3.1.3 跳转到定义名称34 3.1.4 用滚动条浏览34 3.2 选择的技巧35 3.2.1 Shift键的使用35 3.2.2 Ctrl键的使用35 3.2.3 在选区内浏览35 3.2.4 进行选择的快捷键35 3.3 数据输入36 3.3.1 正确输入36 3.3.2 从邻近的单元格复制数据36 3.3.3 充分利用“记忆式键入”功能36
OFM User Operation Manual OFM用户操作手册 一、 Create OFM project建立OFM项目 Learning objectives 学习目标 (一)The data connection数据的连接 (二)Data attribute Definition数据的属性定义 (三)The data connection数据的连接 Create an empty project建立空项目 1. Start the OFM program, expand the File menu, click New Workspace, display as shown in the following illustration shown.启动OFM程序,展开 File 菜单,点击New Workspace,显示如下图所示所示。 2. Click on the button as shown in the graph, and then select the save path, file name (such as Demo_Link).点击图中所示按钮,然后选择保存路径,给出文件名(如 Demo_Link)。 3.The other option is reserved for the default. Click OK.其他选项保留为默认。点击OK。 4.Right click on the OFM Representation frame in HeaderId. Select Delete in the shortcut menu, delete the HeaderId table.右键点击OFM Representation 框中的HeaderId。在快捷菜单中选择Delete,删除HeaderId 表。
2007 Encyclopedia Britannica Online User guide 不列颠百科全书在线英文版 使用手册 https://www.doczj.com/doc/cd4011508.html,/ 飞资得信息技术(上海)有限公司 上海市成都北路333号招商局广场南楼13A TEL: (021) 52980395 FAX: (021)52980397 E-mail: info@https://www.doczj.com/doc/cd4011508.html, https://www.doczj.com/doc/cd4011508.html,
目 录 不列颠百科全书背景简介 (2) 不列颠百科在线英文版收录内容 (2) 不列颠百科在线英文版产品特色 (3) 不列颠百科在线英文版首页介绍 (4) 范例说明:检索行 (6) 范例说明:高级浏览/研究工具 (7) 标题浏览(A~Z Article Browse) (7) 年鉴(Year in Review Browse) (8) 主题浏览(Subject Browse) (10) 视频资料库(Video Collection ) (10) 时间序列浏览(Timeline Browse) (12) 世界地图(World Atlas) (13) 国家比较〈Compare Countries 〉 (15) 世界各国数据信息〈World Data〉 (16) 名人格言〈Notable Quotation〉 (19) 经典文献〈Gateway to the Classics〉 (20) 范例说明:不列颠每日焦点 (21) 不列颠焦点(Britannica highlight) (21) 今日传记(Biography of the day) (21) 历史上的今天(This day in history) (22) 不列颠主题数据库(Spotlights) (23) 个性化服务功能介绍:WORKSPACE (24) 开创集体智能、互动及分享的知识园地:Britannica Blog (26)
MLX Series Gear Box of Cement Mill Operating Manual ·Transmission device and gear box shall be operated by the personal who is familiar with the operating.Please read the manual carefully before operating. ·This gear box has been drained out of oil when delivered from the workshop, therefore,please fuel the oil according to the operating manual. ·Please hand over this operating manual to the actual operating personal ·Be sure to keep this operating manual in good way. Safety Caution ●Before using(installation,operation,maintenance,spot check,etc.),must be familiar with this operating manual and other subsidiary information and operate correctly.Being familiar with the machine knowledge,safety considerations and matters should be paid attention to and then use it.After reading,it should be in actual use personnel's custody and kept in visible place. ●While carrying,setting up,routing the pipes,the machine running,operation, maintenance and inspection,it must be implemented by the personnel with professional knowledge and skills.Otherwise,it may result in injury or damage
Cat. No. W465-E1-01 SYSMAC CS and CJ Series CS1W-EIP21 (100Base-TX) CJ1W-EIP21 (100Base-TX) EtherNet/IP Units OPERATION MANUAL
CS1W-EIP21 (100Base-TX) CJ1W-EIP21 (100Base-TX) EtherNet/IP Units Operation Manual Produced June 2007
iv
Notice: OMRON products are manufactured for use according to proper procedures by a qualified operator and only for the purposes described in this manual. The following conventions are used to indicate and classify precautions in this manual. Always heed the information provided with them. Failure to heed precautions can result in injury to people or dam-age to property. !DANGER Indicates an imminently hazardous situation which, if not avoided, will result in death or serious injury. Additionally, there may be severe property damage. !WARNING Indicates a potentially hazardous situation which, if not avoided, could result in death or serious injury. Additionally, there may be severe property damage. !Caution Indicates a potentially hazardous situation which, if not avoided, may result in minor or moderate injury, or property damage. OMRON Product References All OMRON products are capitalized in this manual. The word “Unit” is also capitalized when it refers to an OMRON product, regardless of whether or not it appears in the proper name of the product. The abbreviation “Ch,” which appears in some displays and on some OMRON products, often means “word” and is abbreviated “Wd” in documentation in this sense. The abbreviation “PLC” means Programmable Controller. “PC” is used, however, in some Program-ming Device displays to mean Programmable Controller. Visual Aids The following headings appear in the left column of the manual to help you locate different types of information. Note Indicates information of particular interest for efficient and convenient opera- tion of the product. 1,2,3... 1.Indicates lists of one sort or another, such as procedures, checklists, etc. Trademarks and Copyrights EtherNet/IP is a registered trademark of the ODVA (Open DeviceNet Vendor Association). Ethernet is a trademark of the Xerox Corporation. Microsoft, Windows, Windows NT, Windows 2000, and Windows XP are registered trademarks of the Microsoft Corporation. Other names of systems or products that appear in this document are trademarks or registered trade-marks of the respective company. OMRON, 2007 All rights reserved. No part of this publication may be reproduced, stored in a retrieval system, or transmitted, in any form, or by any means, mechanical, electronic, photocopying, recording, or otherwise, without the prior written permission of OMRON. No patent liability is assumed with respect to the use of the information contained herein. Moreover, because OMRON is con-stantly striving to improve its high-quality products, the information contained in this manual is subject to change without notice. Every precaution has been taken in the preparation of this manual. Nevertheless, OMRON assumes no responsibility for errors or omissions. Neither is any liability assumed for damages resulting from the use of the information contained in this publication. v
Multiskan Ascent酶标仪英文软件操作手册 1.安装 将随机附送的软件光盘插入光驱,确认默认的安装路径及选择正确的仪器类型(图1),Multiskan MK3可选择Multiskan 选项,按提示输入单位名及任意的序列号(图2),一路按”next”进行安装。完成后在桌面上自动生成快捷图标。如图(1),(2)所示。 图1 图2
2.操作 双击图标打开软件,点“session”下拉菜单,选择“new”编新程序或“open”打开已有的程序。如图3所示。 图3 按“new”编新程序,先选择酶标板类型,一般选择第一个选项。如图4所示。 图4
点击general,分别有area definition,鼠标点击可用来定义检测的范围,如图5。 按下代表不选中,然后 用鼠标拖拉按下代 表选中, 然后用 鼠标拖 拉 图5 点击layout,可设置对应于试剂盒的标准品,测试样本,空白和对照等。设置方法为先用鼠标点击所要设置的位置,下拉”type”菜单,选择所定义的类型,再点击”apply”。如图6。点击右上角Fill键可设置样本和标准的复孔并自动计算平均值。 图6
然后可根据实验的实际情况,按次序设置实验步骤,这些步骤包括“measure(测量步骤),incubate(温控步骤),shake(振荡步骤),如图8。 图8 测量步骤见图9。 图9 控制进板 控制出板 选择测量模式,一般为continuous 选择测量类型,single(单波长)或double(双波长) 选择滤光片 设置测量前等待时间
图11 振荡步骤,如图13 图13 设置完步骤后,就可保存程序,如图15。可指定程序名及保存路径。 设置总振荡时间 振荡开启时间 振荡关闭时间 设置振荡速度
操作手册参考资料 一、安全规范 一般的安全规则 1. 认识你的机器 为了你的个人安全, 仔细阅读本手册。熟知机器的应用与限制,以及与机器相关的潜在性危险。 2.保持工作区域干净. 杂乱的区域以及工作台会引起意外。 3.勿在危险的环境使用 勿在潮湿或下雨的地点使用,或将其暴露在雨中。保持工作区域良好的照明。4.非专业人员勿靠近 所有参观者在工作区域内必须保持安全的距离。 5.勿强行操作机器 让机器以其设计之速度下安全的执行工作。 6.使用正确的工具勿强行使机器或附加装置执行工作 7.穿著适当的衣服 避免佩带可能被移动部分卷入的宽松衣物、手套、项链、手镯或首饰。建议穿著防滑鞋。戴上包住长头发之发帽。 8.勿在工作状态保养机器 机器应进行适当之保养,如润滑、调整 10.维修、更换配件之前,或是组装和重新组装马达时,必须从电源处切断机器的电源. 11.使用建议之配件,查阅手册上建议之配件。 12.不要让机器在无人看管下运转。 本机器自身安全规则(此项由贵厂根据自己机器特点编写)
(英文版) 1.1 SAFETY RULES 1.1.1.GENERAL SAFETY RULES thoroughly and understand completely all instructions, rules, etc. contained in this manual. Failure to comply can result in accidents involving fire, electric shock, or serious personal injury. Keep owners manual and review frequently for continuous safe operation. 1.KNOW YOUR MACHINE. For your own safety, read the owner’s manual carefully. Learn its application and limitations as well as specific potential hazards pertinent to this machine. 2.KEEP WORK AREA CLEAN. Disorder area and working table will cause accident. 3.DO NOT USE IN DANGEROUS ENVIRONMENTS. Do not use power tools in damp or wet locations, or expose them to rain. Keeps work area well illuminated. 4.KEEP NON-PROFESSIONAL PEOPLE A WAY. All visitors should be kept at a safe distance from work area. 5.DO NOT FORCE THE MACHINE. It will do the job better and be safer at the rate for which it was designed. https://www.doczj.com/doc/cd4011508.html,E THE RIGHT TOOLS. Do not force the machine or attachments to do a job for which they were not designed. 7.WEAR PROPER APPAREL. A void loose clothing, gloves ,neckties, rings, bracelets, or jewelry, which could be caught in moving parts. Non-slip footwear is recommended. Wear protective hair covering to contain long hair. 8.DON’T MAINTENANCE THE MACHINE IN RUNNING STA TES The machine should be maintained such as lubrication, proper adjustment. 9. BEFORE MAINTENANCE, ACCESSORY CHANGING OR ASSEMBLING AND REASSEMBLE MOTOR, BE SURE TO CUT OFF THE POWER FROM THE POWER RESOURCE. https://www.doczj.com/doc/cd4011508.html,E RECOMMENDED ACCESSORIES. Consult the o wner’s manual for recommended accessories. 11.NEVER LEA VE MACHINE RUNNING UNA TTACHED. 1.1.2 ADDITIONAL SAFETY RULES FOR COLD FORMING MACHINE
Atlas Copco Stationary Air Compressors GA5-7-11C-11-15-18-22-30C-30-37-45-55C-55-75-90C and GA30 W-37 W-45 W-55C W-55 W-75 W-90C W With Elektronikon I or Elektronikon II regulator User manual for Elektronikon? I and II regulators
Compressor type:. . . . . . . . . . . . . . . . . . . . . . . . . . . . . . . . . . . . . . . . Unit serial No. compressor:. . . . . . . . . . . . . . . . . . . . . . . . . . . . . . . . . . . . Air dryer type:. . . . . . . . . . . . . . . . . . . . . . . . . . . . . . . . . . . . . . . . . . Unit serial No. dryer:. . . . . . . . . . . . . . . . . . . . . . . . . . . . . . . . . . . . . . . . . Motor type:. . . . . . . . . . . . . . . . . . . . . . . . . . . . . . . . . . . . . . . . . . . . . Motor serial No.:. . . . . . . . . . . . . . . . . . . . . . . . . . . . . . . . . . . . . . . . . . . . Delivery date:. . . . . . . . . . . . . . . . . . . . . . . . . . . . . . . . . . . . . . . . . . . First start-up date:. . . . . . . . . . . . . . . . . . . . . . . . . . . . . . . . . . . . . . . . . . . Service Plan:. . . . . . . . . . . . . . . . . . . . . . . . . . . . . . . . . . . . . . . . . . . . Owner's machine No.:. . . . . . . . . . . . . . . . . . . . . . . . . . . . . . . . . . . . . . . . Selected lubricants Compressor:. . . . . . . . . . . . . . . . . . . . . . . . . . . . . . . . . . . . . . . . . . . . Capacity:. . . . . . . . . . . . . . . . . . . . . . . . . . . . . . . . . . . . . . . . . . . . . . . . . . Bearing grease type, electric motor:. . . . . . . . . . . . . . . . . . . . . . . . . Dryer gearbox. . . . . . . . . . . . . . . . . . . . . . . . . . . . . . . . . . . . . . . . . . . Capacity . . . . . . . . . . . . . . . . . . . . . . . . . . . . . . . . . . . . . . . . . . . . . . . . . . . Printed Matter Nos. Atlas Copco compressor instruction book:. . . . . . . . . . . . . . . . . . . . Atlas Copco air dryer instruction book:. . . . . . . . . . . . . . . . . . . . . . . . . . Atlas Copco compressor parts list:. . . . . . . . . . . . . . . . . . . . . . . . . . Atlas Copco air dryer parts list:. . . . . . . . . . . . . . . . . . . . . . . . . . . . . . . . Atlas Copco logbook:. . . . . . . . . . . . . . . . . . . . . . . . . . . . . . . . . . . . . Local Atlas Copco Representative Name:. . . . . . . . . . . . . . . . . . . . . . . . . . . . . . . . . . . . . . . . . . . . . . . . . . . . . . . . . . . . . . . . . . . . . . . . . . . . . . . . . . . . . . . . . . . . . . . . . . . . . . . . . . . . . . . Address:. . . . . . . . . . . . . . . . . . . . . . . . . . . . . . . . . . . . . . . . . . . . . . . . . . . . . . . . . . . . . . . . . . . . . . . . . . . . . . . . . . . . . . . . . . . . . . . . . . . . . . . . . . . . . . Telephone:. . . . . . . . . . . . . . . . . . . . . . . . . . . . . . . . . . . . . . . Contact persons:Service:. . . . . . . . . . . . . . . . . . . . . . . . . . . . . . . . . . . . . . . . . . . . . Telex:. . . . . . . . . . . . . . . . . . . . . . . . . . . . . . . . . . . . . . . . . . Parts:. . . . . . . . . . . . . . . . . . . . . . . . . . . . . . . . . . . . . . . . . . . . . . . E-mail . . . . . . . . . . . . . . . . . . . . . . . . . . . . . . . . . . . . . . . . . . . . . . . . . . . . . . . . . . . . . . . . . . . . . . . . . . . . . . . . . . . . . . . . . . . . . . . . . . . . . . . . . . . . . . . SAFETY PRECAUTIONS To be read attentively and acted accordingly before installing, operating or repairing the unit. These recommendations apply to machinery processing or consuming air or inert gas. Processing of any other gas requires additional safety precautions typical to the application which are not included herein. If necessary, install a suction duct. Never obstruct the air inlet. Care shall be taken to minimize the entry of moisture with the inlet air.4.The aspirated air shall be free from flammable fumes or vapours, e.g. paint solvents, that can lead to internal fire or explosion.5.Air-cooled units shall be installed in such a way that an adequate flow of cooling air is available and that the exhausted air does not recirculate to the inlet.6.Arrange the air intake so that loose clothing of people cannot be sucked in.7.Ensure that the discharge pipe from the compressor to the aftercooler, air dryer or air net is free to expand under heat and that it is not in contact with or close to flammable material.8.No external force may be exerted on the air outlet valve; the connected pipe must be free of strain.9.If remote control is installed, the unit shall bear an obvious sign reading: DANGER: This machine is remotely controlled and may start without warning. As a further safeguard, persons switching on remotely controlled units shall take adequate precautions to ensure that there is no one checking or working on the machine. To this end, a suitable notice shall be affixed to the start equipment. 10.On units with automatic start-stop system, a sign stating "This machine may start without warning" shall be attached near the instrument panel.11.In multiple compressor systems manual valves shall be installed to isolate each compressor. Non-return valves (check valves) shall not be relied upon for isolating pressure systems.12.Never remove or tamper with the safety devices, guards or insulations fitted on the unit. Every pressure vessel or auxiliary installed outside the unit to contain air above atmospheric pressure shall be protected by a pressure-relieving device or devices as required.13.Pipework or other parts with a temperature in excess of 80 degrees celsius and which may be accidentally touched by personnel in nor-mal operation shall be guarded or insulated. Other high-temperature pipework shall be clearly marked. OWNERSHIP DA T A In addition to normal safety rules which should be observed with stationary air compressors and equipment, the following safety directions and precautions are of special importance. When operating this unit, the operator must employ safe working practices and observe all related local work safety requirements and ordinances.The owner is responsible for maintaining the unit in a safe operating condition. Parts and accessories shall be replaced if unsuitable for safe operation. Installation, operation, maintenance and repair shall only be performed by authorized, trained, competent personnel. Normal ratings (pressures, temperatures, time settings, etc.) shall be durably marked. Any modification on the compressor or air dryer shall only be performed in agreement with Atlas Copco and under supervision of authorized,competent personnel. If any statement in this book, especially with regard to safety, does not comply with local legislation, the stricter of the two shall apply.These precautions are general and cover several machine types and equipment; hence some statements may not apply to the unit(s) described in this book. Installation Apart from general engineering practice in conformity with the local safety regulations, the following directives are specially stressed:1. A compressor or air dryer shall be lifted only with adequate equipment in conformity with local safety rules. Loose or pivoting parts shall be securely fastened before lifting. It is strictly forbidden to dwell or stay in the risk zone under a lifted load.Lifting acceleration and retardation shall be kept within safe limits.Wear a safety helmet when working in the area of overhead or lifting equipment. 2.Any blanking flanges, plugs, caps and desiccant bags shall be removed before connecting up the pipes. Distribution pipes and connections shall be of correct size and suitable for the working pressure.3.Place the unit where the ambient air is as cool and clean as possible.2920 1377 03 1/2 (continued on inside of cover)