
Android自定义ViewGroup(四、打造
自己的布局容器)
1. 简单实现水平排列效果
我们先自定义一个ViewGroup作为布局容器,实现一个从左往右水平排列(排满换行)的效果:
/**
* 自定义布局管理器的示例。
*/
public class CustomLayout extends ViewGroup {
private static final String TAG = "CustomLayout";
public CustomLayout(Context context) {
super(context);
}
public CustomLayout(Context context, AttributeSet attrs) {
this(context, attrs, 0);
}
public CustomLayout(Context context, AttributeSet attrs, int defStyle) {
super(context, attrs, defStyle);
}
/**
* 要求所有的孩子测量自己的大小,然后根据这些孩子的大小完成自己的尺寸测量*/
@SuppressLint("NewApi") @Override
protected void onMeasure( int widthMeasureSpec, int heightMeasureSpec) {
// 计算出所有的childView的宽和高
measureChildren(widthMeasureSpec, heightMeasureSpec);
//测量并保存layout的宽高(使用getDefaultSize时,wrap_content和match_perent 都是填充屏幕)
//稍后会重新写这个方法,能达到wrap_content的效果
setMeasuredDimension( getDefaultSize(getSuggestedMinimumWidth(), widthMeasureSpec),
getDefaultSize(getSuggestedMinimumHeight(), heightMeasureSpec));
}
/**
* 为所有的子控件摆放位置.
*/
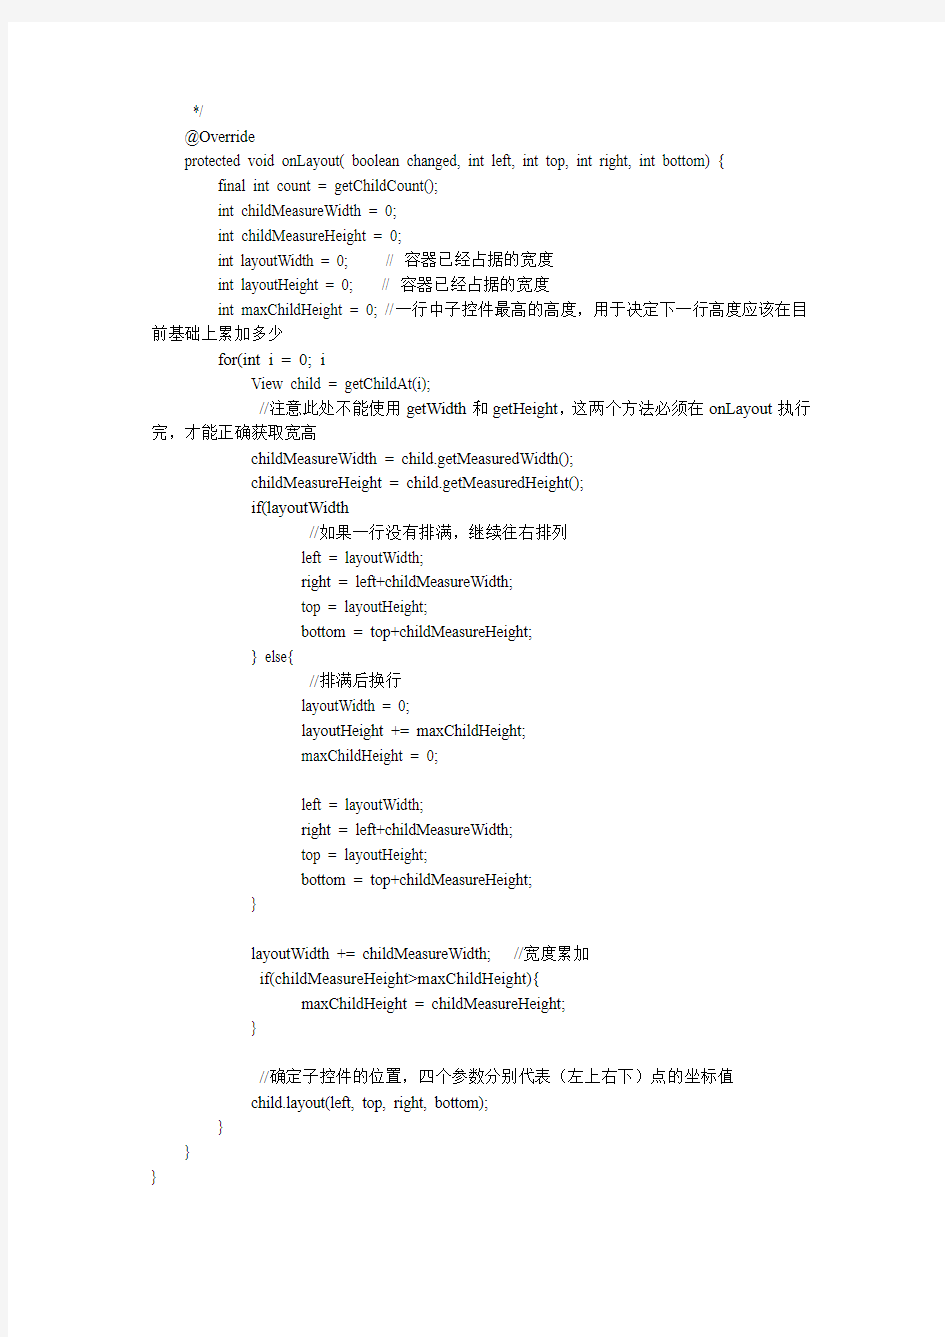
@Override
protected void onLayout( boolean changed, int left, int top, int right, int bottom) { final int count = getChildCount();
int childMeasureWidth = 0;
int childMeasureHeight = 0;
int layoutWidth = 0; // 容器已经占据的宽度
int layoutHeight = 0; // 容器已经占据的宽度
int maxChildHeight = 0; //一行中子控件最高的高度,用于决定下一行高度应该在目前基础上累加多少
for(int i = 0; i View child = getChildAt(i); //注意此处不能使用getWidth和getHeight,这两个方法必须在onLayout执行完,才能正确获取宽高 childMeasureWidth = child.getMeasuredWidth(); childMeasureHeight = child.getMeasuredHeight(); if(layoutWidth //如果一行没有排满,继续往右排列 left = layoutWidth; right = left+childMeasureWidth; top = layoutHeight; bottom = top+childMeasureHeight; } else{ //排满后换行 layoutWidth = 0; layoutHeight += maxChildHeight; maxChildHeight = 0; left = layoutWidth; right = left+childMeasureWidth; top = layoutHeight; bottom = top+childMeasureHeight; } layoutWidth += childMeasureWidth; //宽度累加 if(childMeasureHeight>maxChildHeight){ maxChildHeight = childMeasureHeight; } //确定子控件的位置,四个参数分别代表(左上右下)点的坐标值 https://www.doczj.com/doc/be17781907.html,yout(left, top, right, bottom); } } } xmlns:android="https://www.doczj.com/doc/be17781907.html,/apk/res/android" android:layout_width= "wrap_content" android:layout_height= "wrap_content" > android:layout_width= "wrap_content" android:layout_height= "wrap_content" android:background= "#FF8247" android:textColor= "#ffffff" android:textSize="20dip" android:padding= "20dip" android:text="按钮1" /> android:layout_width= "wrap_content" android:layout_height= "wrap_content" android:background= "#8B0A50" android:textColor= "#ffffff" android:textSize="20dip" android:padding= "10dip" android:text="按钮2222222222222" /> android:layout_width= "wrap_content" android:layout_height= "wrap_content" android:background= "#7CFC00" android:textColor= "#ffffff" android:textSize="20dip" android:padding= "15dip" android:text="按钮333333" /> android:layout_width= "wrap_content" android:layout_height= "wrap_content" android:background= "#1E90FF" android:textColor= "#ffffff" android:textSize="10dip" android:padding= "10dip" android:text="按钮4" /> android:layout_width= "wrap_content" android:layout_height= "wrap_content" android:background= "#191970" android:textColor= "#ffffff" android:textSize="20dip" android:padding= "15dip" android:text="按钮5" /> android:layout_width= "wrap_content" android:layout_height= "wrap_content" android:background= "#7A67EE" android:textColor= "#ffffff" android:textSize="20dip" android:padding= "20dip" android:text="按钮6" /> 2. 自定义LayoutParams 回想一下我们平时使用RelativeLayout的时候,在布局文件中使用android:layout_alignParentRight="true"、android:layout_centerInParent="true"等各种属性,就能控制子控件显示在父控件的上下左右、居中等效果。,我们有了解过https://www.doczj.com/doc/be17781907.html,youtParams类,ViewGroup中有两个内部类https://www.doczj.com/doc/be17781907.html,youtParams和ViewGroup.MarginLayoutParams,MarginLayoutParams继承自LayoutParams,这两个内部类就是ViewGroup的布局参数类,比如我们在LinearLayout等布局中使用的layout_width\layout_hight等以“layout_ ”开头的属性都是布局属性。 在View中有一个mLayoutParams的变量用来保存这个View的所有布局属性。https://www.doczj.com/doc/be17781907.html,youtParams有两个属性layout_width和layout_height,因为所有的容器都需要 设置子控件的宽高,所以这个LayoutParams是所有布局参数的基类,如果需要扩展其他属性,都应该继承自它。比如RelativeLayout中就提供了它自己的布局参数类https://www.doczj.com/doc/be17781907.html,youtParams,并扩展了很多布局参数,我们平时在RelativeLayout中使用的布局属性都来自它: 看了上面的介绍,我们大概知道怎么为我们的布局容器定义自己的布局属性了吧,就不绕弯子了,按照下面的步骤做: ①. 大致明确布局容器的需求,初步定义布局属性 在定义属性之前要弄清楚,我们自定义的布局容器需要满足那些需求,需要哪些属性,比如,我们现在要实现像相对布局一样,为子控件设置一个位置属性layout_position=”“,来控制子控件在布局中显示的位置。暂定位置有五种:左上、左下、右上、右下、居中。有了需求,我们就在attr.xml定义自己的布局属性(和之前讲的自定义属性一样的操作)。 left就代表是左上(按常理默认就是左上方开始,就不用写leftTop了,简洁一点),bottom 左下,right 右上,rightAndBottom右下,center居中。属性类型是枚举,同时只能设置一个值。 ②. 继承LayoutParams,定义布局参数类 我们可以选择继承https://www.doczj.com/doc/be17781907.html,youtParams,这样的话我们的布局只是简单的支持layout_width和layout_height;也可以继承MarginLayoutParams,就能使用layout_marginxxx 属性了。因为后面我们还要用到margin属性,所以这里方便起见就直接继承MarginLayoutParams了。 覆盖构造方法,然后在有AttributeSet参数的构造方法中初始化参数值,这个构造方法才是布局文件被映射为对象的时候被调用的。 public static class CustomLayoutParams extends MarginLayoutParams { public static final int POSITION_MIDDLE = 0; // 中间 public static final int POSITION_LEFT = 1; // 左上方 public static final int POSITION_RIGHT = 2; // 右上方 public static final int POSITION_BOTTOM = 3; // 左下角 public static final int POSITION_RIGHTANDBOTTOM = 4; // 右下角 public int position = POSITION_LEFT; // 默认我们的位置就是左上角 public CustomLayoutParams(Context c, AttributeSet attrs) { super(c, attrs); TypedArray a = c.obtainStyledAttributes(attrs,R.styleable.CustomLayout ); //获取设置在子控件上的位置属性 position = a.getInt(R.styleable.CustomLayout_layout_position ,position ); a.recycle(); } public CustomLayoutParams( int width, int height) { super(width, height); } public CustomLayoutParams(https://www.doczj.com/doc/be17781907.html,youtParams source) { super(source); } } ③. 重写generateLayoutParams() 在ViewGroup中有下面几个关于LayoutParams的方法,generateLayoutParams (AttributeSet attrs)是在布局文件被填充为对象的时候调用的,这个方法是下面几个方法中最重要的,如果不重写它,我么布局文件中设置的布局参数都不能拿到。后面我也会专门写一篇博客来介绍布局文件被添加到activity窗口的过程,里面会讲到这个方法被调用的来龙去脉。其他几个方法我们最好也能重写一下,将里面的LayoutParams换成我们自定义的CustomLayoutParams类,避免以后会遇到布局参数类型转换异常。 @Override public LayoutParams generateLayoutParams(AttributeSet attrs) { return new CustomLayoutParams(getContext(), attrs); } @Override protected https://www.doczj.com/doc/be17781907.html,youtParams generateLayoutParams(https://www.doczj.com/doc/be17781907.html,youtParams p) { return new CustomLayoutParams (p); } @Override protected LayoutParams generateDefaultLayoutParams() { return new CustomLayoutParams (LayoutParams.MATCH_PARENT , LayoutParams.MATCH_PARENT); } @Override protected boolean checkLayoutParams(https://www.doczj.com/doc/be17781907.html,youtParams p) { return p instanceof CustomLayoutParams ; } ④. 在布局文件中使用布局属性 注意引入命名空间xmlns:openxu= "https://www.doczj.com/doc/be17781907.html,/apk/res/包名" xmlns:android="https://www.doczj.com/doc/be17781907.html,/apk/res/android" xmlns:openxu= "https://www.doczj.com/doc/be17781907.html,/apk/res/com.openxu.costomlayout" android:background="#33000000" android:layout_width= "match_parent " android:layout_height= "match_parent" > android:layout_width= "wrap_content" android:layout_height= "wrap_content" openxu:layout_position= "left" android:background= "#FF8247" android:textColor= "#ffffff" android:textSize="20dip" android:padding= "20dip" android:text= "按钮1" /> android:layout_width= "wrap_content" android:layout_height= "wrap_content" openxu:layout_position= "right" android:background= "#8B0A50" android:textColor= "#ffffff" android:textSize= "18dip" android:padding= "10dip" android:text= "按钮2222222222222" /> android:layout_width= "wrap_content" android:layout_height= "wrap_content" openxu:layout_position= "bottom" android:background= "#7CFC00" android:textColor= "#ffffff" android:textSize= "20dip" android:padding= "15dip" android:text= "按钮333333" /> android:layout_width= "wrap_content" android:layout_height= "wrap_content" openxu:layout_position= "rightAndBottom" android:background= "#1E90FF" android:textColor= "#ffffff" android:textSize= "15dip" android:padding= "10dip" android:text= "按钮4" /> android:layout_width= "wrap_content" android:layout_height= "wrap_content" openxu:layout_position= "center" android:background= "#191970" android:textColor= "#ffffff" android:textSize= "20dip" android:padding= "15dip" android:text= "按钮5" /> ④. 在布局文件中使用布局属性 注意引入命名空间xmlns:openxu= "https://www.doczj.com/doc/be17781907.html,/apk/res/包名" xmlns:android="https://www.doczj.com/doc/be17781907.html,/apk/res/android" xmlns:openxu= "https://www.doczj.com/doc/be17781907.html,/apk/res/com.openxu.costomlayout" android:background="#33000000" android:layout_width= "match_parent " android:layout_height= "match_parent" > android:layout_width= "wrap_content" android:layout_height= "wrap_content" openxu:layout_position= "left" android:background= "#FF8247" android:textColor= "#ffffff" android:textSize="20dip" android:padding= "20dip" android:text= "按钮1" /> android:layout_width= "wrap_content" android:layout_height= "wrap_content" openxu:layout_position= "right" android:background= "#8B0A50" android:textColor= "#ffffff" android:textSize= "18dip" android:padding= "10dip" android:text= "按钮2222222222222" /> android:layout_width= "wrap_content" android:layout_height= "wrap_content" openxu:layout_position= "bottom" android:background= "#7CFC00" android:textColor= "#ffffff" android:textSize= "20dip" android:padding= "15dip" android:text= "按钮333333" /> android:layout_width= "wrap_content" android:layout_height= "wrap_content" openxu:layout_position= "rightAndBottom" android:background= "#1E90FF" android:textColor= "#ffffff" android:textSize= "15dip" android:padding= "10dip" android:text= "按钮4" /> android:layout_width= "wrap_content" android:layout_height= "wrap_content" openxu:layout_position= "center" android:background= "#191970" android:textColor= "#ffffff" android:textSize= "20dip" android:padding= "15dip" android:text= "按钮5" /> ⑤. 在onMeasure和onLayout中使用布局参数 经过上面几步之后,我们运行程序,就能获取子控件的布局参数了,在onMeasure 方法和onLayout方法中,我们按照自定义布局容器的特殊需求,对宽度和位置坐特殊处理。这里我们需要注意一下,如果布局容器被设置为包裹类容,我们只需要保证能将最大的子控件包裹住就ok,代码注释比较详细,就不多说了。 @Override protected void onMeasure( int widthMeasureSpec, int heightMeasureSpec) { //获得此ViewGroup上级容器为其推荐的宽和高,以及计算模式 int widthMode = MeasureSpec. getMode(widthMeasureSpec); int heightMode = MeasureSpec. getMode(heightMeasureSpec); int sizeWidth = MeasureSpec. getSize(widthMeasureSpec); int sizeHeight = MeasureSpec. getSize(heightMeasureSpec); int layoutWidth = 0; int layoutHeight = 0; // 计算出所有的childView的宽和高 measureChildren(widthMeasureSpec, heightMeasureSpec); int cWidth = 0; int cHeight = 0; int count = getChildCount(); if(widthMode == MeasureSpec. EXACTL Y){ //如果布局容器的宽度模式是确定的(具体的size或者match_parent),直接使用父窗体建议的宽度 layoutWidth = sizeWidth; } else{ //如果是未指定或者wrap_content,我们都按照包裹内容做,宽度方向上只需要拿到所有子控件中宽度做大的作为布局宽度 for ( int i = 0; i < count; i++) { View child = getChildAt(i); cWidth = child.getMeasuredWidth(); //获取子控件最大宽度 layoutWidth = cWidth > layoutWidth ? cWidth : layoutWidth; } } //高度很宽度处理思想一样 if(heightMode == MeasureSpec. EXACTL Y){ layoutHeight = sizeHeight; } else{ for ( int i = 0; i < count; i++) { View child = getChildAt(i); cHeight = child.getMeasuredHeight(); layoutHeight = cHeight > layoutHeight ? cHeight : layoutHeight; } } // 测量并保存layout的宽高 setMeasuredDimension(layoutWidth, layoutHeight); } @Override protected void onLayout( boolean changed, int left, int top, int right, int https://www.doczj.com/doc/be17781907.html,ttom) { final int count = getChildCount(); int childMeasureWidth = 0; int childMeasureHeight = 0; CustomLayoutParams params = null; for ( int i = 0; i < count; i++) { View child = getChildAt(i); // 注意此处不能使用getWidth和getHeight,这两个方法必须在onLayout 执行完,才能正确获取宽高 childMeasureWidth = child.getMeasuredWidth(); childMeasureHeight = child.getMeasuredHeight(); params = (CustomLayoutParams) child.getLayoutParams(); switch (params. https://www.doczj.com/doc/be17781907.html,ion) { case CustomLayoutParams. POSITION_MIDDLE: // 中间 left = (getWidth()-childMeasureWidth)/2; top = (getHeight()-childMeasureHeight)/2; break; case CustomLayoutParams. POSITION_LEFT: // 左上方 left = 0; top = 0; break; case CustomLayoutParams. POSITION_RIGHT: // 右上方 left = getWidth()-childMeasureWidth; top = 0; break; case CustomLayoutParams. POSITION_BOTTOM: // 左下角 left = 0; top = getHeight()-childMeasureHeight; break; case CustomLayoutParams. POSITION_RIGHTANDBOTTOM:// 右下角 left = getWidth()-childMeasureWidth; top = getHeight()-childMeasureHeight; break; default: break; } // 确定子控件的位置,四个参数分别代表(左上右下)点的坐标值 https://www.doczj.com/doc/be17781907.html,yout(left, top, left+childMeasureWidth, top+childMeasureHeight); } } 从运行结果看,我们自定义的布局容器在各种宽高设置下都能很好的测量大小和摆放 子控件。现在我们让他支持margin属性 3. 支持layout_margin属性 如果我们自定义的布局参数类继承自MarginLayoutParams,就自动支持了layout_margin属性了,我们需要做的就是直接在布局文件中使用layout_margin属性,然后再onMeasure和onLayout中使用margin属性值测量和摆放子控件。需要注意的是我们测量子控件的时候应该调用measureChildWithMargin()方法。 布局文件: xmlns:android="https://www.doczj.com/doc/be17781907.html,/apk/res/android" xmlns:openxu= "https://www.doczj.com/doc/be17781907.html,/apk/res/com.openxu.costomlayout" android:background="#33000000" android:layout_width= "match_parent" android:layout_height= "match_parent" > android:layout_width= "wrap_content" android:layout_height= "wrap_content" openxu:layout_position= "left" android:layout_marginLeft = "20dip" android:background= "#FF8247" android:textColor= "#ffffff" android:textSize="20dip" android:padding= "20dip" android:text="按钮1" /> android:layout_width= "wrap_content" android:layout_height= "wrap_content" android:layout_marginTop = "30dip" openxu:layout_position= "right" android:background= "#8B0A50" android:textColor= "#ffffff" android:textSize="18dip" android:padding= "10dip" android:text="按钮2222222222222" /> android:layout_width= "wrap_content" android:layout_height= "wrap_content" android:layout_marginLeft = "30dip" android:layout_marginBottom = "10dip" openxu:layout_position= "bottom" android:background= "#7CFC00" android:textColor= "#ffffff" android:textSize="20dip" android:padding= "15dip" android:text="按钮333333" /> android:layout_width= "wrap_content" android:layout_height= "wrap_content" openxu:layout_position= "rightAndBottom" android:layout_marginBottom = "30dip" android:background= "#1E90FF" android:textColor= "#ffffff" android:textSize="15dip" android:padding= "10dip" android:text="按钮4" /> android:layout_width= "wrap_content" android:layout_height= "wrap_content" openxu:layout_position= "center" android:layout_marginBottom = "30dip" android:layout_marginRight = "30dip" android:background= "#191970" android:textColor= "#ffffff" android:textSize="20dip" android:padding= "15dip" android:text="按钮5" /> onMeasure和onLayout: protected void onMeasure(int widthMeasureSpec, int heightMeasureSpec) { // 获得此ViewGroup上级容器为其推荐的宽和高,以及计算模式int widthMode = MeasureSpec. getMode(widthMeasureSpec); int heightMode = MeasureSpec. getMode(heightMeasureSpec); int sizeWidth = MeasureSpec. getSize(widthMeasureSpec); int sizeHeight = MeasureSpec. getSize(heightMeasureSpec); int layoutWidth = 0; int layoutHeight = 0; int cWidth = 0; int cHeight = 0; int count = getChildCount(); // 计算出所有的childView的宽和高 for( int i = 0; i < count; i++){ View child = getChildAt(i); measureChildWithMargins(child, widthMeasureSpec, 0, heightMeasureSpec, 0); } CustomLayoutParams params = null; if(widthMode == MeasureSpec. EXACTL Y){ //如果布局容器的宽度模式时确定的(具体的size或者match_parent) layoutWidth = sizeWidth; } else{ //如果是未指定或者wrap_content,我们都按照包裹内容做,宽度方向上只需要拿到所有子控件中宽度做大的作为布局宽度 for ( int i = 0; i < count; i++) { View child = getChildAt(i); cWidth = child.getMeasuredWidth(); params = (CustomLayoutParams) child.getLayoutParams(); //获取子控件宽度和左右边距之和,作为这个控件需要占据的宽度 int marginWidth = cWidth+params.leftMargin+params.rightMargin ; layoutWidth = marginWidth > layoutWidth ? marginWidth : layoutWidth; } } //高度很宽度处理思想一样 if(heightMode == MeasureSpec. EXACTL Y){ layoutHeight = sizeHeight; } else{ for ( int i = 0; i < count; i++) { View child = getChildAt(i); cHeight = child.getMeasuredHeight(); params = (CustomLayoutParams) child.getLayoutParams(); int marginHeight = cHeight+params.topMargin+params.bottomMargin ; layoutHeight = marginHeight > layoutHeight ? marginHeight : layoutHeight; } } // 测量并保存layout的宽高 setMeasuredDimension(layoutWidth, layoutHeight); } @Override protected void onLayout( boolean changed, int left, int top, int right, int bottom) { final int count = getChildCount(); int childMeasureWidth = 0; int childMeasureHeight = 0; CustomLayoutParams params = null; for ( int i = 0; i < count; i++) { View child = getChildAt(i); // 注意此处不能使用getWidth和getHeight,这两个方法必须在onLayout 执行完,才能正确获取宽高 childMeasureWidth = child.getMeasuredWidth(); childMeasureHeight = child.getMeasuredHeight(); params = (CustomLayoutParams) child.getLayoutParams(); switch (params. position) { case CustomLayoutParams. POSITION_MIDDLE: // 中间 left = (getWidth()-childMeasureWidth)/2 - params.rightMargin + params.leftMargin ; top = (getHeight()-childMeasureHeight)/2 + params.topMargin - params.bottomMargin ; break; case CustomLayoutParams. POSITION_LEFT: // 左上方 left = 0 + params. leftMargin; top = 0 + params. topMargin; break; case CustomLayoutParams. POSITION_RIGHT: // 右上方 left = getWidth()-childMeasureWidth - params.rightMargin; top = 0 + params. topMargin; break; case CustomLayoutParams. POSITION_BOTTOM: // 左下角 left = 0 + params. leftMargin; top = getHeight()-childMeasureHeight-params.bottomMargin ; break; case CustomLayoutParams. POSITION_RIGHTANDBOTTOM:// 右下角 left = getWidth()-childMeasureWidth - params.rightMargin; top = getHeight()-childMeasureHeight-params.bottomMargin ; break; default: break; } // 确定子控件的位置,四个参数分别代表(左上右下)点的坐标值 https://www.doczj.com/doc/be17781907.html,yout(left, top, left+childMeasureWidth, top+childMeasureHeight); } } 好了,就写到这里,如果想尝试设置其他属性,比如above、below等,感兴趣的同学可以尝试一下哦~。其实也没什么难的,无非就是如果布局属性定义的多,那么在onMeasure 和onLayout中考虑的问题就更多更复杂,自定义布局容器就是根据自己的需求,让容器满足我们特殊的摆放要求。 总结一下今天学习的内容,这篇博客主要学习了两个知识点: 自定义ViewGroup的步骤: ①. 继承ViewGroup,覆盖构造方法 ②. 重写onMeasure方法测量子控件和自身宽高 ③. 实现onLayout方法摆放子控件 为布局容器自定义布局属性: ①. 大致明确布局容器的需求,初步定义布局属性 ②. 继承LayoutParams,定义布局参数类 ③. 重写获取布局参数的方法 ④. 在布局文件中使用布局属性 ⑤. 在onMeasure和onLayout中使用布局参数 Android布局属性大全 布局: AbsoluteLayout(绝对布局): xmlns:android="https://www.doczj.com/doc/be17781907.html,/apk/res/android" style="@..." android:clipChildren="true|false" android:clipToPadding="true|false" android:layoutAnimation="@---" android:animationCache="true|false" android:persistentDrawingCache="none|animation|scrolling|all":持续高速缓存绘图 android:alwaysDrawnWithCache="true|false" android:andStatesFromChildre="true|false" android:descendantFocusability="beforeDescendants|afterDescendants|bl ocksDescendants":后裔可聚焦 android:id="@+id/absoluteLayout" android:tag="@---" android:android:scrollX="---" android:android:scrollY="---" android:background="@---" android:padding="----" android:paddingLeft="----" android:paddingTop="----" android:paddingRight="----" android:paddingBotton="---" android:focusable="true|false" android:focusableInTouchMode="true|false" android:visibility="visible|invisible|gone" android:fitsSystemWindows="true|false":适合系统窗口 android:scrollbars="none|horizontal|vertical" android:scrollbarStyle="insideOverlay(内覆盖)|insideInset(内插 图)|outsideOverlay(外覆盖)|outsideInset(外插图)" android:isScrollContainer="true|false":是一个滚动集合 android:fadeScrollbars="true|false":褪色的滚动条 android:scrollbarFadeDuration="---":卷轴淡出 android:scrollDefaultDelayBeforeFade="---":滚动前默认延迟 android:scrollbarSize="---" android:scrollbarThumbHorizontal="@----":拇指水平滚动条 android:scrollbarThumbVertical="@----":拇指垂直滚动条 android:scrollbarTrackVertical="@---":垂直滚动条轨道 android:scrollbarTrackHorizontal="@---":水平滚动条轨道 android:scrollbarAlwaysDrawHorizontalTrack="true|false":水平滚动条总是吸引轨道 RelativeLayout用到的一些重要的属性: 第一类:属性值为true或false android:layout_centerHrizontal 水平居中 android:layout_centerVertical 垂直居中 android:layout_centerInparent 相对于父元素完全居中 android:layout_alignParentBottom 贴紧父元素的下边缘 android:layout_alignParentLeft 贴紧父元素的左边缘 android:layout_alignParentRight 贴紧父元素的右边缘 android:layout_alignParentTop 贴紧父元素的上边缘 android:layout_alignWithParentIfMissing 如果对应的兄弟元素找不到的话就以父元素做参照物 第二类:属性值必须为id的引用名“@id/id-name” android:layout_below 在某元素的下方 android:layout_above 在某元素的的上方 android:layout_toLeftOf 在某元素的左边 android:layout_toRightOf 在某元素的右边 android:layout_alignTop 本元素的上边缘和某元素的的上边缘对齐 android:layout_alignLeft 本元素的左边缘和某元素的的左边缘对齐 android:layout_alignBottom 本元素的下边缘和某元素的的下边缘对齐 android:layout_alignRight 本元素的右边缘和某元素的的右边缘对齐 第三类:属性值为具体的像素值,如30dip,40px android:layout_marginBottom 离某元素底边缘的距离 android:layout_marginLeft 离某元素左边缘的距离 android:layout_marginRight 离某元素右边缘的距离 android:layout_marginTop 离某元素上边缘的距离 EditText的android:hint 设置EditText为空时输入框内的提示信息。 android:gravity android:gravity属性是对该view 内容的限定.比如一个button 上面的text. 你可以设置该text 在view的靠左,靠右等位置.以button为例,android:gravity="right"则button上面的文字靠右 android:layout_gravity android:layout_gravity是用来设置该view相对与起父view 的位置.比如一个button 在 Android 开发之旅:view的几种布局方式及实践 https://www.doczj.com/doc/be17781907.html,/1943397/363552 2010-06-06 14:14:00 标签:布局 View 实践移动开发 Android 原创作品,允许转载,转载时请务必以超链接形式标明文章原始出处、作者信息和本声明。否则将追究法律责任。 https://www.doczj.com/doc/be17781907.html,/1943397/363552 引言 通过前面两篇: 1.Android 开发之旅:又见Hello World! 2.Android 开发之旅:深入分析布局文件&又是“Hello World!” 我们对Android应用程序运行原理及布局文件可谓有了比较深刻的认识和理解,并且用“Hello World!”程序来实践证明了。在继续深入Android开发之旅之前,有必要解决前两篇中没有介绍的遗留问题:View的几种布局显示方法,以后就不会在针对布局方面做过多的介绍。View的布局显示方式有下面几种:线性布局(Linear Layout)、相对布局(Relative Layout)、表格布局(Table Layout)、网格视图(Grid View)、标签布局(Tab Layout)、列表视图(List View)、绝对布局(AbsoluteLayout)。本文虽然是介绍View的布局方式,但不仅仅是这样,其中涉及了很多小的知识点,绝对能给你带来Android大餐! 本文的主要内容就是分别介绍以上视图的七种布局显示方式效果及实现,大纲如下: 1.1、View布局概述 2.2、线性布局(Linear Layout) 1. 2.1、Tips:android:layout_weight="1" 3.3、相对布局(Relative Layout) 4.4、表格布局(Table Layout) 5.5、列表视图(List View) 1. 5.1、一个小的改进 2. 5.2、补充说明 6.6、网格视图(Grid View) 7.7 、绝对布局() 8.8、标签布局(Tab Layout) 1、view的布局显示概述 通过前面的学习我们知道:在一个Android应用程序中,用户界面通过View和ViewGroup对象构建。Android中有很多种View和ViewGroup,他们都继承自View类。View对象是Android平台上表示用户界面的基本单元。 View的布局显示方式直接影响用户界面,View的布局方式是指一组View元素如何布局,准确的说是一个ViewGroup中包含的一些View怎么样布局。ViewGroup类是布局(layout)和视图容器(View container)的基类,此类也定义了https://www.doczj.com/doc/be17781907.html,youtParams类,它作为布局参数的基类,此类告诉父视图其中的子视图想如何显示。例如,XML布局文件中名为layout_something的属性(参加上篇的4.2节)。我们要介绍的View的布局方式的类,都是直接或间接继承自ViewGroup类,如下图所示: 我们对Android应用程序运行原理及布局文件可谓有了比较深刻的认识和理解,并且用“Hello World!” 程序来实践证明了。在继续深入Android开发之旅之前,有必要解决前两篇中没有介绍的遗留问题:View 的几种布局显示方法,以后就不会在针对布局方面做过多的介绍。View的布局显示方式有下面几种: 线性布局(Linear Layout)、 相对布局(Relative Layout)、 表格布局(Table Layout)、 网格视图(Grid View)、 标签布局(Tab Layout)、 列表视图(List View)、 绝对布局(AbsoluteLayout)。本文虽然是介绍View的布局方式,但不仅仅是这样,其中涉及了很多小的知识点,绝对能给你带来Android大餐! 本文的主要内容就是分别介绍以上视图的七种布局显示方式效果及实现,大纲如下: ?1、View布局概述 ?2、线性布局(Linear Layout) o 2.1、Tips:android:layout_weight="1" ?3、相对布局(Relative Layout) ?4、表格布局(Table Layout) ?5、列表视图(List View) o 5.1、一个小的改进 o 5.2、补充说明 ?6、网格视图(Grid View) ?7 、绝对布局() ?8、标签布局(Tab Layout) 1、view的布局显示概述 通过前面的学习我们知道:在一个Android应用程序中,用户界面通过View和ViewGroup对象构建。A ndroid中有很多种View和ViewGroup,他们都继承自View类。View对象是Android平台上表示用户界面的基本单元。 View的布局显示方式直接影响用户界面,View的布局方式是指一组View元素如何布局,准确的说是一个ViewGroup中包含的一些View怎么样布局。ViewGroup类是布局(layout)和视图容器(View containe r)的基类,此类也定义了https://www.doczj.com/doc/be17781907.html,youtParams类,它作为布局参数的基类,此 类告诉父视图其中的子视图想如何显示。例如,XML布局文件中名为layout_so mething的属性(参加上篇的4.2节)。我们要介绍的View的布局方式的类,都是直接或间接继承自ViewGroup类,如下图所示: Android 布局详解【图文】 Android 布局是开发中非常重要的一个知识部分,它的布局分为以下几种: Linear Layout:线性布局 Relative Layout:相对布局 Table Layout:表格布局 FrameLayout AbsoluteLayout Grid View:网格布局 Tab Layout:选项卡布局 List View:列表布局 一、Linear Layout 简单来说,直着排,横着排都可以,还可以嵌套,此布局运用的非常多。下面直接上示例代码及截图: 接下来,看一下布局XML文件: Android布局属性大全
android布局属性详解
Android 开发之旅-view的几种布局方式及实践
Android七种布局解析
Android_布局详解【图文】