Create a Fire and Rust Text Effect Using the Flame Filter in Adobe Photoshop CC
What You'll Be Creating
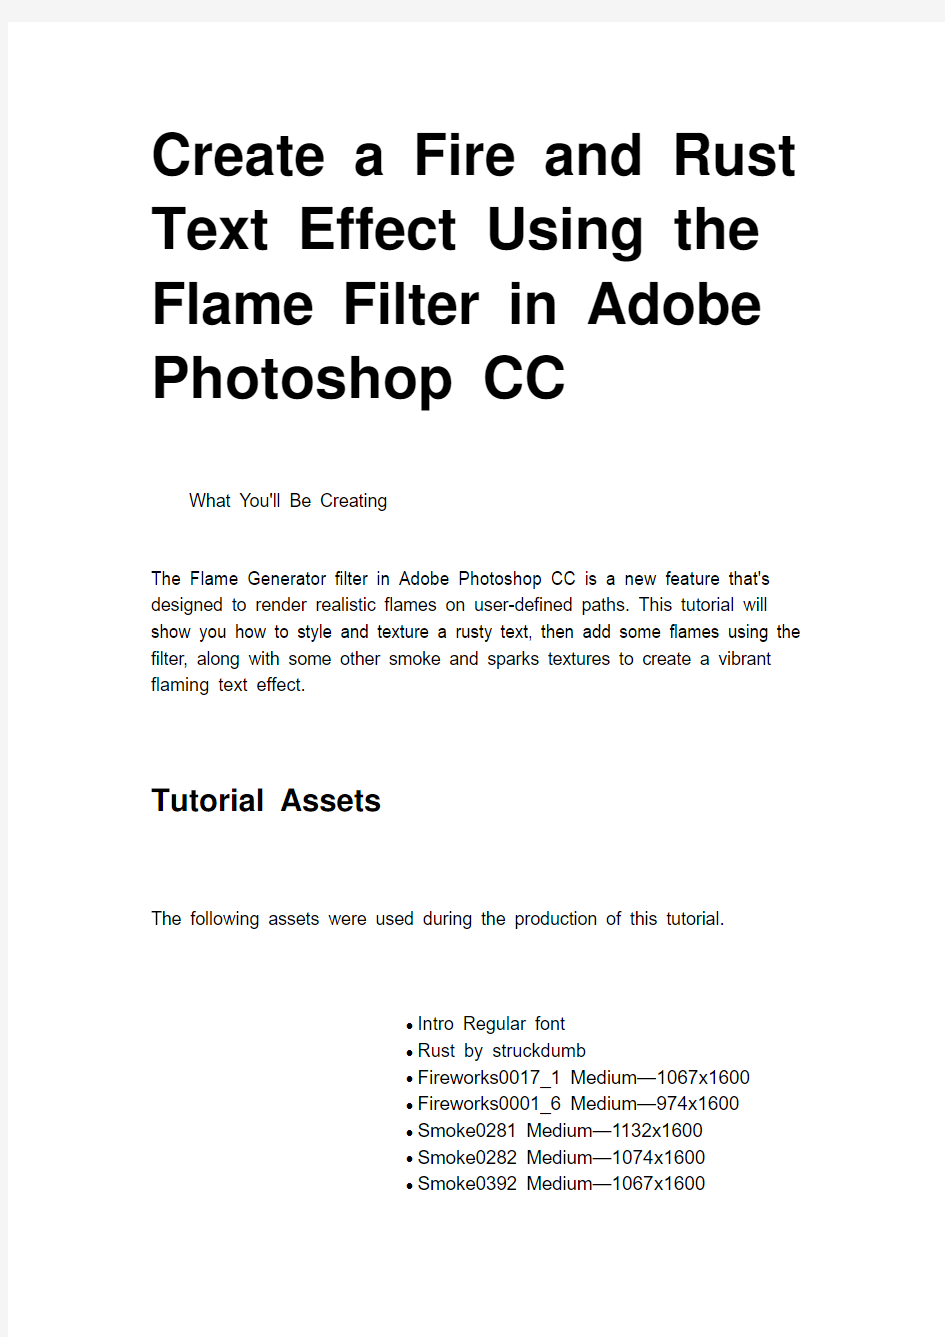
The Flame Generator filter in Adobe Photoshop CC is a new feature that's designed to render realistic flames on user-defined paths. This tutorial will show you how to style and texture a rusty text, then add some flames using the filter, along with some other smoke and sparks textures to create a vibrant flaming text effect.
Tutorial Assets
The following assets were used during the production of this tutorial.
?Intro Regular font
?Rust by struckdumb
?Fireworks0017_1 Medium—1067x1600
?Fireworks0001_6 Medium—974x1600
?Smoke0281 Medium—1132x1600
?Smoke0282 Medium—1074x1600
?Smoke0392 Medium—1067x1600
1. Creating the Background and the Text, and Styling the Text
Step 1
Create a new 1740 x 1170 px document, and fill it with the color #111111.
Then, create the text using the font Intro Regular, the color #d2b593,
the Size350 pt, and change the Tracking value to 50, or whatever other value you like depending on the result you're looking for.
Step 2
Double-click the text layer to apply the following layer style: Add a Bevel and Emboss with these settings:
?Technique: Chisel Hard
?Size: 35
?Highlight Mode: Vivid Light
?Color:#fae8c1
?Shadow Mode: Color Burn
?Color:#b07133
Step 3
Add a Contour with these settings:
?Contour: Gaussian
?Check the Anti-aliased box. Step 4
Add an Inner Shadow with these settings:
?Blend Mode: Color Burn
?Color:#b0764c
?Distance: 0
?Size: 8
Step 5
Add an Inner Glow with these settings:
?Blend Mode: Linear Light
?Color:#dd8238
Step 6
Add an Outer Glow with these settings:
?Blend Mode: Linear Light
?Color:#edc09f
Step 7
This will style the text and give it a 3D look.
2. Adding the Rust Texture and Smudging the Edges of the Text
Step 1
Place the Rust texture on top of the text layer, rename its layer to Texture and change its Blend Mode to Multiply, and then right-click it and choose Create Clipping Mask.
Once you do that, the texture will be clipped to the text, and you can then resize and move the texture around until you like the result you get.
Step 2
Select both the text and the Texture layers, duplicate them, then go to Layer > Merge Layers. Make sure that the merged layer's Blend Mode is set
to Normal.
Step 3
Right-click the text layer and choose Create Work Path.
Step 4
Pick the Smudge Tool, choose a 25 px soft round tip, and make sure that
the Mode and Strength values in the Options bar are set to Normal and 50%.
Select the Texture copy layer, then hit the Return key once to smudge the edges. Alternatively, you can pick the Direct Selection Tool (A), right-click the work path and choose Stroke path, then choose Smudge from
the Tool drop-down menu, uncheck the Simulate Pressure box, and
click OK.
With the Direct Selection Tool selected, hit the Return key to get rid of the work path.
Step 5
Place the Fireworks0017_1 image on top of all layers, change its
layer's Blend Mode to Linear Dodge (Add), go to Edit > Transform > Rotate 90° Clockwise, and resize it as you like.
Step 6
Go to Image > Adjustments > Hue/Saturation, check the Colorize box, and change the Hue to 35 and the Saturation to 50.
3. Adding the Paths and Rendering the Flames
Step 1
Pick the Pen Tool and choose the Path option in the Options bar. What you'll need to do next is add a couple of straight vertical paths randomly over the text.
To do so, click once where you want the path to start, press and hold
the Shift key, then click once more where you want the path to end. Then, press and hold the Command key and click anywhere outside the path so that you can start creating a separate new one.
Repeat the same steps until you create a couple of paths all over the text. Longer paths will give longer flames.
Step 2
Create a new layer on top of all layers and call it Flames.
Step 3
Go to Filter > Render > Flame, and use the following settings to create the flames:
?Flame Type: One Flame Along Path
This means that a single flame will be
rendered on each path.
?Width: 34
This value defines the flame's width in
pixels.
?Flame Lines (Complexity): 29
This setting controls the number of lines in
each flame.
?Turbulent: 49
This controls the calmness and roughness of
the flame.
?Jag: 43
Values greater than 0 result in a jagged
flame.
?Opacity: 40
This controls the flame's transperancy.
?Flame Bottom Alignment: 20
If set to 0, the flame's lines will be evenly
aligned. If greater than 0, they will be
randomized.
?Flame Style: Violent
?Flame Shape: Spread
This will make the lines that construct the
flame spread away from the center.
Check the Randomize Shapes box. Step 4
Once you click OK, the flames will be rendered. Pick the Direct Selection Tool and hit Return to get rid of the paths.
4. Styling the Flames
Step 1
Change the Flames layer's Blend Mode to Screen.
Step 2
Duplicate the Flames layer.
Step 3
Double click the Flames layer to apply an Outer Glow effect using the following settings:
?Blend Mode: Linear Dodge (Add)
?Opacity: 60%
?Color:#e0b455
?Size: 70
Step 4
This will make the flames a lot brighter and more vibrant.
Step 5
Create a new layer below the Flames layer and call it Dark Spots. Set the Foreground color to #111111 and pick the Brush Tool. Choose a soft
round tip, and add a dark spot right at the bottom of each flame. This will make the effect look more realistic.
5. Adding the Smoke
6.Step 1
Place the Smoke0281 and Smoke0282 images on top of all layers, and change the Blend Mode of both layers to Lighter Color. This will enable you to see the text behind them. Resize, rotate, and move those images around until you like how the smoke that covers the text looks.
Step 2
Select all the smoke texture layers you have, and then go to Layer > Merge Layers. Rename the merged layer to Smoke Top and change its Blend Mode to Lighter Color. Then, click the Add layer mask icon down
the Layers panel.
Step 3
Pick the Brush Tool, choose a soft round tip, and set the Foreground color to Black. Start painting all over the areas that you want to remove, so that the smoke covers the text and extends a little bit outside it.
6. Adding the Text Sparks
Step 1
Place the Fireworks0001_6 image right below the Dark Spots layer, change its layer's Blend Mode to Linear Dodge (Add), and resize it as needed.
Step 2
Command-click the text layer's thumbnail to create a selection.
Step 3
Click the Add layer mask icon again. This will remove all the texture parts outside the text.
Step 4
Pick the Brush Tool and set the Foreground color to White. Use a soft round tip to paint over some areas around the text's edges and corners to show back the sparks there. This will blend the sparks much better with the text without leaving lots of harsh edges.
7. Adding the Background Smoke
8.Step 1
Place the Smoke0392 image on top of the Background layer and change its layer's Blend Mode to Color Dodge. Go to Edit > Transform > Rotate 90°Clockwise, and then resize the texture as needed and place it behind the text.
Step 2
Go to Image > Adjustments > Hue/Saturation, and change
the Hue to 162 and the Saturation to 35.
8. Applying the Iris Blur Filter
Step 1
Select all the layers you have, duplicate them, and go to Layer > Merge Layers. Rename the merged layer to Final then go to Filter > Convert for Smart Filters.
Step 2
Go to Filter > Blur Gallery > Iris Blur. Change the Focus value at the top
to 95%, and the Blur value under the Blur Tools panel to the right to 10.
Change the shape of the ellipse by clicking and dragging the four dots that are connected by the line, and modify the Transition Area by clicking and dragging the four larger dots between the center pin and the outer blur line. You can also move those individually by pressing and holding the Option key and then clicking and dragging one of the dots.
Step 3
The blur will add a nice finishing touch to the effect.
Congratulations! You're Done
In this tutorial, we created and styled some simple text using a couple of layer effects to give it a 3D appearance. Then we textured the text with a rusty texture, created a work path, and smudged the edges of the textured text layer.
Then we created a couple of paths, used the Flame filter to render a couple of small flames all over the text, and styled those flames to look brighter and more vibrant.
We added smoke textures on top of the text, as well as a couple of sparks textures to add more interesting elements to it.
Finally, we used one more smoke texture for the background, and applied a blur filter to give the final result some more depth.
Please feel free to leave your comments, suggestions, and outcomes below.