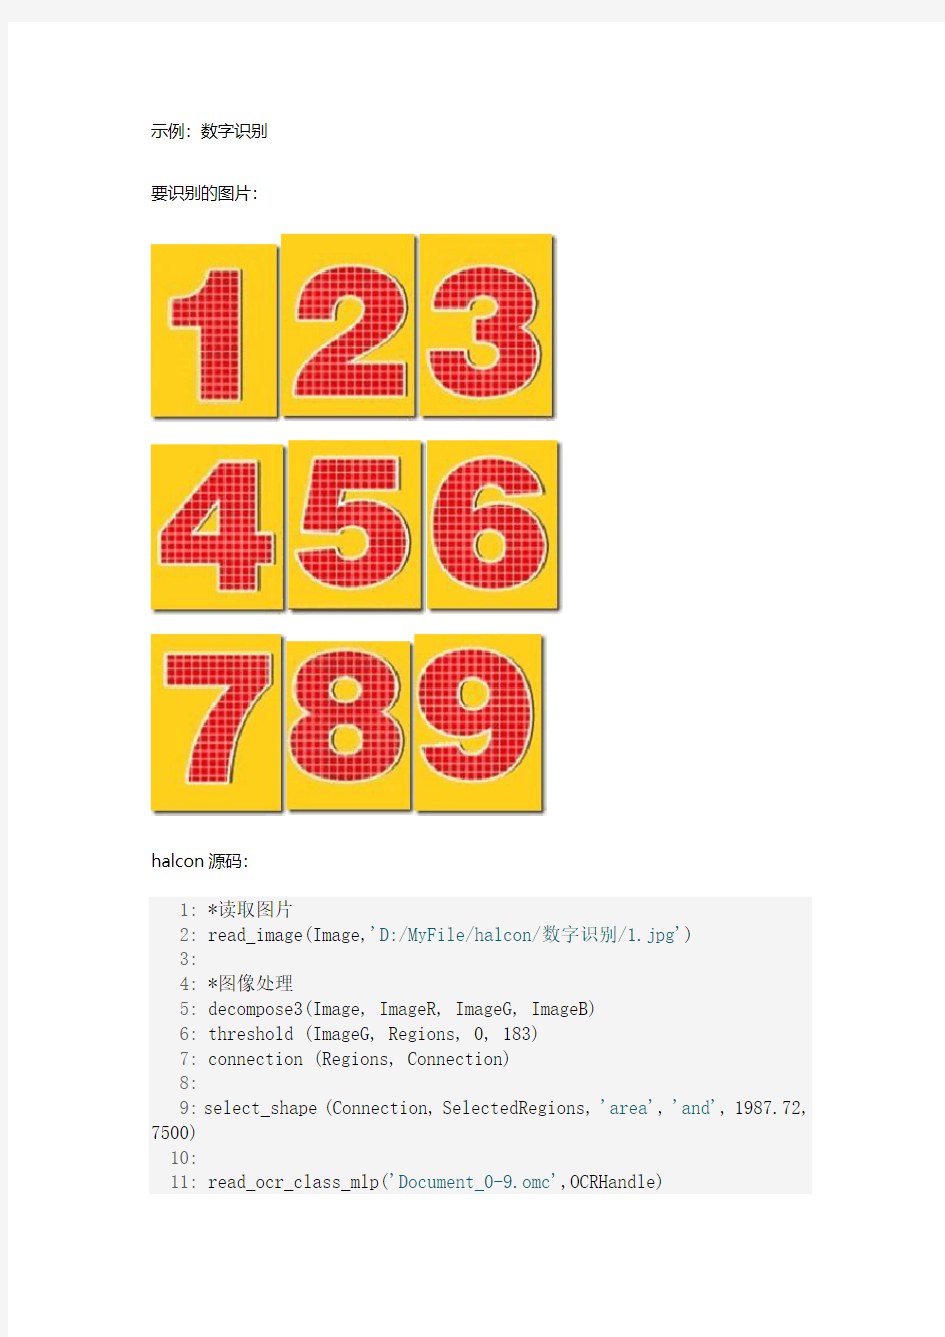

示例:数字识别要识别的图片:
halcon源码:
1: *读取图片
2: read_image(Image,'D:/MyFile/halcon/数字识别/1.jpg')
3:
4: *图像处理
5: decompose3(Image, ImageR, ImageG, ImageB)
6: threshold (ImageG, Regions, 0, 183)
7: connection (Regions, Connection)
8:
9:select_shape (Connection, SelectedRegions, 'area', 'and', 1987.72, 7500)
10:
11: read_ocr_class_mlp('Document_0-9.omc',OCRHandle)
12: do_ocr_multi_class_mlp(SelectedRegions,ImageG,OCRHandle, Class, Confidence)
halcon导出的C#代码:
1://
2:// File generated by HDevelop for HALCON/DOTNET (C#) Version 10.0 3://
4:// This file is intended to be used with the HDevelopTemplate or 5:// HDevelopTemplateWPF projects located under %HALCONEXAMPLES%\c# 6:
7:using System;
8:using HalconDotNet;
9:
10:publicpartialclass HDevelopExport
11: {
12:public HTuple hv_ExpDefaultWinHandle;
13:
14:// Main procedure
15:privatevoid action()
16: {
17:
18:// Local iconic variables
19:
20: HObject ho_Image, ho_ImageR, ho_ImageG, ho_ImageB;
21: HObject ho_Regions, ho_Connection, ho_SelectedRegions;
22:
23:
24:// Local control variables
25:
26: HTuple hv_OCRHandle, hv_Class, hv_Confidence;
27:
28:// Initialize local and output iconic variables
29: HOperatorSet.GenEmptyObj(out ho_Image);
30: HOperatorSet.GenEmptyObj(out ho_ImageR);
31: HOperatorSet.GenEmptyObj(out ho_ImageG);
32: HOperatorSet.GenEmptyObj(out ho_ImageB);
33: HOperatorSet.GenEmptyObj(out ho_Regions);
34: HOperatorSet.GenEmptyObj(out ho_Connection);
35: HOperatorSet.GenEmptyObj(out ho_SelectedRegions);
36:
37://读取图片
38: ho_Image.Dispose();
39: HOperatorSet.ReadImage(out ho_Image, "D:/MyFile/halcon/数字识别/1.jpg");
40:
41://图像处理
42: ho_ImageR.Dispose();
43: ho_ImageG.Dispose();
44: ho_ImageB.Dispose();
45: HOperatorSet.Decompose3(ho_Image, out ho_ImageR, out
ho_ImageG, out ho_ImageB
46: );
47: ho_Regions.Dispose();
48: HOperatorSet.Threshold(ho_ImageG, out ho_Regions, 0, 183); 49: ho_Connection.Dispose();
50: HOperatorSet.Connection(ho_Regions, out ho_Connection);
51:
52: ho_SelectedRegions.Dispose();
53: HOperatorSet.SelectShape(ho_Connection, out
ho_SelectedRegions, "area", "and",
54: 1987.72, 7500);
55:
56: HOperatorSet.ReadOcrClassMlp("Document_0-9.omc", out
hv_OCRHandle);
57: HOperatorSet.DoOcrMultiClassMlp(ho_SelectedRegions,
ho_ImageG, hv_OCRHandle,
58:out hv_Class, out hv_Confidence);
59:
60: ho_Image.Dispose();
61: ho_ImageR.Dispose();
62: ho_ImageG.Dispose();
63: ho_ImageB.Dispose();
64: ho_Regions.Dispose();
65: ho_Connection.Dispose();
66: ho_SelectedRegions.Dispose();
67:
68: }
69:
70:publicvoid InitHalcon()
71: {
72:// Default settings used in HDevelop
73: HOperatorSet.SetSystem("do_low_error", "false");
74: }
75:
76:publicvoid RunHalcon(HTuple Window)
77: {
78: hv_ExpDefaultWinHandle = Window;
79: action();
80: }
81:
82: }
83:
C#工程:
1:using System;
2:using System.Collections.Generic;
3:using https://www.doczj.com/doc/987366273.html,ponentModel;
4:using System.Data;
5:using System.Drawing;
6:using System.Linq;
7:using System.Text;
8:using System.Windows.Forms;
9:
10:using HalconDotNet;
11:
12:
13:namespace NumericalRecognition
14: {
15:publicpartialclass FormMain : Form
16: {
17://增加代码:
18: HDevelopExport HD = new HDevelopExport();
19:string ImagePath;
20:
21:public FormMain()
22: {
23: InitializeComponent();
24: btnRecognitionNumber.Enabled = false;
25: }
26:
27:privatevoid btnOpenImage_Click(object sender, EventArgs e)
28: {
29: openFileDialog1.Filter = "JPEG文件|*.jpg*|BMP文件|*.bmp*|TIFF文件|*.tiff*";
30:
31: openFileDialog1.RestoreDirectory = true;
32:
33: openFileDialog1.FilterIndex = 1;
34:
35:if (openFileDialog1.ShowDialog() == DialogResult.OK)
36:
37: {
38:
39: ImagePath = openFileDialog1.FileName;
40:
41: HD.ReadImage(hWindowControl1.HalconWindow, ImagePath);
42:
43: btnRecognitionNumber.Enabled = true;
44:
45: }
46: }
47:
48:privatevoid btnRecognitionNumber_Click(object sender, EventArgs e) 49: {
50: HD.NumberRecognition();
51: labNumber.Text = HD.hv_Class.ToString();
52:
53: btnRecognitionNumber.Enabled = false;
54: }
55: }
56:
57://halcon导出的类
58:publicpartialclass HDevelopExport
59: {
60:public HTuple hv_ExpDefaultWinHandle;
61:
62: HObject ho_Image, ho_ImageR, ho_ImageG, ho_ImageB;
63: HObject ho_Regions, ho_Connection, ho_SelectedRegions; 64:
65:
66:// Local control variables
67: HTuple hv_OCRHandle, hv_Confidence;
68:public HTuple hv_Class;
69:
70:publicvoid InitHalcon()
71: {
72:// Default settings used in HDevelop
73: HOperatorSet.SetSystem("do_low_error", "false");
74: }
75:
76:publicvoid ReadImage(HTuple Window,string ImagePath)
77: {
78: hv_ExpDefaultWinHandle = Window;
79:
80:// Initialize local and output iconic variables
81: HOperatorSet.GenEmptyObj(out ho_Image);
82:
83://读取图片
84: ho_Image.Dispose();
85: HOperatorSet.ReadImage(out ho_Image, ImagePath);
86: HOperatorSet.DispObj(ho_Image,
hv_ExpDefaultWinHandle);
87: }
88:
89:publicvoid NumberRecognition()
90: {
91: HOperatorSet.GenEmptyObj(out ho_ImageR);
92: HOperatorSet.GenEmptyObj(out ho_ImageG);
93: HOperatorSet.GenEmptyObj(out ho_ImageB);
94: HOperatorSet.GenEmptyObj(out ho_Regions);
95: HOperatorSet.GenEmptyObj(out ho_Connection);
96: HOperatorSet.GenEmptyObj(out ho_SelectedRegions); 97://图像处理
98: ho_ImageR.Dispose();
99: ho_ImageG.Dispose();
100: ho_ImageB.Dispose();
101: HOperatorSet.Decompose3(ho_Image, out ho_ImageR, out ho_ImageG, out ho_ImageB
102: );
103: ho_Regions.Dispose();
104: HOperatorSet.Threshold(ho_ImageG, out ho_Regions, 0, 183);
105: ho_Connection.Dispose();
106: HOperatorSet.Connection(ho_Regions, out
ho_Connection);
107:
108: ho_SelectedRegions.Dispose();
109: HOperatorSet.SelectShape(ho_Connection, out
ho_SelectedRegions, "area", "and",
110: 1987.72, 7500);
111:
112: HOperatorSet.ReadOcrClassMlp("Document_0-9.omc", out hv_OCRHandle);
113: HOperatorSet.DoOcrMultiClassMlp(ho_SelectedRegions, ho_ImageG, hv_OCRHandle,
114:out hv_Class, out hv_Confidence);
115:
116:
117: ho_Image.Dispose();
118: ho_ImageR.Dispose();
119: ho_ImageG.Dispose();
120: ho_ImageB.Dispose();
121: ho_Regions.Dispose();
122: ho_Connection.Dispose();
123: ho_SelectedRegions.Dispose(); 124:
125: }
126:
127: }
128: }
运行结果:
Halcon表面划伤检测实例 *关闭活动图形窗口 dev_close_window () * 在程序执行中指定输出行为为off。 dev_update_window ('off') * **** * step: acquire image 步骤:获取图像 * ****读入文件名为'surface_scratch' 的图像到Image read_image (Image, 'surface_scratch') get_image_size (Image, Width, Height) *打开一个和Image宽高比一致的图像窗口 dev_open_window_fit_image (Image, 0, 0, Width, Width, WindowID) *设置窗口字体大小为12,字体类型为Courier,粗体不倾斜字体。 set_display_font (WindowID, 12, 'Courier', 'true', 'false') *设置填充模式为'margin' dev_set_draw ('margin') *定义输出轮廓线宽为4
dev_set_line_width (4) *显示Image到窗口 dev_display (Image) *WindowID窗口使用黑色字体在一个方框内显示按"F5"继续运行字体,并注册F5消息处理disp_continue_message (WindowID, 'black', 'true') stop () * **** * step: segment image 步骤:图像分割 * **** * -> using a local threshold 使用局部阈值 * 对Image进行7*7均值滤波 mean_image (Image, ImageMean, 7, 7) ********************************************************************* *得到的图像为: * * * *用均值滤波图像作为二值化阈值图像,返回小于灰度值小于该点阈值-5的图像。 dyn_threshold (Image, ImageMean, DarkPixels, 5, 'dark') *************************************** ****得到的区域为:
halcon学习笔记——实例篇长度和角度测量实例二:长度和角度测量 素材图片: halcon代码: 1: *读取并截取图片 2: dev_close_window() 3: read_image (Image, 'D:/MyFile/halcon/长度和角度测量/图.png') 4: crop_rectangle1 (Image, ImagePart, 75, 0, 400, 400) 5: get_image_size (ImagePart, Width, Height) 6: dev_open_window (0, 0, Width, Height, 'black', WindowHandle) 7: dev_display (ImagePart) 8: 9: *获取图形的边界 10: threshold (ImagePart, Regions, 0, 112) 11: 12: *分离三角形和圆形
13: connection(Regions,ConnectedRegions) 14: sort_region(ConnectedRegions,SortedRegions,'upper_left','true','column') 15: select_obj(SortedRegions,Circle,1) 16: select_obj(SortedRegions,Triangle,2) 17: 18: *获取三角形各边的信息 19: skeleton(Triangle,TriangleSkeleton) 20: gen_contours_skeleton_xld(TriangleSkeleton,TriangleContours,1,'filter') 21: segment_contours_xld(TriangleContours,ContoursSplit,'lines_circles', 5, 4, 2) 22:select_contours_xld(ContoursSplit,SelectedContours, 'contour_length',100, 999, -0.5, 0.5) 23: fit_line_contour_xld (SelectedContours, 'tukey', -1, 10, 5, 2, RowBegin, ColBegin, RowEnd, ColEnd, Nr, Nc, Dist) 24: 25: *计算三角形角度 26:angle_ll (RowBegin[0], ColBegin[0], RowEnd[0], ColEnd[0], RowBegin[1], ColBegin[1], RowEnd[1], ColEnd[1], Angle1) 27:angle_ll (RowBegin[0], ColBegin[0], RowEnd[0], ColEnd[0], RowBegin[2], ColBegin[2], RowEnd[2], ColEnd[2], Angle2) 28:angle_ll (RowBegin[1], ColBegin[1], RowEnd[1], ColEnd[1], RowBegin[2], ColBegin[2], RowEnd[2], ColEnd[2], Angle3) 29: Angle1:=abs(deg(Angle1)) 30: Angle2:=abs(deg(Angle2)) 31: Angle3:=abs(deg(Angle3)) 32: 33: *获取圆的信息 34: area_center(Circle,AreaCircle, RowCircle, ColumnCircle) 35: 36: *计算圆心到三角形各边的距离 37: Distance := [] 38:for Index := 0 to 2 by 1 39:distance_pl (RowCircle, ColumnCircle, RowBegin[Index], ColBegin[Index], RowEnd[Index], ColEnd[Index], ThisDistance) 40: Distance := [Distance,ThisDistance] 41: endfor
数字图像角点特征检测方法研究
目录 引言 (3) 1 研究背景与发展 (6) 1.1研究背景 (6) 1.2研究现状和发展概述 (6) 1.3应用软件M ATLAB (7) 2 角点检测概念与原理 (9) 2.1角点的定义 (9) 2.2角点概念及特征 (9) 2.3角点检测意义 (9) 2.4角点检测原理 (10) 2.5角点检测技术的基本方法 (10) 2.5.1 基于模板的角点检测 (10) 2.5.2 基于边缘的角点检测 (11) 2.5.3 基于灰度变化的角点检测 (13) 3 角点算法概述 (14) 3.1角点检测的标准 (14) 3.2H ARRIS角点检测算子 (14) 3.2.1 Harris角点检测算子流程图 (19) 3.2.2 Harris角点检测算子的特点 (20) 3.2.3 Harris角点检测性质 (20) 3.2.4 Harris和Moravec算子角点检测实验结果 (21) 3.3一种改进的H ARRIS的算法 (23) 3.3.1试验结果 (24) 3.4S USAN角点检测算子 (25) 3.3.1 SUSAN角点检测一般步骤 (27) 3.3.2 Susan角点检测算子特点 (29) 3.3.3 Susan角点检测试验结果 (29) 4 其他算子简介 (33) 4.1小波变换算子 (33) 4.2F ORSTNER算子 (33) 4.3CSS角点检测算法 (35) 4.4ACSS角点检测算法 (36) 4.5各种角点检测算法的比较 (36) 结论 (39) 致谢 (41)
参考文献 (42) 附录1 HARRIS算法程序 (44) 附录2 MORA VEC算法程序 (46) 附录3 改进的HARRIS算法 (48) 附录4 SUSAN算法程序 (50)
Harris角点检测算法编程步骤及示例演示 也不说那么多废话了,要介绍啥背景意义之类的,角点检测,顾名思义,就是检测角点,最简单的就是两条线的交点了,还有比如下国际象棋的棋盘格子的交点之类的,反正就是检测这些点。 简单将Harris角点检测算法的思想说下,就是拿一个小窗在图像中移动,通过考察这个小窗口内图像灰度的平均变换值来确定角点。(1)如果窗口内区域图像的灰度值恒定,那么所有不同方向的偏移几乎不发生变化; (2)如果窗口跨越一条边,那么沿着这条边的偏移几乎不发生变化,但是与边垂直的偏移会发生很大的变化; (3)如果窗口包含一个孤立的点或者角点,那么所有不同方向的偏移会发生很大的变化。 下面给出具体数学推导: 设图像窗口平移量为(u,v),产生的灰度变化为E(u,v), 有E(u,v)=sum[w(x,y)[I(x+u,y+v)-I(x,y)]^2],其中w(x,y)为窗口函数, I(x+u,y+v)为平移后的灰度值,I(x,y)为平移前的灰度值。 有泰勒公式展开可得: I(x+u,y+v)=I(x,y)+Ix*u+Iy*v+O(u^2,v^2); Ix,Iy分别为偏微分,在图像中为图像的方向导数. 因此E(u,v)=sum[w(x,y) [Ix*u+Iy*v+O(u^2,v^2)]^2], 可以近似得到E(u,v)=sum[w(x,y) [Ix*u+Iy*v]^2],即 E(u,v)=[u,v][Ix^2,Ix*Iy;Ix*Iy,Iy^2][u,v]T
令M=[Ix^2,Ix*Iy;Ix*Iy,Iy^2],因此最后对角点的检测成了对矩阵M的特征值的分析了,令M其特征值为x1,x2; 当x1>>x2或者x2>>x1,则检测到的是边缘部分; 当x1,x2都很小,图像窗口在所有移动的方向上移动灰度级都无明显变化. 当X1,X2都很大时且相当,检测到的是角点。 编程时用x1,x2不方便,因此定义角点响应函数; R=det(M)-k(trace(M))^2; 其中det(M)为矩阵M的行列式,trace(M)为矩阵M的迹。 下面给出更具数学公式实际编程的步骤: 1.利用水平,竖直差分算子对图像的每个像素进行滤波以求得 Ix,Iy,进而求得M中的四个元素的值。 M=[Ix^2,Ix*Iy;Ix*Iy,Iy^2] 2.对M的四个元素进行高斯平滑滤波,为的是消除一些不必要 的孤立点和凸起,得到新的矩阵M。 3.接下来利用M计算对应每个像素的角点响应函数R,即: R=det(M)-k(trace(M))^2; 也可以使用改进的R: R=[Ix^2*Iy^2-(Ix*Iy)^2]/(Ix^2+Iy^2);里面没有随意给定的参数k,取值应当比第一个令人满意。 4.在矩阵R中,同时满足R(i,j)大于一定阈值threshold和R(i,j)
halcon+vb检测光学玻璃元件实例发布于:2013-08-20 10:05 自然光下的玻璃元件实图 环型光源下的玻璃元件图 halcon 代码
open_framegrabber ('DirectShow', 1, 1, 0, 0, 0, 0, 'default', 8, 'gray', -1, 'false', 'def ault', 'Microvision MV-1400UC Digital Camera', 0, -1, AcqHandle) *打开摄像头 grab_image_start (AcqHandle, -1) *开始铺货图像 grab_image_async (Image, AcqHandle, -1) *捕获第一帧图像 get_image_size (Image, Width, Height) *获得图像大小 dev_open_window (0, 0, Width/6, Height/6, 'black', WindowHandle) *打开适合大小的窗口,应为相机是1400万像素所以图想太大窗口被我缩小了。 while (true) *无限循环 try grab_image_async (Image, AcqHandle, -1) *捕获一帧图像 dev_display (Image) *显示图像 smooth_image(Image, ImageSmooth, 'deriche2', 0.5) *平滑图像 threshold (ImageSmooth, Regions,125, 255) *阈值处理 *这个表面有些灰尘呵呵不过可以当噪点过滤掉的 area_center (Regions, Area1, Row3, Column3) *获得区域中心点 gen_contour_region_xld(Regions, Contours, 'border_holes') *将阈值处理后获得的区域转换成xld smooth_contours_xld(Contours, SmoothedContours, 5) *平滑xld
角点检测(Corner Detection) 角点检测(Corner Detection)是计算机视觉系统中用来获得图像特征的一种方法,广泛应用于运动检测、图像匹配、视频跟踪、三维建模和目标识别等领域中。也称为特征点检测。角点通常被定义为两条边的交点,更严格的说,角点的局部邻域应该具有两个不同区域的不同方向的边界。而实际应用中,大多数所谓的角点检测方法检测的是拥有特定特征的图像点,而不仅仅是“角点”。这些特征点在图像中有具体的坐标,并具有某些数学特征,如局部最大或最小灰度、某些梯度特征等。现有的角点检测算法并不是都十分的鲁棒。很多方法都要求有大量的训练集和冗余数据来防止或减少错误特征的出现。 角点检测方法的一个很重要的评价标准是其对多幅图像中相同或相似特征的检测能力,并且能够应对光照变化、图像旋转等图像变化。角点检测的方法有:Moravec角点检测算法,FAST角点检测算法,Harris角点检测法和shi_tomas角点检测法等。 1.1.1Moravec角点检测算法 Moravec角点检测算法Moravec角点检测算法是最早的角点检测算法之一。该算法将角点定义为具有低“自相关性”的点。算法会检测图像的每一个像素,将像素周边的一个邻域作为一个patch,并检测这个patch和周围其他patch的相关性。这种相关性通过两个patch间的平方差之和(SSD)来衡量,SSD值越小则相似性越高。如果像素位于平滑图像区域内,周围的patch都会非常相似。如果像素在边缘上,则周围的patch在与边缘正交的方向上会有很大差异,在与边缘平行的方向上则较为相似。而如果像素是各个方向上都有变化的特征点,则周围所有的patch都不会很相似。Moravec会计算每个像素patch和周围patch的SSD 最小值作为强度值,取局部强度最大的点作为特征点。Moravec角点检测算法有几个很明显的缺陷:1,强度值的计算并不是各向同性的,只有离散的8个45 度角方向被考虑。因为patch的评议比较最多只有8个方向;2,由于窗口是方形并且二元的,因此相应函数会有噪声;3,对边缘的相应太简单,因为强度值尽取SSD的最小值;
MORA VEC算法提取角点特征 1.角点 图像灰度值在各个方向变化都比较大的点,即认为是角点。Moravec角点量是指在各个方向上灰度变化的最小值,当在某个方向上,灰度值的变化最小,并且这个最小值也大于某个设定的阈值,那么认为这个点就是一个角点。 2.MORA VEC算法介绍 Moravec角点检测算法的思想是:在图像中设计一个局部检测窗口,当该窗口沿各个方向作微小移动时,考查窗口的平均能量变化,当该能量变化值超过设定的阈值时,就将窗口的中心像素点提取为角点。 本实验的算法的步骤如下: (1) 对每一像素(c,r),计算以其为中心的m*m的影像窗口中0°、45°、90°、 135°四个方向相邻像素灰度差的平方和V1、V2、V3、V4。 其中,k为m/2的模。计算V1、V2、V3、V4的最小值作为该像素点的兴趣值。 (2)给定经验阈值T,将兴趣值大于阈值的点作为候选点。 (3)新建一个窗口,窗口大小可不同于计算兴趣值窗口的大小。选择候选点中 的极值点作为特征点,即在一定范围内,取兴趣值最大者为特征点。此过程也称为抑制局部非最大。 综上,Moravec算子是在四个主要方向上,选择具有最大—最小方差的点作为特征点。 3.实验过程 本实验采用5*5的窗口大小,设置了0°、45°、90°、135°四个方向的移动,设置经验阀值为4000,新窗口为8*8,进行实验。 实验代码如下:
img=imread('1.png');%读取图像 [m,n,d]=size(img); %获取数据大小 if (d==3) %转换为灰度图像 img=rgb2gray(img); end window=5; w=floor(window/2); %设置窗口大小 V=zeros(m,n); for i=(w+1):(m-w-1) for j=(w+1):(n-w-1) V1=0;V2=0;V3=0;V4=0; %设置初始值 for k=(-w):(w-1) %计算四个方向的值 V1=V1 + (double(img(i+k,j))-double(img(i+k+1,j))).^2; V2=V2 + (double(img(i+k,j+k))-double(img(i+k+1,j+k+1))).^2; V3=V3 + (double(img(i,j+k))-double(img(i,j+k+1))).^2; V4=V4 + (double(img(i+k,j-k))-double(img(i+k+1,j-k+1))).^2; V(i,j)=min([V1,V2,V3,V4]); end end end T=1000;%经验阀值 V(V 基于角点检测的图像处理方法研究 摘要:本文主要研究了图像的角点检测方法,在计算机视觉中,机器视觉和图像处理后总,特征提取都是一个重要的方向。而角点又是图像的一个重要局部特征,它决定了图像中目标的形状,因此在图像匹配,目标描述与识别及运动估计,目标跟踪等领域,角点提取都具有重要的意义。角点的信息含量很高,可以对图像处理提供足够的约束,减少运算量,极大地提高运算速度。角点检测问题是图像处理领域的一个基础问题,是低层次图像处理的一个重要方法。角点检测的目的是为了匹配,而匹配的效率取决于角点的数量。Harris角点检测原理是对于一副图像,角点于自相关函数的曲率特性有关,自相关函数描述了局部局部图像灰度的变化程度。在角点处,图像窗口的偏移将造成自相关函数(图像灰度的平均变化)的显著变化。harris算子是一种简单的点特征提取算子,这种算子受信号处理中自相关函数的启发,给出与自相关函数相联系的矩阵M。M阵的特征值是自相关函数的一个阶曲率,如果两个曲率值都高,那么久认为该点是特征点。 关键词:角点,角点检测,Harris角点 ABSTRACT This paper studies the image of the corner detection methods in computer vision, machine vision and image processing general, feature extraction is an important direction. The corner is an important local feature image, which determines the shape of the target image, so the image matching, object description and recognition and motion estimation, target tracking and other fields, corner detection are of great significance. Corner of the information content is high, image processing can provide sufficient constraints to reduce the amount of computation greatly improve the processing speed. Corner detection is a basic image processing problems, low-level image processing is an important way. Corner detection is designed to match the efficiency of the matching depends on the number of corners。Harris corner detection principle is that for an image, corner point on the curvature properties of the autocorrelation function is related to the local auto-correlation function describes the degree of local image intensity changes. In the corner point, the offset will result in the image window autocorrelation function (the average image intensity changes) change significantly. arris operator is a simple point feature extraction operator, this operator by the signal processing in the autocorrelation function of inspiration, given the autocorrelation function associated with the matrix M. Eigenvalues of matrix M is an order autocorrelation function of the curvature, if the two curvature values are high, for so long that the point is the feature points. Key word: Corner , Corner detection , Harris Corner halcon角点检测实例 楼主# 更多发布于:2013-11-15 18:18 This program compares the result of different operators * which detect points of interest * dev_update_off () Dark := 100 Background := 175 Light := 250 Angle := rad(45) Size := 3 create_test_image (Image, Background, Light, Dark) dev_close_window () get_image_size (Image, Width, Height) dev_open_window (0, 0, 512, 512, 'black', WindowHandle) set_display_font (WindowHandle, 16, 'mono', 'true', 'false') dev_set_color ('black') dev_set_line_width (3) * * Foerstner interest points detector points_foerstner (Image, 1, 2, 3, 200, 0.3, 'gauss', 'true', RowJunctions, ColJunctions, CoRRJunctions, CoRCJunctions, CoCCJunctions, RowArea, ColArea, CoRRArea, CoRCA rea, CoCCArea) gen_cross_contour_xld (CrossFoerstner, RowJunctions, ColJunctions, Size, Angle) dev_display (Image) dev_display (CrossFoerstner) disp_message (WindowHandle, 'Foerstner interest points detector', 'window', 12, 12, 'black', 'true') disp_continue_message (WindowHandle, 'black', 'true') stop () * * Harris interest points detector points_harris (Image, 0.7, 2, 0.04, 0, RowHarris, ColHarris) gen_cross_contour_xld (CrossHarris, RowHarris, ColHarris, Size, Angle) dev_display (Image) dev_display (CrossHarris) disp_message (WindowHandle, 'Harris interest points detector', 'window', 12, 12, 'bla ck', 'true') disp_continue_message (WindowHandle, 'black', 'true') stop () * SUSAN角点检测算子的MATLAB实现 []=uigetfile('*.jpg','选择JPG格式图片'); if ~ischar() return end str=[pathname ]; pic=imread(str); if length(size(pic))==3 img=rgb2gray(pic); end [M,N]=size(img); timg=zeros(M+6,N+6); timg(4:end-3,4:end-3)=img; %扩展图像边缘3个像素 img=timg; t=45; %阈值 USAN=[]; %用于存放USAN for i= 4:M+3 for j=4:N+3 tmp=img(i-3:i+3,j-3:j+3); cnt=0; %计数专用,统计圆形邻域内满足条件的像素点个数 for p=1:7 for q=1:7 if (p-4)^2+(q-4)^2<=12 %半径一般在3~4之间 if abs(img(i,j)-tmp(p,q)) Halcon学习(十五)角点检测 * This program compares the result of different operators * which detect points of interest * dev_update_off () Dark := 100 Background := 175 Light := 250 Angle := rad(45) Size := 3 create_test_image (Image, Background, Light, Dark) dev_close_window () get_image_size (Image, Width, Height) dev_open_window (0, 0, 512, 512, 'black', WindowHandle) set_display_font (WindowHandle, 16, 'mono', 'true', 'false') dev_set_color ('black') dev_set_line_width (3) * * Foerstner interest points detector points_foerstner (Image, 1, 2, 3, 200, 0.3, 'gauss', 'true', RowJunctions, ColJunctions, CoRRJunctions, CoRCJunctions, CoCCJunctions, RowArea, ColArea, CoRRArea, CoRCArea, CoCCArea) gen_cross_contour_xld (CrossFoerstner, RowJunctions, ColJunctions, Size, Angle) dev_display (Image) dev_display (CrossFoerstner) disp_message (WindowHandle, 'Foerstner interest points detector', 'window', 12, 12, 'black', 'true') disp_continue_message (WindowHandle, 'black', 'true') stop () * * Harris interest points detector points_harris (Image, 0.7, 2, 0.04, 0, RowHarris, ColHarris) gen_cross_contour_xld (CrossHarris, RowHarris, ColHarris, Size, Angle) dev_display (Image) dev_display (CrossHarris) disp_message (WindowHandle, 'Harris interest points detector', 'window', 12, 12, 'black', 'true') disp_continue_message (WindowHandle, 'black', 'true') stop () * * Harris binomial interest points detector points_harris_binomial (Image, 5, 15, 0.04, 1000, 'on', RowHarrisBinomial, ColHarrisBinomial) gen_cross_contour_xld (CrossHarrisBinom, RowHarrisBinomial, ColHarrisBinomial, Size, Angle) dev_display (Image)基于角点检测的图像处理方法
halcon角点检测实例
SUSAN角点检测算子的MATLAB实现
Halcon学习(15)角点检测