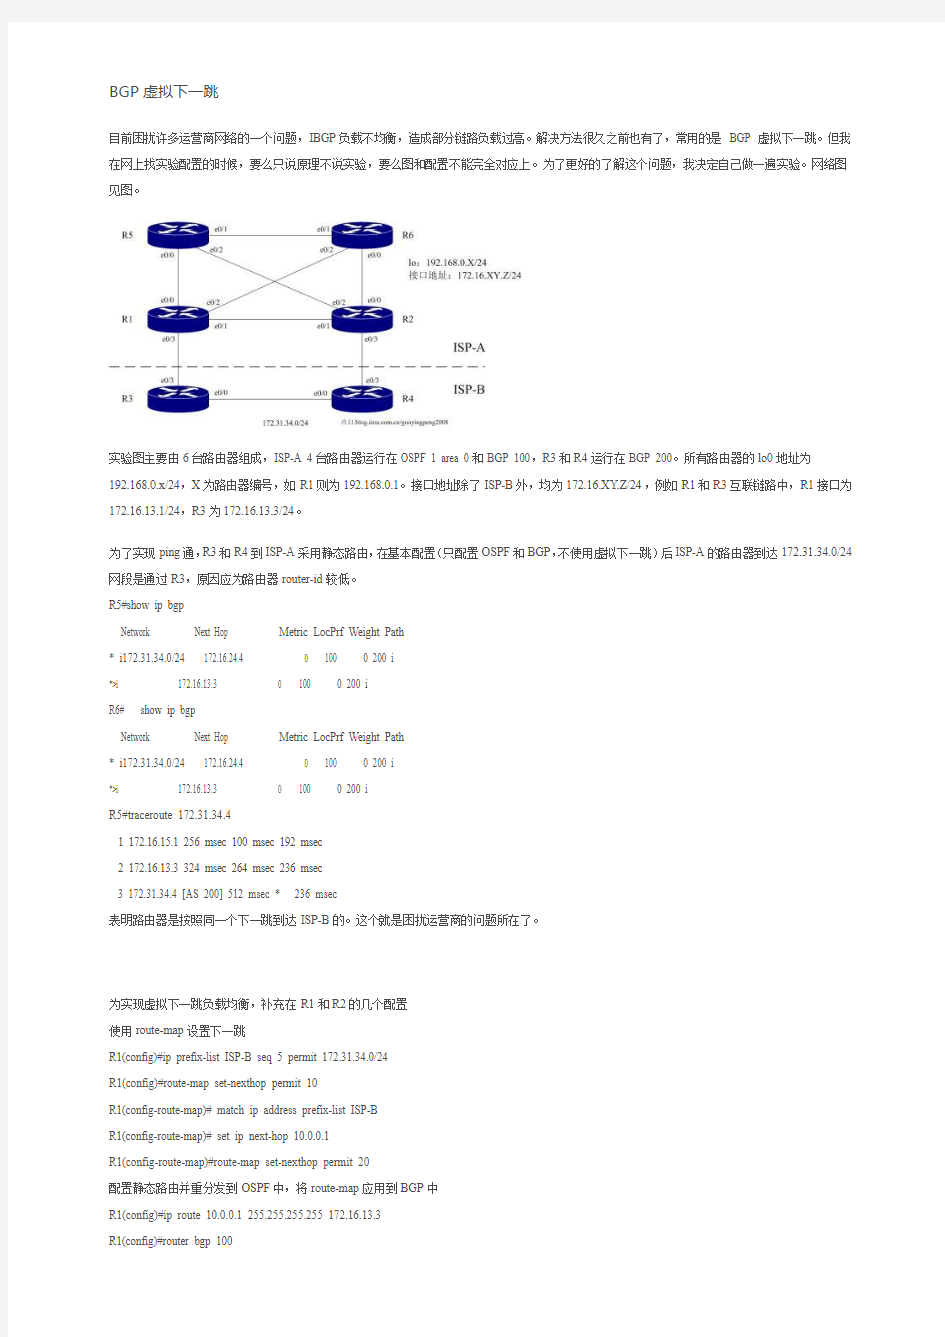
BGP虚拟下一跳
目前困扰许多运营商网络的一个问题,IBGP负载不均衡,造成部分链路负载过高。解决方法很久之前也有了,常用的是BGP 虚拟下一跳。但我在网上找实验配置的时候,要么只说原理不说实验,要么图和配置不能完全对应上。为了更好的了解这个问题,我决定自己做一遍实验。网络图见图。
实验图主要由6台路由器组成,ISP-A 4台路由器运行在OSPF 1 area 0和BGP 100,R3和R4运行在BGP 200。所有路由器的lo0地址为
192.168.0.x/24,X为路由器编号,如R1则为192.168.0.1。接口地址除了ISP-B外,均为172.16.XY.Z/24,例如R1和R3互联链路中,R1接口为172.16.13.1/24,R3为172.16.13.3/24。
为了实现ping通,R3和R4到ISP-A采用静态路由,在基本配置(只配置OSPF和BGP,不使用虚拟下一跳)后ISP-A的路由器到达172.31.34.0/24网段是通过R3,原因应为路由器router-id较低。
R5#show ip bgp
Network Next Hop Metric LocPrf Weight Path
* i172.31.34.0/24 172.16.24.4 0 100 0 200 i
*>i 172.16.13.3 0 100 0 200 i
R6# show ip bgp
Network Next Hop Metric LocPrf Weight Path
* i172.31.34.0/24 172.16.24.4 0 100 0 200 i
*>i 172.16.13.3 0 100 0 200 i
R5#traceroute 172.31.34.4
1 172.16.15.1 256 msec 100 msec 19
2 msec
2 172.16.13.
3 32
4 msec 264 msec 236 msec
3 172.31.34.
4 [AS 200] 512 msec * 236 msec
表明路由器是按照同一个下一跳到达ISP-B的。这个就是困扰运营商的问题所在了。
为实现虚拟下一跳负载均衡,补充在R1和R2的几个配置
使用route-map设置下一跳
R1(config)#ip prefix-list ISP-B seq 5 permit 172.31.34.0/24
R1(config)#route-map set-nexthop permit 10
R1(config-route-map)# match ip address prefix-list ISP-B
R1(config-route-map)# set ip next-hop 10.0.0.1
R1(config-route-map)#route-map set-nexthop permit 20
配置静态路由并重分发到OSPF中,将route-map应用到BGP中
R1(config)#ip route 10.0.0.1 255.255.255.255 172.16.13.3
R1(config)#router bgp 100
R1(config-router)# neighbor internal route-map set-nexthop out
R1(config-router)#exit
R1(config)#router ospf 1
R1(config-router)#redistribute static metric 10 metric-type 1 subnets
R1和R2设置了next-hop后,ISP-A内部路由器如R5和R6的下一跳就已经修改过来
R5#show ip bgp
Network Next Hop Metric LocPrf Weight Path
* i172.31.34.0/24 10.0.0.1 0 100 0 200 i
*>i 10.0.0.1 0 100 0 200 i
最后测试:
R6#traceroute 172.31.34.4
1 172.16.26.
2 396 msec
172.16.16.1 216 msec
172.16.26.2 108 msec
2 172.16.13.
3 276 msec
172.16.24.4 192 msec
172.16.13.3 316 msec
R5#traceroute 172.31.34.4
1 172.16.25.
2 228 msec
172.16.15.1 100 msec
172.16.25.2 84 msec
2 172.16.13.
3 26
4 msec
172.16.24.4 332 msec
172.16.13.3 204 msec
表明负载均衡成功。配置中无需对ISP-B上设备做额外配置。本实验在dynamips使用3600路由器模拟实验通过。当然这不是唯一的方法,如果ISP-B上设备可配置,也可以在R3和R4上设置,将下一跳10.0.0.1的路由信息传送到ISP-A。
详细配置:(节选)
R1#show run
hostname R1
interface Loopback0
ip address 192.168.0.1 255.255.255.0
!
interface Ethernet0/0
ip address 172.16.15.1 255.255.255.0
half-duplex
!
interface Ethernet0/1
ip address 172.16.12.1 255.255.255.0
half-duplex
!
interface Ethernet0/2
ip address 172.16.16.1 255.255.255.0
half-duplex
!
interface Ethernet0/3
ip address 172.16.13.1 255.255.255.0
half-duplex
router ospf 1
log-adjacency-changes
redistribute static metric 10 metric-type 1 subnets network 172.16.0.0 0.0.255.255 area 0
network 192.168.0.0 0.0.0.255 area 0
!
router bgp 100
no synchronization
bgp router-id 192.168.0.1
bgp log-neighbor-changes
neighbor internal peer-group
neighbor internal remote-as 100
neighbor internal update-source Loopback0
neighbor internal route-map set-nexthop out
neighbor 172.16.13.3 remote-as 200
neighbor 192.168.0.2 peer-group internal
neighbor 192.168.0.5 peer-group internal
neighbor 192.168.0.6 peer-group internal
no auto-summary
ip route 10.0.0.1 255.255.255.255 172.16.13.3
ip prefix-list ISP-B seq 5 permit 172.31.34.0/24 route-map set-nexthop permit 10
match ip address prefix-list ISP-B
set ip next-hop 10.0.0.1
route-map set-nexthop permit 20
end
R2#show run
hostname R2
interface Loopback0
ip address 192.168.0.2 255.255.255.0
!
interface Ethernet0/0
ip address 172.16.26.2 255.255.255.0
half-duplex
!
interface Ethernet0/1
ip address 172.16.12.2 255.255.255.0
half-duplex
!
interface Ethernet0/2
ip address 172.16.25.2 255.255.255.0
half-duplex
!
interface Ethernet0/3
ip address 172.16.24.2 255.255.255.0
half-duplex
!
router ospf 1
log-adjacency-changes
redistribute static metric 10 metric-type 1 subnets network 172.16.0.0 0.0.255.255 area 0
network 192.168.0.0 0.0.0.255 area 0
!
router bgp 100
no synchronization
bgp router-id 192.168.0.2
bgp log-neighbor-changes
neighbor internal peer-group
neighbor internal remote-as 100
neighbor internal update-source Loopback0
neighbor internal route-map set-nexthop out
neighbor 172.16.24.4 remote-as 200
neighbor 192.168.0.1 peer-group internal
neighbor 192.168.0.5 peer-group internal
neighbor 192.168.0.6 peer-group internal
no auto-summary
!
ip http server
ip classless
ip route 10.0.0.1 255.255.255.255 172.16.24.4
!
ip prefix-list ISP-B seq 5 permit 172.31.34.0/24 route-map set-nexthop permit 10
match ip address prefix-list ISP-B
set ip next-hop 10.0.0.1
!
route-map set-nexthop permit 20
end
R3#show run
hostname R3
interface Loopback0
ip address 192.168.0.3 255.255.255.0
!
interface Ethernet0/0
ip address 172.31.34.3 255.255.255.0
half-duplex
!
interface Ethernet0/3
ip address 172.16.13.3 255.255.255.0
half-duplex
!
router bgp 200
no synchronization
bgp log-neighbor-changes
network 172.31.34.0 mask 255.255.255.0
neighbor 172.16.13.1 remote-as 100
neighbor 192.168.0.4 remote-as 200
neighbor 192.168.0.4 update-source Loopback0 no auto-summary
!
ip http server
ip classless
ip route 0.0.0.0 0.0.0.0 172.16.13.1
end
R4#show run
hostname R4
interface Loopback0
ip address 192.168.0.4 255.255.255.0
!
interface Ethernet0/0
ip address 172.31.34.4 255.255.255.0
half-duplex
!
interface Ethernet0/3
ip address 172.16.24.4 255.255.255.0
half-duplex
!
router bgp 200
no synchronization
bgp log-neighbor-changes
network 172.31.34.0 mask 255.255.255.0
neighbor 172.16.24.2 remote-as 100
neighbor 192.168.0.3 remote-as 200
neighbor 192.168.0.3 update-source Loopback0 no auto-summary
!
ip route 0.0.0.0 0.0.0.0 172.16.24.2
end
R5#show run
hostname R5
interface Loopback0
ip address 192.168.0.5 255.255.255.0
!
interface Ethernet0/0
ip address 172.16.15.5 255.255.255.0
half-duplex
!
interface Ethernet0/1
ip address 172.16.56.5 255.255.255.0
half-duplex
!
interface Ethernet0/2
ip address 172.16.25.5 255.255.255.0
half-duplex
!
interface Ethernet0/3
no ip address
shutdown
half-duplex
!
router ospf 1
log-adjacency-changes
network 172.16.0.0 0.0.255.255 area 0
network 192.168.0.0 0.0.0.255 area 0
!
router bgp 100
no synchronization
bgp router-id 192.168.0.5
bgp log-neighbor-changes
neighbor internal peer-group
neighbor internal remote-as 100
neighbor internal update-source Loopback0
neighbor 192.168.0.1 peer-group internal neighbor 192.168.0.2 peer-group internal neighbor 192.168.0.6 peer-group internal no auto-summary
end
R6#show run
hostname R6
interface Loopback0
ip address 192.168.0.6 255.255.255.0
!
interface Ethernet0/0
ip address 172.16.26.6 255.255.255.0
half-duplex
!
interface Ethernet0/1
ip address 172.16.56.6 255.255.255.0
half-duplex
!
interface Ethernet0/2
ip address 172.16.16.6 255.255.255.0
half-duplex
!
interface Ethernet0/3
no ip address
shutdown
half-duplex
!
router ospf 1
log-adjacency-changes
network 172.16.0.0 0.0.255.255 area 0
network 192.168.0.0 0.0.0.255 area 0
!
router bgp 100
no synchronization
bgp router-id 192.168.0.6
bgp log-neighbor-changes
neighbor internal peer-group
neighbor internal remote-as 100
neighbor internal update-source Loopback0 neighbor 192.168.0.1 peer-group internal neighbor 192.168.0.2 peer-group internal neighbor 192.168.0.5 peer-group internal
no auto-summary
end
BGP路由的下一跳属性
网友:怒咆的野狼发布于:2007.04.21 15:52(共有条评论) 查看评论| 我要评论
一各路由器的基本配置
RA#sh run
interface Loopback0
ip address 1.1.1.1 255.255.255.0
interface Serial0
ip address 192.1.1.1 255.255.255.0
!
router bgp 100 // 启动BGP AS 100
no synchronization
bgp log-neighbor-changes
neighbor 192.1.1.2 remote-as 200 //与AS 200 中的RB建立EBGP邻接关系no auto-summary
! !!!!!!!!!!!!!!!!!!
!!!!!!!!!!!!!!!!
RB#sh run
!
interface Loopback0
ip address 2.2.2.2 255.255.255.0
interface Ethernet0
ip address 193.1.1.1 255.255.255.0
interface Serial0
ip address 192.1.1.2 255.255.255.0
clockrate 64000
!
router bgp 200 //启动BGP AS 200
neighbor 192.1.1.1 remote-as 100 //与AS100中的RA建立EBGP邻接关系neighbor 193.1.1.2 remote-as 200 //与本AS中的RC建立IBGP邻接关系
! !!!!!!!!!!!!!!!!!!!
!!!!!!!!!!
RC#sh run
interface Loopback0
ip address 3.3.3.3 255.255.255.0
interface Ethernet0
ip address 193.1.1.2 255.255.255.0
!
router bgp 200 //启动BGP进程,AS 200
no synchronization
bgp log-neighbor-changes
neighbor 193.1.1.1 remote-as 200 //与本AS中的RB建立IBGP邻接关系
no auto-summary
!
二测试邻居关系
RB#sh ip bgp neighbors
BGP neighbor is 192.1.1.1, remote AS 100, external link
BGP version 4, remote router ID 1.1.1.1
BGP state = Established, up for 00:01:04
Last read 00:00:04, hold time is 180, keepalive interval is 60 seconds
Neighbor capabilities:
Route refresh: advertised and received
Address family IPv4 Unicast: advertised and received
Received 5 messages, 0 notifications, 0 in queue
Sent 4 messages, 0 notifications, 0 in queue
Route refresh request: received 0, sent 0
Minimum time between advertisement runs is 30 seconds
Connections established 1; dropped 0
Last reset never
Connection state is ESTAB, I/O status: 1, unread input bytes: 0
Local host: 192.1.1.2, Local port: 11001
Foreign host: 192.1.1.1, Foreign port: 179
BGP neighbor is 193.1.1.2, remote AS 200, internal link
BGP version 4, remote router ID 3.3.3.3
BGP state = Established, up for 00:00:34
Last read 00:00:34, hold time is 180, keepalive interval is 60 seconds
Neighbor capabilities:
Route refresh: advertised and received
Address family IPv4 Unicast: advertised and received
Received 4 messages, 0 notifications, 0 in queue
Sent 3 messages, 0 notifications, 0 in queue
Route refresh request: received 0, sent 0
Minimum time between advertisement runs is 5 seconds
Connections established 1; dropped 0
Last reset never
Connection state is ESTAB, I/O status: 1, unread input bytes: 0
Local host: 193.1.1.1, Local port: 179
Foreign host: 193.1.1.2, Foreign port: 37817
说明:通过在RB上输入:show ip bgp neigbors 这条命令可以看到RB已经和RA和RC建立了邻居关系。输出中的蓝色带下划线的部分从不同的角度都表示了这种邻居关系已经建立。还可以看出BGP协议是使用TCP协议通过179端口与邻居建立连接的,这种连接关系一旦建立就会一直存在下去,除非路由器失效。
三测试网络的宣告
一个路由器若要向他的BGP邻居路由器宣告一个网络,可以用network命令或者用重发布,使BGP进程能知道该路由,另外,被一个路由器宣告的网络必须存在于该路由器的IP路由表中。
在本实验中要将RA的1.1.1.0/24网络宣告到BGP进程中;首先在RA中查看该网络是否在路由表中。
RA#sh ip route
1.0.0.0/24 is subnetted, 1 subnets
C 1.1.1.0 is directly connected, Loopback0 //1.1.1.0/24存在于路由表中
C 192.1.1.0/24 is directly connected, Serial0
下面进行宣告。
RA# conf t
RA(config)#router bgp 100
RA(config-router)#network 1.1.1.0 mask 255.255.255.0 // 将网络宣告到BGP中
*************************************************
*************************************************
RB#sh ip bgp //显示RB上的IP BGP表
BGP table version is 4, local router ID is 2.2.2.2
Status codes: s suppressed, d damped, h history, * valid, > best, i - internal
Origin codes: i - IGP, e - EGP, ? - incomplete
Network Next Hop Metric LocPrf Weight Path
*> 1.1.1.0/24 192.1.1.1 0 0 100 i
该输出表示1.1.1.0/24通过192.1.1.1已经被RB学习到了,*表示该条目有效,〉表示该条目是最佳的。
*********************************************************************
RB#sh ip route
Gateway of last resort is not set
1.0.0.0/24 is subnetted, 1 subnets
B 1.1.1.0 [20/0] via 192.1.1.1, 02:49:03
2.0.0.0/24 is subnetted, 1 subnets
C 2.2.2.0 is directly connected, Loopback0
C 193.1.1.0/24 is directly connected, Ethernet0
C 192.1.1.0/24 is directly connected, Serial0
RB的路由表也表示1.1.1.0/24这条路由已经被学习到了。
**********************************************************************
下面我们来看RC
RC#sh ip bgp
BGP table version is 1, local router ID is 3.3.3.3
Status codes: s suppressed, d damped, h history, * valid, > best, i - internal,
r RIB-failure, S Stale
Origin codes: i - IGP, e - EGP, ? - incomplete
Network Next Hop Metric LocPrf Weight Path
* i1.1.1.0/24 192.1.1.1 0 100 0 100 i
RC的BGP表也学到了这条路由,i表示这是通过IBGP进程学习到的。
RC#sh ip route
3.0.0.0/24 is subnetted, 1 subnets
C 3.3.3.0 is directly connected, Loopback0
C 193.1.1.0/24 is directly connected, Ethernet0
但是RC的路由表中我们却没有看到这条路由,我分析是1.1.1.0/24网络所指明的下一条地址并没有存在于RC的路由表中,因此RC并没有到该网络的路径。我觉得可以有两种方法来解决这个问题。
1 可以用路由重发布将BGP发布到AS 200 的IGP中(上次已经做过,这次省略)
2 在RB上强制将该路由的下一条改为193.1.1.1 从而使RC能学习到。
在这里我们使用第二种方法。
*********************************************************
RB(config)#router bgp 200
RB(config-router)#neighbor 193.1.1.2 next-hop-self
第二条语句表示RB将邻居193.1.1.2 的下一条指定为自己
****************************************************
RC#sh ip bgp
BGP table version is 2, local router ID is 3.3.3.3
Status codes: s suppressed, d damped, h history, * valid, > best, i - internal,
r RIB-failure, S Stale
Origin codes: i - IGP, e - EGP, ? - incomplete
Network Next Hop Metric LocPrf Weight Path
*>i1.1.1.0/24 193.1.1.1 0 100 0 100 i
这次的输出已经和上次有所不同,可以看到下一跳已经从192.1.1.1 变为193.1.1.1,而且路由条目的前缀多了一个>号,表示该条目已经是最佳的。
*******************************************************
RC#sh ip route
Gateway of last resort is not set
1.0.0.0/24 is subnetted, 1 subnets
B 1.1.1.0 [200/0] via 193.1.1.1, 00:02:00
3.0.0.0/24 is subnetted, 1 subnets
C 3.3.3.0 is directly connected, Loopback0
C 193.1.1.0/24 is directly connected, Ethernet0
这次IP 路由表的输出,我们可以看到RC已经学习到了这条路由,下一条指向193.1.1.1 。但我们注意到这条BGP路由的管理距离值为200。而在RB的输出中该路由的管理距离值为20 。我想这是由于RB是通过EBGP学习到的该路由,而RC是通过IBGP学习到的该路由,从而管理距离值夜发生了变化。
**********************************************************************
**********************************************************************
总结:通过本次实验,我了解了BGP邻接关系的建立过程以及在宣告网端时的各种问题,比如说一条路由被路由器宣告到BGP中,该路由所指向的下一跳并不会因为学习该路由的路由器不同而发生改变。这所造成的结果是如果一台路由器与宣告该路由的路由器没有直连,它能通过BGP学习到该路由,但IGP却无法学到,因为该路由器的路由表中根本没有到达学习到的路由所指的下一条的路径。解决的方法是可以使用重发布或者使用neihbor X.X.X.X next--hop--self 这条命令强制更改到达所学习路由的下一条地址。
BGP community属性 网友:怒咆的野狼发布于:2007.05.18 13:11(共有条评论) 查看评论| 我要评论 R1R2R3R4R5顺次互联 community属性。这是不同于选路属性的一个属性。该属性具有以下几个特点; 1 community是一个任选可透明传送属性,它可以简化策略的执行。 2 它是cisco的一个专有属性,现在在RFC1997中已被标准化。 3 commnity属性标明一个目的地作为一些目的地团体中的一个成员,这些目的地共享一个或多个共同的特性。 4 community值可以自己定义,另外有几个已经定义好的团体属性: NO_ADVERTISE:表示携带该值的路由不能公布给EBGP和IBGP邻居 NO_EXPORT:表示携带该值的路由不能公布给EBGP邻居 LOCAL_AS:(NO_EXPORT_SUBCONFED)携带该值的路由可以公布给联盟内的其它子自治系统但不能在构成联盟的AS以外进行公布。 试验步骤如下: 配置BGP,在本实验中要建立联邦我们顺便学习一下联邦 配置团体属性,让2.2.2.0网络只被R2学习到 配置团体属性,让22.22.22.0网络只被R2,R3学习到 配置团体属性,让222.222.222.0网络只被R2,R3,R4学习到 配置团体属性,让R1不传递2.2.2.0 这条路由 二试验配置 配置BGP r1#sh run | b r b
router bgp 100 no synchronization network 2.2.2.0 mask 255.255.255.0 network 22.22.22.0 mask 255.255.255.0 network 222.222.222.0 neighbor 12.0.0.2 remote-as 234 no auto-summary r2#sh run | b r b router bgp 64512 no synchronization bgp confederation identifier 234 /指明联邦号是234 neighbor 12.0.0.1 remote-as 100 neighbor 23.0.0.3 remote-as 64512 /R3跟它处于联邦内同一个子AS中neighbor 23.0.0.3 next-hop-self /指定下一跳是它自己 no auto-summary r3#sh run | b r b router bgp 64512 no synchronization bgp confederation identifier 234 bgp confederation peers 64513 /指明该联邦内的另一个子AS neighbor 23.0.0.2 remote-as 64512 neighbor 34.0.0.4 remote-as 64513 /R4跟它处于联邦内不同子AS之间no auto-summary
第三章BGP协议特性与配置实验 3-1 IBGP 与 EBGP 学习目的 ?掌握区域内部BGP勺配置方法 ?掌握多区域BGP勺配置方法 *观察BGP勺邻居表和数据库 ?掌握BG更新源的配置方法 ?掌握EBG多跳的配置方法 ?观察IBGF和EBGI中路由的下一跳的变化 ?掌握IBGP中下一跳的配置 ?掌握BGP勺Network命令的配置方法拓扑图 -523O
场景 根据图上地址以茂阳弓规划配置BGP 1-ARSjARl, AR?谨立EE13P令I;居关系.建用貝连物理接口雀立2?AR1,醐齐AR4盘立IEGP邻居关葩僮甬环回接口.注竜更新源问题 3 . AR4. AR6^2L LEBGP Jp 关系,使冃环jg环叵接门建兀使用静忘路由:呆证 TCP連接可込■注童更血花EMP多跳等问题 4?使用networkfl'J A式将AR5「ARS的loop5&, 60成为BGP路由"要求所有运行BGP的路由器都能学习到,注意RR1和冉恥上配置next-hop-load问题 5 ■使用import的方式*将略2佃中的O5PF路由成为并卩路由’是其他所有路由器都能学习到「曼求最终服5上的“孔能ping通就R&上的L“0 第略路由, 在翻1配宜策珞路由, 要求1,1,1.1^问40丄1 * 1时通过AR2访问 1,1*1-2访问4e.L.1.2lHt通过"茄方问 学习任务 步骤一?基础配置与IP编址与布置IGP 这里IP和OSP已经配置好,平时大家自己配置好IP的后,配置好后记得测试直连是否能通 步骤二. AR1 AR5 AR7建立EBGP邻居(使用直连接口建立) [R1]bgp 200 (进入 BG进程) [R1-bgp]router-id 1.1.1.1 (指定 BGP勺 router-id ) [R1-bgp]peer 15.1.1.5 as-number 100 _________ (指定与哪个AS勺对等体建立邻居)[R1-bgp]peer 17.1.1.7 as-number 400 _________ (指定与哪个AS勺对等体建立邻居)[R5]bgp 100 [R5-bgp]router-id 5.5.5.5 [R5-bgp]peer 15.1.1.1 as-number 200 _________ (指定与哪个AS勺对等体建立邻居) [R7]bgp 400 [R7-bgp]router-id 7.7.7.7 [R7-bgp]peer 17.1.1.1 as-number 200 (指定与哪个AS勺对等体建立邻居) 对等体关系建立完成后,使用display bgp peer检查对等体关系状态。 [R1-bgp]dis bgp peer (截图,可以看到AR和AR5 AR7匀建立了 EBG邻居关系)
BGP MPLS VPN配置实例 图为bgp mpls vpn实例,下面分别为P设备,PE设备,CE设备配置及网络拓扑结构。sysname RT2 mpls lsr-id 2.2.2.2 mpls mpls ldp
isis 1 is-level level-2 cost-style wide network-entity 49.0020.0200.2002.00 interface GigabitEthernet0/0/0 ip address 10.1.12.2 255.255.255.0 isis enable 1 mpls mpls ldp # interface GigabitEthernet0/0/1 ip address 10.1.23.2 255.255.255.0 isis enable 1 mpls mpls ldp # interface LoopBack0 ip address 2.2.2.2 255.255.255.255 isis enable 1 PE 1 sysname RT1 ip vpn-instance VPNA ipv4-family route-distinguisher 100:1 vpn-target 100:1 export-extcommunity vpn-target 100:1 import-extcommunity # ip vpn-instance VPNB ipv4-family route-distinguisher 200:1 vpn-target 200:1 export-extcommunity vpn-target 200:1 import-extcommunity # mpls lsr-id 1.1.1.1
CISCO 路由器OSPF+MPLS+BGP配置实例 二OO八年九月四日
目录 一、网络环境 (3) 二、网络描述 (3) 三、网络拓扑图 (4) 四、P路由器配置 (4) 五、PE1路由器配置 (6) 六、PE2路由器配置 (9) 七、CE1路由器配置 (11) 八、CE2路由器配置 (13) 九、业务测试 (14)
一、网络环境 由5台CISCO7204组成的网络,一台为P路由器,两台PE路由器,两台CE 路由器; 二、网络描述 在P和两台PE路由器这间通过OSPF动态路由协议完成MPLS网络的建立,两台PE路由器这间启用BGP路由协议,在PE路由器上向所属的CE路由器指VPN 路由,在CE路由器中向PE路由器配置静态路由。 配置思路: 1、在P和两台PE路由器这间通过OSPF动态路由协议,在P和PE路由器两两互连的端口上启用MPLS,两台PE之间的路为备份路由,这属公网路由。 2、两台PE路由器这间启用BGP路由协议,这使得属于VPN的IP地址能在两个网络(两台CE所属的网络)互相发布,这属私网(VPN)路由。 3、在PE路由器上向所属的CE路由器指VPN路由,这打通了两个网络(两台CE所属的网络)之间的路由。
三、网络拓扑图 P 路由器(r1)(r4)CE1路由器(r5) PE1LOOP0:202.98.4.3/32 LOOP0:192.168.3.1/24LOOP0:192.168.4.1/24 四、P 路由器配置 p#SHOW RUN Building configuration... Current configuration : 1172 bytes ! version 12.3 service timestamps debug datetime msec service timestamps log datetime msec no service password-encryption ! hostname p ! boot-start-marker boot-end-marker ! ! no aaa new-model
<BGP(Border Gateway Protocol)理论部分> ·BGP属于EGP,是高级DV协议,也被称为路径矢量协议,基于TCP 179端口。 ·现在使用版本BGP4。 第一次做完整更新,以后就只增量更新 ·Autonomous Systems:运行同一种选路策略,由统一管理者管理。 1-64511 (公有) 64512-65535 (私有) 电信AS号:4134 网通AS号:9929 https://www.doczj.com/doc/7413322775.html, 一个好的网站,可以了解到关于AS号的一些信息 Telnet https://www.doczj.com/doc/7413322775.html,这一地址可以看到公网上的路由条目数 ·IGP支持的路由条目有限 运行IGP不利于管理, 做路由聚合、选路。 ·BGP路由器只能将其使用的路由通告给他的邻居。 BGP用Open报文建邻居,用KL报文做日常联系 ·Neighbor table : List of BGP neighbors ·BGP forwarding table/database List of all networks learned from each neighbor Can contain multiple pathways to destination networks Database contains BGP attributes for each pathway ·IP routing table List of best paths to destination networks BGP表和路由表是独立的,同样遵循AD小的进入路由表。 BGP默认不做负载均衡 ·Router-ID选举和OSPF一致。 四种报文: Open ---includes holdtime and BGP router ID (用于建立TCP连接后,发起BGP会话,每个邻居都用该消息来标识自己,并且规定自己的BGP运行参数) Keepalive — (用于保持BGP会话,每隔60秒发送一次,hold time为180S) Update ---information for one path only (could be to multiple networks) ---Includes path attributes and networks ·一个UPDATE 消息一次只能通告一条路由,但它可以携带多个属性。 一个UPDATE 消息一次也可通告多条路由,但它的属性必须相同。 一个UPDATE 消息可以同时撤消多条路由。
Bgp 配置 R4: router bgp 4 no synchronization 默认关闭同步(同步:是只有互联通信的路由器才能建立邻居,可以写默认或者跑IGP解决) bgp router-id 4.4.4.4 //bgp router-id bgp log-neighbor-changes network 4.4.4.0 mask 255.255.255.0 //宣告网络(必须自己有,而且要精确匹配)neighbor 2.2.2.2 remote-as 1 //手动添加邻居 neighbor 2.2.2.2 ebgp-multihop 5 //ebgp默认ttl 为1,用环回口改大点才能 建邻居 neighbor 2.2.2.2 update-source Loopback0 //指定更新源环回口 no auto-summary ip route 2.2.2.2 255.255.255.255 Serial0/0 //同步问题解决方案,写默认,确认能互联 R2: router ospf 1 log-adjacency-changes network 2.2.2.0 0.0.0.255 area 0 network 192.168.12.0 0.0.0.255 area 0 ! router bgp 1 no synchronization bgp router-id 2.2.2.2 bgp log-neighbor-changes neighbor 1.1.1.1 remote-as 1
neighbor 1.1.1.1 update-source Loopback0 neighbor 1.1.1.1 next-hop-self //对ibgp邻居必须指定自己为宣 告路由的下一跳 neighbor 3.3.3.3 remote-as 1 neighbor 3.3.3.3 update-source Loopback0 neighbor 3.3.3.3 next-hop-self neighbor 4.4.4.4 remote-as 4 neighbor 4.4.4.4 ebgp-multihop 2 //ebgp 邻居改ttl neighbor 4.4.4.4 update-source Loopback0 no auto-summary ip route 4.4.4.4 255.255.255.255 Serial0/1 R1: router ospf 1 log-adjacency-changes network 0.0.0.0 255.255.255.255 area 0 ! router bgp 1 no synchronization bgp log-neighbor-changes neighbor 2.2.2.2 remote-as 1 neighbor 2.2.2.2 update-source Loopback0 neighbor 3.3.3.3 remote-as 1 neighbor 3.3.3.3 update-source Loopback0 no auto-summary R3: router ospf 1 log-adjacency-changes network 3.3.3.0 0.0.0.255 area 0 network 192.168.13.0 0.0.0.255 area 0 router bgp 1 no synchronization bgp log-neighbor-changes neighbor 1.1.1.1 remote-as 1 neighbor 1.1.1.1 update-source Loopback0 neighbor 1.1.1.1 next-hop-self neighbor 2.2.2.2 remote-as 1 neighbor 2.2.2.2 update-source Loopback0 neighbor 2.2.2.2 next-hop-self neighbor 5.5.5.5 remote-as 5
BGP学习总结 ------李永峰 命令集合与注解 (config-if)#router bgp 64512 (开启bgp进程,64512为自己所在AS) (config-router)#neighbor 12.1.1.1 remote-as 100 (指定和谁建立邻居,12.1.1.1为对方地址) (config-router)#neighbor 4.4.4.4 remote-as 64512 (指定和谁建立邻居,4.4.4.4为对方地址,这里是对方环回口地址)(config-router)#neighbor 4.4.4.4 update-source loopback 0 (用自己环回地址和对方环回地址建邻居时,用该命令指定更新源)(config-router)#neighbor 4.4.4.4 next-hop-self (收到路由后,用自己地址作为下一跳再传给邻居R4) (config-router)#neighbor 2.2.2.2 route-reflector-client (指定R2为反射器客户端,路由可以反射给邻居R2) (config-router)#neighbor 3.3.3.3 route-reflector-client (指定R3为反射器客户端,路由可以反射给邻居R3) (config-router)#bgp confederation identifier 200 (配置联盟大AS号码,这样路由器对外宣称自己AS为200 ) (config-router)#bgp confederation peers 64513
(配置联盟对等体AS号码) (config-router)#bgp dampening 15 750 2000 60 (开启路由惩罚) BGP基本配置详解 目的:两两路由器之间建立邻居关系 R1和R2建立EBGP邻居关系 R1(config)#router bgp 100(100为自己所在的AS号码) R1(config-router)#neighbor 12.1.1.2 remote-as 200(邻居的地址,邻居的AS号码) R2(config)#router bgp 200(100为自己所在的AS号码) R2(config-router)#neighbor 12.1.1.1 remote-as 100(邻居的地址,邻居的AS号码) 同理进行R3 与R4邻居建立。略 R2与R3使用环回口建立IBGP邻居关系, R2(config-if)#router bgp 200 R2(config-router)#neighbor 3.3.3.3 remote-as 200 R2(config-router)#neighbor 3.3.3.3 update-source loopback 0
【CCNP】BGP联盟配置案例 版本V1.0 密级?开放?内部?机密 类型?讨论版?测试版?正式版 1案例配置拓扑 2案例配置需求 1、如上图所示,IP地址规划方面,R2上有一环回接口loopback 200,地址为200.1.1.1/32,R5上 有一环回接口loopback 100,地址为100.1.1.1/32,路由器互连的接口为172.8.AB.X/24(其中AB为路由器编号叠加,X为路由器编号,如R1连接R2的接口S0/0的地址为172.8.12.1/24) 2、如图所示,联盟AS 100中有两个子AS,它们分别为AS 65501、AS 65502,配置R1与R2行成 联盟iBGP邻居关系,R2与R3之间行成联盟eBGP邻居关系,R3与R4行成联盟iBGP邻居关系,R3与R5形成eBGP邻居关系,采用物理接口配置邻居建立; SPOTO 全球培训●项目●人才 1
SPOTO 全球 培训 ● 项目 ● 人才 2 3、 将R2的loopback 200、R5的loopback 100接口宣告到相应的BGP 中,观察联盟内部的特征; 3 案例配置思路 1、 R1上的关键配置: router bgp 65501 /联盟子AS/ no synchronization bgp log-neighbor-changes bgp confederation identifier 100 /指定对联盟外呈现的AS/ 雏鹰论坛CCNP neighbor 172.8.12.2 remote-as 65501 no auto-summary 2、 R2上的关键配置: router bgp 65501 no synchronization bgp log-neighbor-changes bgp confederation identifier 100 bgp confederation peers 65502 /指定联盟内部eBGP 邻居关系的邻居AS/ network 200.1.1.1 mask 255.255.255.255 neighbor 172.8.12.1 remote-as 65501 neighbor 172.8.23.3 remote-as 65502 no auto-summary 3、 R3上的关键配置: router bgp 65502 no synchronization bgp log-neighbor-changes bgp confederation identifier 100 bgp confederation peers 65501 neighbor 172.8.23.2 remote-as 65501 neighbor 172.8.34.4 remote-as 65502 neighbor 172.8.35.5 remote-as 200 no auto-summary 4、 R4上的关键配置: router bgp 65502
组网说明: 本案例采用H3C HCL模拟器来模拟IPV6 IBGP典型组网配置案例。R1属于AS 100,R2属于AS 200。要求R1与R2建立EBGP邻居关系后,R1和R2的loopback 0地址能够互通。 配置思路: 1、按照网络拓扑图正确配置IPV6地址 2、R1与R2建立EBGP邻居关系 配置过程: R1:
[R1-bgp-default-ipv6]peer 1::2 enable [R1-bgp-default-ipv6]network 2:: 64 [R1-bgp-default-ipv6]quit [R1-bgp-default]quit R2:
H3C-BGP配置
1.14 BGP典型配置举例 1.14.1 BGP基本配置 1. 组网需求 如图1-15所示,所有路由器均运行BGP协议。要求Router A和Router B之间建立EBGP连接,Router B和Router C之间建立IBGP连接,使得Router C能够访问Router A直连的8.1.1.0/24网段。 2. 组网图 图1-15 BGP基本配置组网图 3. 配置步骤 (1) 配置各接口的IP地址(略) (2) 配置IBGP连接 ?为了防止端口状态不稳定引起路由震荡,本举例使用Loopback接口来创建IBGP 对等体。
?使用Loopback接口创建IBGP对等体时,因为Loopback接口不是两对等体实际连接的接口,所以,必须使用peer connect-interface命令将Loopback接口配置为BGP连接的源接口。 ?在AS 65009内部,使用OSPF协议,保证Router B到Router C的Loopback 接口路由可达。 # 配置Router B。
华为AR2240 bgp配置实例 作者:救世主220 实验日期:2015.7.1 实验拓扑如下: AR1配置: [AR1]dis current-configuration [V200R003C00] # sysname AR1 # # interface GigabitEthernet0/0/0 ip address 10.0.12.1 255.255.255.0 # interface LoopBack0 ip address 1.1.1.1 255.255.255.0 # interface LoopBack1 ip address 8.1.1.1 255.255.255.0 # bgp 1 peer 10.0.12.2 as-number 2 # ipv4-family unicast undo synchronization network 1.1.1.0 255.255.255.0 import-route direct peer 10.0.12.2 enable
AR2配置: [AR2]dis current-configuration [V200R003C00] # sysname AR2 # interface GigabitEthernet0/0/0 ip address 10.0.12.2 255.255.255.0 # interface GigabitEthernet0/0/1 ip address 10.0.23.2 255.255.255.0 # interface LoopBack0 ip address 2.2.2.2 255.255.255.0 ospf network-type broadcast # bgp 2 peer 3.3.3.3 as-number 2 peer 3.3.3.3 connect-interface LoopBack0 peer 10.0.12.1 as-number 1 # ipv4-family unicast undo synchronization network 2.2.2.0 255.255.255.0 import-route ospf 1 peer 3.3.3.3 enable peer 3.3.3.3 next-hop-local peer 10.0.12.1 enable # ospf 1 router-id 2.2.2.2 area 0.0.0.0
第三章 BGP协议特性与配置实验 3-1 IBGP与EBGP 学习目的 ?掌握区域内部BGP的配置方法 ?掌握多区域BGP的配置方法 ?观察BGP的邻居表和数据库 ?掌握BGP更新源的配置方法 ?掌握EBGP多跳的配置方法 ?观察IBGP和EBGP中路由的下一跳的变化 ?掌握IBGP中下一跳的配置 ?掌握BGP的Network命令的配置方法 拓扑图
场景 学习任务 步骤一. 基础配置与IP编址与布置IGP 这里IP和OSPF已经配置好,平时大家自己配置好IP的后,配置好后记得测试直连是否能通 步骤二. AR1、AR5、AR7建立EBGP邻居(使用直连接口建立) [R1]bgp 200 (进入BGP进程) [R1-bgp]router-id 1.1.1.1 (指定BGP的router-id) [R1-bgp]peer 15.1.1.5 as-number 100(指定与哪个AS的对等体建立邻居)[R1-bgp]peer 17.1.1.7 as-number 400(指定与哪个AS的对等体建立邻居)[R5]bgp 100 [R5-bgp]router-id 5.5.5.5 [R5-bgp]peer 15.1.1.1 as-number 200(指定与哪个AS的对等体建立邻居) [R7]bgp 400 [R7-bgp]router-id 7.7.7.7 [R7-bgp]peer 17.1.1.1 as-number 200(指定与哪个AS的对等体建立邻居)对等体关系建立完成后,使用display bgp peer检查对等体关系状态。 [R1-bgp]dis bgp peer(截图,可以看到AR1和AR5、AR7均建立了EBGP邻居关系)
BGP的各种属性配置 Lab 31. Configuring BGP Summarization 实验目的: 1、掌握使用指向NULL0接口的静态路由的汇总配置方法。 2、掌握使用聚合属性的路由汇总配置方法。 R1(config)#ip route 172.16.0.0 255.25 5.252.0 null 0 R1(config)#router bgp 64512 R1(config-router)#aggregate-address 172.16.0.0 255.255.252.0 summary- only Lab 33. BGP Neighbor Authentication 实验目的: 1、掌握其于MD5的BGP对等体认证配置。 R1(config)#router bgp 64512 R1(config-router)#neighbor 10.1.255.2 password cisco123 R2(config)#router bgp 64513 R2(config-router)#neighbor 10.1.255.1 password cisco123 Lab 34. Configuring BGP Local Preference 实验目的: 1、理解掌握BGP的本地优选属性概念和配置方法。 2、本地优选的属性默认值为100,较高值的路径会被优先选择。 3、本地优先属性,决定离开本自治系统最佳的路径。 (BGP在选择最佳路由时,并不会考具体链路的带宽。为了解决这一问题,可以在本地配置“本地优先”来确定数据流如何流出本自治系统。BGP会优先选择本地优先属性值较高的路由。)
华为BGP基础配置之基于ISIS 1、配置IP R1配置: [R1]interface LoopBack 0 [R1-LoopBack0]ip address 1.1.1.1 32 [R1-LoopBack0]quit [R1]interface GigabitEthernet 0/0/0 [R1-GigabitEthernet0/0/0]ip address 12.1.1.1 24 [R1-GigabitEthernet0/0/0]quit [R1]interface GigabitEthernet 0/0/1 [R1-GigabitEthernet0/0/1]ip address 192.168.1.1 24 [R1-GigabitEthernet0/0/1]quit R2配置: [R2]interface LoopBack 0 [R2-LoopBack0]ip address 2.2.2.2 32 [R2-LoopBack0]quit [R2]interface GigabitEthernet 0/0/0 [R2-GigabitEthernet0/0/0]ip address 12.1.1.2 24 [R2-GigabitEthernet0/0/0]quit [R2]interface GigabitEthernet 0/0/1 [R2-GigabitEthernet0/0/1]ip address 23.1.1.2 24
[R2-GigabitEthernet0/0/1]quit R3配置: [R3]interface LoopBack 0 [R3-LoopBack0]ip address 3.3.3.3 32 [R3-LoopBack0]quit [R3]interface GigabitEthernet 0/0/0 [R3-GigabitEthernet0/0/0]ip address 23.1.1.3 24 [R3-GigabitEthernet0/0/0]quit [R3]interface GigabitEthernet 0/0/1 [R3-GigabitEthernet0/0/1]ip address 34.1.1.3 24 [R3-GigabitEthernet0/0/1]quit R4配置: [R4]interface LoopBack 0 [R4-LoopBack0]ip address 4.4.4.4 32 [R4-LoopBack0]quit [R4]interface GigabitEthernet 0/0/0 [R4-GigabitEthernet0/0/0]ip address 34.1.1.4 24 [R4-GigabitEthernet0/0/0]quit [R4]interface GigabitEthernet 0/0/1 [R4-GigabitEthernet0/0/1]ip address 45.1.1.4 24 [R4-GigabitEthernet0/0/1]quit R5配置: [R5]interface LoopBack 0 [R5-LoopBack0]ip address 5.5.5.5 32 [R5-LoopBack0]quit [R5]interface GigabitEthernet 0/0/0 [R5-GigabitEthernet0/0/0]ip address 45.1.1.5 24 [R5-GigabitEthernet0/0/0]quit [R5]interface GigabitEthernet 0/0/1 [R5-GigabitEthernet0/0/1]ip address 192.168.2.1 24 [R5-GigabitEthernet0/0/1]quit 2、配置ISIS区域,使用level-1、level-2均可。这里使用level-2
BGP路由属性实例 AS_path属性 * AS_PATH属性按一定次序记录了某条路由从本地到目的地址所要经过的所有AS号。当BGP将一条路由通告到其他AS时,便会把本地AS号添加在AS_PATH列表的最前面。收到此路由的BGP路由器根据AS_PATH属性就可以知道去目的地址所要经过的AS。离本地AS最近的相邻AS号排在前面,其他AS号按顺序依次排列。例如: * 通常BGP不会接受AS_PATH中已包含本地AS号的路由,从而避免形成环路的可能. Next_hop属性 BGP的下一跳属性和IGP的有所不同,不一定就是邻居路由器
的IP地址。主要分以下三种情况: ●BGP发言者把自己产生的路由发给所有邻居时,将把该路由信息 的下一跳属性设置为自己与对端连接的接口地址; 如图: ●BGP发言者把接收到的路由发送给EBGP对等体时,将把该路由 信息的下一跳属性设置为本地与对端连接的接口地址; 如图: ●BGP发言者把从EBGP邻居得到的路由发给IBGP邻居时,并不 改变路由信息的下一跳属性。
Local_pref属性 Local_pref属性仅在IBGP对等体之间交换,不通告给其他AS。它表明BGP路由器的优先级。Local_pref属性用于判断流量离开本AS时的最佳路由。当BGP的路由器通过不同的IBGP对等体得到目的地址相同但下一跳不同的多条路由时,将优先选择Local_pref属性值较高的路由。如图: Med属性 MED属性仅在相邻两个AS之间交换,收到此属性的AS一方不会再将其通告给任何其他第三方AS。 MED属性相当于IGP使用的度量值,它用于判断流量进入AS 时的最佳路由。当一个运行BGP的路由器通过不同的EBGP对等体得到目的地址相同但下一跳不同的多条路由时,在其它条件相同的情
BGP协议在运营商网络中的配置建议 2007-9-3 BGP简介 BGP在TCP/IP网中实现域间路由。BGP是一种外部网关协议(EGP),即它在多个自治系统或域间执行路由、与其它BGP系统交换路由和可达性信息。BGP有多个版本,目前在internet中应用的是BGP4版本,在RFC1711中进行了规定。BGP协议既可以提供AS间(IBGP)也可以提供AS内部路由(EBGP)。为解决IBGP peer 全连接的问题, internet常采用路由反射器(Route Reflector)技术。 本文就IBGP、EBGP及常用的RR技术的相关注意事项进行描述,供工程或者运维人员参考。 一、SP中IBGP的注意事项 两个路由器之间的相邻连接称为对等体连接,它可以建立在同一AS内,在这种情况下,BGP称为内部BGP(IBGP)。 1.1 采用 loopback 0地址建立IBGP连接 IBGP中通常建议采用路由器的回环地址建立BGP对等,相对于物理接口地址,回环地址具有很好的稳定性,因为只要有任何一个物理接口连接正常能保证IGP的互通,BGP的连接就能够维持。 配置的示例如下: interface loopback 0 ip address m.m.m.m 255.255.255.255 router bgp XX---------------------------/BGP AS域/ neighbor n.n.n.n remote-as XX------/n.n.n.n为对等路由器的Loopback 0地址/ neighbor update-source loopback 0 1.2 同步规则 BGP同步规则的定义: 在BGP同步打开的情况下,一个BGP路由器不会把那些通过IBGP邻居学到的BGP路由通告给自己的EBGP邻居;除非自 己的IGP路由表中存在这些路由,才可以向EBGP路由器通告。BGP同步
B G P实验1(B G P基础 配置)
第三章 BGP协议特性与配置实验 3-1 IBGP与EBGP 学习目的 ?掌握区域内部BGP的配置方法 ?掌握多区域BGP的配置方法 ?观察BGP的邻居表和数据库 ?掌握BGP更新源的配置方法 ?掌握EBGP多跳的配置方法 ?观察IBGP和EBGP中路由的下一跳的变化 ?掌握IBGP中下一跳的配置 ?掌握BGP的Network命令的配置方法 拓扑图
场景 学习任务 步骤一. 基础配置与IP编址与布置IGP 这里IP和OSPF已经配置好,平时大家自己配置好IP的后,配置好后记得测试直连是否能通 步骤二. AR1、AR5、AR7建立EBGP邻居(使用直连接口建立) [R1]bgp 200 (进入BGP进程) [R1-bgp]router-id 1.1.1.1 (指定BGP的router-id) [R1-bgp]peer 15.1.1.5 as-number 100(指定与哪个AS的对等体建立邻居) [R1-bgp]peer 17.1.1.7 as-number 400(指定与哪个AS的对等体建立邻居)[R5]bgp 100 [R5-bgp]router-id 5.5.5.5 [R5-bgp]peer 15.1.1.1 as-number 200(指定与哪个AS的对等体建立邻居) [R7]bgp 400 [R7-bgp]router-id 7.7.7.7 [R7-bgp]peer 17.1.1.1 as-number 200(指定与哪个AS的对等体建立邻居) 对等体关系建立完成后,使用display bgp peer检查对等体关系状态。 [R1-bgp]dis bgp peer(截图,可以看到AR1和AR5、AR7均建立了EBGP邻居关系)