
RAT STOWAGE AND SERVICING (2) EXTENSION PROCEDURE
W ARNING:PUT THE SAFETY DEVICES AND THE W ARNING NOTICES IN POSITION BEFORE YOU START A TASK
ON OR NEAR:
- THE FLIGHT CONTROLS,
- THE FLIGHT CONTROL SURFACES,
- THE L/G AND THE RELATED DOORS,
- COMPONENTS THAT MOVE.
MAKE SURE THAT THE TRA VEL RANGES OF THE
FLIGHT CONTROL SURFACES ARE CLEAR BEFORE
YOU PRESSURIZE/DEPRESSURIZE A HYDRAULIC
SYSTEM.
MAKE SURE THAT THE RAM AIR TURBINE (RAT)
TRA VEL RANGE IS CLEAR BEFORE YOU EXTEND
THE RAT.
PLACE SAFETY BARRIERS IN POSITION AND FIT
THE RAT PROTECTIVE EQUIPMENT AS PER AMM
PROCEDURE.
DO NOT STAND IN FRONT OF OR BESIDE THE RAT
PROPELLER ASSEMBLY DURING THE FUNCTIONAL
TEST.
NOTE:Note: do not operate the RAT deployment solenoids for more than 60 sec. You can operate them more than once, but you
must then let them cool down for 30 min.
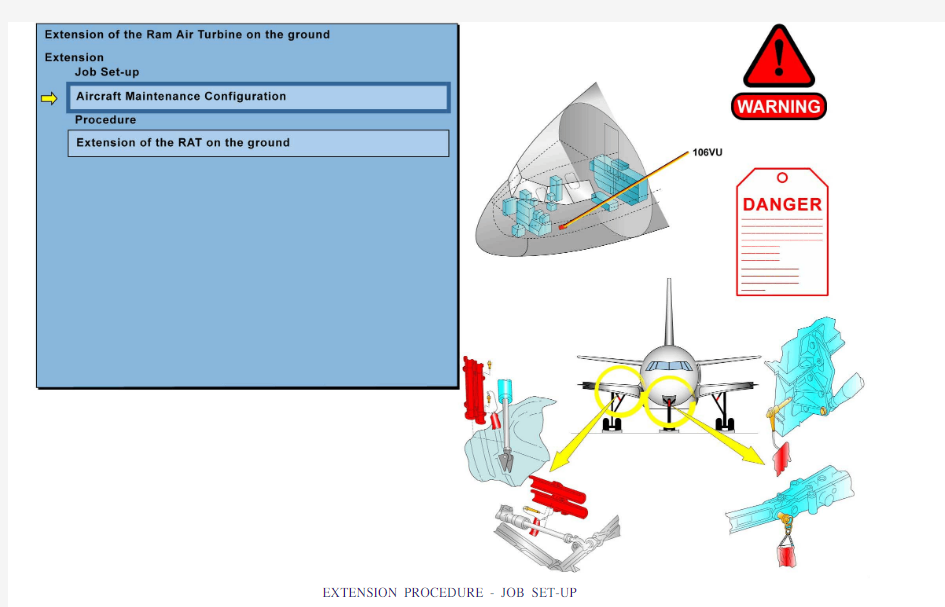
JOB SET-UP
Put the warning notices in the position to tell persons not to stand directly behind or in the extension area of the RAT.
Put the safety barriers in position.
Energize the A/C electrical circuit.
Make sure that these C/Bs are closed: 106VU.
EXTENSION PROCEDURE - JOB SET-UP
RAT STOWAGE AND SERVICING (2) EXTENSION PROCEDURE (continued)
PROCEDURE
On the hydraulic panel, open the protective cover and push the
MANual ON/AUTO switch in the EMERgency ELECtrical PoWeR panel.
Make sure that the RAT extend.
Install the protective covers on the turbine blades.
NOTE:Note: make sure that a second person is on the ground near the RAT to observe the extension of the RAT.
Note: do not operate the RAT deployment solenoids for
more than 60 seconds. You can operate them more than
once. When the operation time (solenoids energized) is max.
60 seconds, you must let solenoids cool for 30 minutes.
EXTENSION PROCEDURE - PROCEDURE
RAT STOWAGE AND SERVICING (2) RETRACTION PROCEDURE
W ARNING:PUT THE SAFETY DEVICES AND THE W ARNING NOTICES IN POSITION BEFORE YOU START A TASK
ON OR NEAR:
- THE FLIGHT CONTROLS,
- THE FLIGHT CONTROL SURFACES,
- THE L/G AND THE RELATED DOORS,
- COMPONENTS THAT MOVE.
MAKE SURE THAT THE TRA VEL RANGES OF THE
FLIGHT CONTROL SURFACES ARE CLEAR BEFORE
YOU PRESSURIZE/DEPRESSURIZE A HYDRAULIC
SYSTEM.
MAKE SURE THAT THE GROUND SAFETY-LOCKS
ARE IN POSITION ON THE L/G.
CAUTION:make sure that the RAT is retracted completely before you release the "RAT stow" switch. If the retraction sequence
stops just before the rat enters the bay in the fairing this will
cause damage to RAT actuator.
JOB SET-UP
Make sure that the warning notices are in position.
Make sure that the safety barriers are in position.
Energized the A/C electrical circuits.
Pressurize the blue hydraulic system.
Make sure that this C/B is closed: 49VU.
RETRACTION PROCEDURE - JOB SET-UP
RAT STOWAGE AND SERVICING (2) RETRACTION PROCEDURE (continued)
PROCEDURE
Open the door of the RAT ground control panel.
Remove the protective cover from the turbine blades.
Turn the turbine blades with your hands until the arrows on the turbine hub and the gearbox align.
On the RAT ground control panel set the ARM switch to the on
position.
Move the STOW/RESET switch to the STOW position and hold it there until:
- the RAT STOWED indicator light comes on,
- the ACTUATOR PRESSURE light comes on.
Make sure that the RAT retracts.
Release the STOW/RESET switch: the ACTUATOR PRESSURE light goes off.
Set the switch 28V DC to the OFF position: the RAT STOWED light goes off.
RETRACTION PROCEDURE - PROCEDURE
RAT STOWAGE AND SERVICING (2) RETRACTION PROCEDURE (continued)
CLOSE-UP
Put the A/C back to the serviceable condition:
- depressurize the blue hydraulic system,
- de-energized the A/C electrical circuits,
- if you have completed all work in the deploy area to the RAT, remove the SAFETY DEVICE-RAT.
Close access:
- close the door of the RAT ground control panel,
- close the access doors,
- remove the warning notices,
- remove the safety barriers.
RETRACTION PROCEDURE - CLOSE-UP
RAT TEST (3)
PRECAUTIONS
W ARNING:PUT THE SAFETY DEVICES AND THE W ARNING NOTICES IN POSITION BEFORE YOU START A TASK
ON OR NEAR:
- THE FLIGHT CONTROLS,
- THE FLIGHT CONTROL SURFACES,
- THE L/G AND THE RELATED DOORS,
- COMPONENTS THAT MOVE.
MAKE SURE THAT THE TRA VEL RANGES OF THE
FLIGHT CONTROL SURFACES ARE CLEAR BEFORE
YOU PRESSURIZE/DEPRESSURIZE A HYDRAULIC
SYSTEM.
MAKE SURE THAT THE SAFETY LOCKS ARE IN
POSITION ON THE L/G.
MAKE SURE THAT THE RAM AIR TURBINE (RAT)
TRA VEL RANGE IS CLEAR BEFORE YOU EXTEND
THE RAT.
PLACE SAFETY BARRIERS IN POSITION AND FIT
THE RAT PROTECTIVE EQUIPMENT AS PER AMM
PROCEDURE.
DO NOT STAND IN FRONT OF OR BESIDE THE RAT
PROPELLER ASSEMBLY DURING THE FUNCTIONAL
TEST.
NOTE:Note: do not operate the RAT deployment solenoids for more than 60 sec. You can operate them more than once, but you
must then let them cool down for 30 min.
GROUND CHECKOUT UNIT PRESENTATION
The ground checkout unit provides a visual indication of the RAT rpm and the blue system pressure delivered by the RAT during a ground check.A cable provides electrical connection between the RAT control panel and the connector on the ground checkout unit.
PRECAUTIONS & GROUND CHECKOUT UNIT PRESENTATION
RAT TEST (3)
RAT GROUND TEST MOTOR PRESENTATION
To test the RAT performance on ground, a ground test motor must be connected to the RAT gearbox. The RAT ground test motor is driven by a hydraulic ground cart.
RAT GROUND TEST MOTOR PRESENTATION
RAT TEST (3)
FLOW CONTROL TEST KIT PRESENTATION
To simulate A/C hydraulic consumers during RAT ground check, a flow control test kit must be connected to the blue hydraulic service panel. The flow control test kit provides visual indication of blue system flow delivered by the RAT by means of a flow meter. The flow is controlled by means of a manual adjustable flow valve.
FLOW CONTROL TEST KIT PRESENTATION
RAT TEST (3)
MAIN STEPS OF THE TEST OPERATION
PREPARATION OF RAT TEST
To functionally check the RAT on ground it is necessary to:
- manually deploy the RAT from the cockpit,
- connect the ground test motor to the RAT gearbox,
- connect the ground checkout unit to the RAT control panel,
- connect the RAT flow control test kit to the blue ground service panel.
MAIN STEPS OF THE TEST OPERATION - PREPARATION OF RAT TEST
RAT TEST (3)
MAIN STEPS OF THE TEST OPERATION (continued)
RAT EXTENTION
When the RAT is extended on the ejection spring jack, the RAT leg drops, opening mechanically the doors.
MAIN STEPS OF THE TEST OPERATION - RAT EXTENTION