12 – Input Forms
Exercise 12.1.1 – Creating Account by Time Input Form
Tasks:
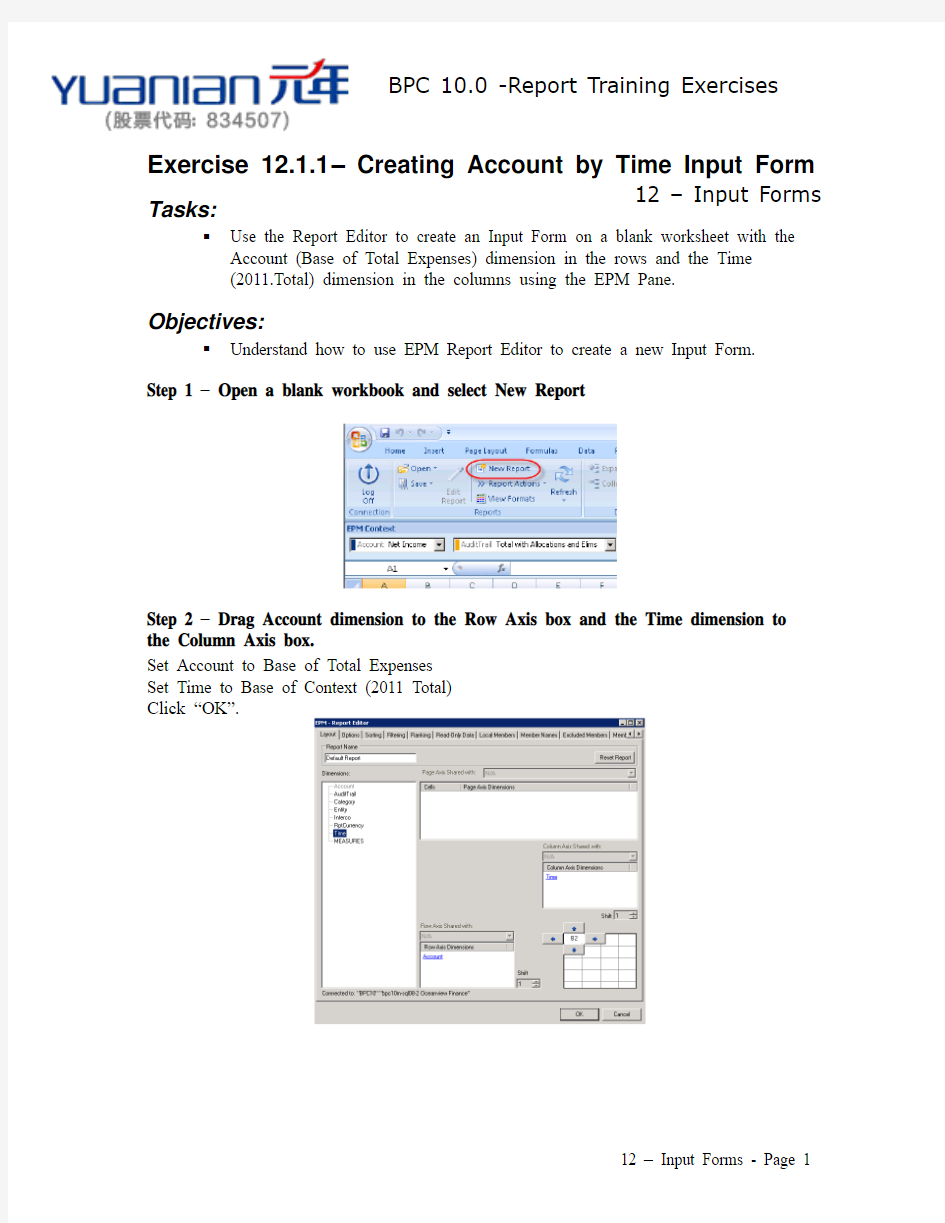
? Use the Report Editor to create an Input Form on a blank worksheet with the
Account (Base of Total Expenses) dimension in the rows and the Time (2011.Total) dimension in the columns using the EPM Pane.
Objectives:
? Understand how to use EPM Report Editor to create a new Input Form. Step 1 – Open a blank workbook and select New Report
Step 2 – Drag Account dimension to the Row Axis box and the Time dimension to the Column Axis box.
Set Account to Base of Total Expenses Set Time to Base of Context (2011 Total) Click “OK”.
12 – Input Forms
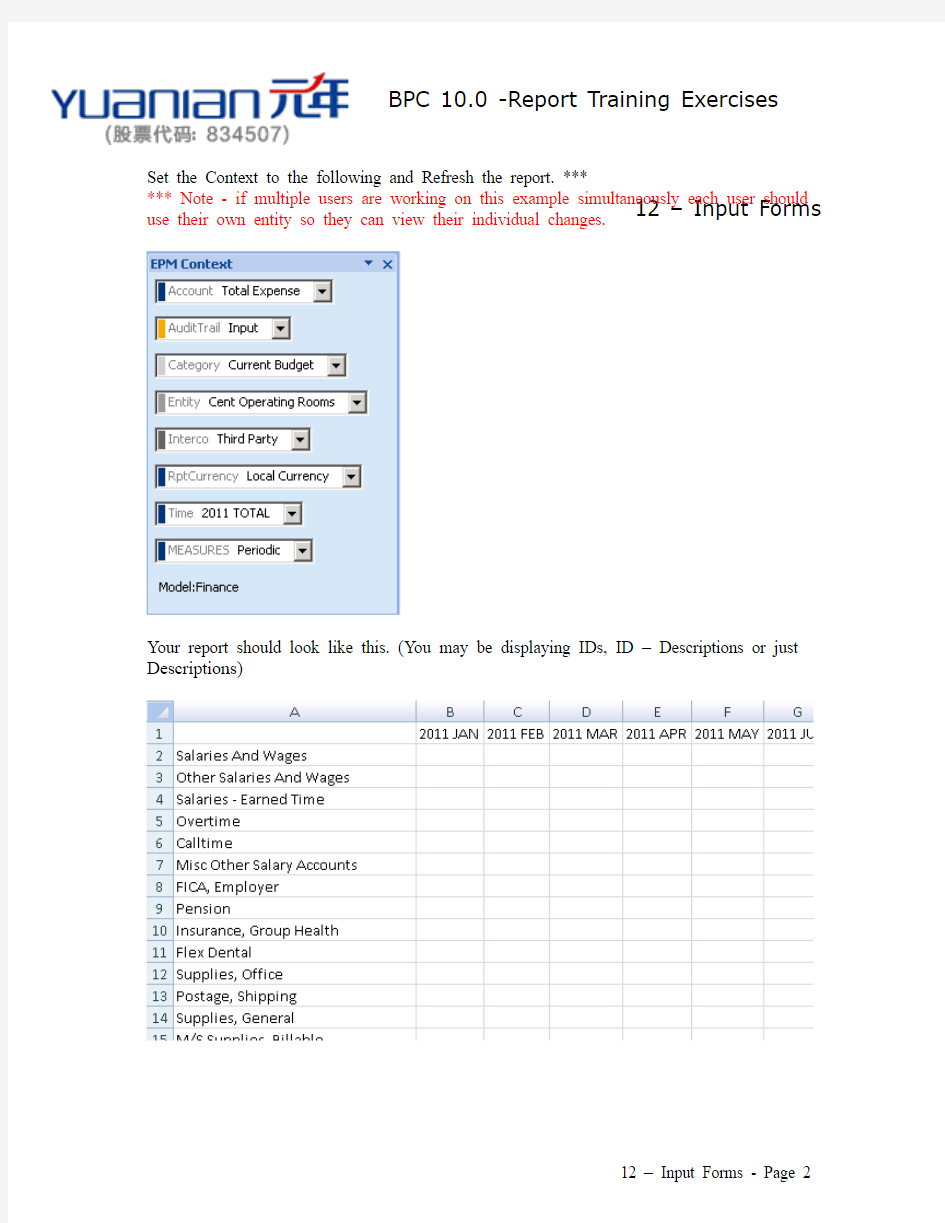
Set the Context to the following and Refresh the report. ***
*** Note - if multiple users are working on this example simultaneously each user should use their own entity so they can view their individual changes.
Your report should look like this. (You may be displaying IDs, ID – Descriptions or just Descriptions)
12 – Input Forms Exercise 12.1.2 – Add Dimensions to Page Axis, Move Row Axis and Column Axis
Tasks:
?
Modify Page Axis to include Category and Entity Dimensions to the Page
Axis
?Place two empty rows between the Column Axis and the Data Grid
?Have the top left cell in the Data Grid located in cell B9
Objectives:
?Modify the Page Axis and move the Column, Row and Data Grids
Step 1 – Click on Edit Report in the EPM Ribbon to open Report Editor
Step 2 – Modify the Layout tab
Move Category and Measures dimension to the Page Axis.
Increase Column Shift to 3 (to place it three rows above the Data Grid).
Modify the start cell for the Data Grid to B9.
Your report should now look like this
12 – Input Forms
Exercise 12.1.3 – Modify Member Description
Tasks:
?Modify report to display the ID – Description in the Row Axis
?Modify report to display the ID in the Column Axis
Objectives:
?Use the Report Editor to modify the member description.
Exercise 12.2 – Complete Input Form
Tasks:
?Using the report built in the previous exercises, convert it to an input schedule
?Enable the report report to be an Input Form.
?Save Input Form to Server (InputSchedule folder) as SIMPLE_INPUT.xltx
12 – Input Forms
Objectives:
? Create a complete input schedule
In Sheet Options, under Data Input section, select “Use as Input Form” . Choose OK. Refresh the report to change the report in your workbook to an input template.
Exercise 12.3 – Save Data
Tasks:
? Use EPM>Save Data to save/send data to database
Objectives:
? Illustrate Saving Data to the database
Enter Data as show below. (If there are multiple users performing the same exercise choose different data points.)
12 – Input Forms Chose EPM>Save Data
Choose Yes
View Results
12 – Input Forms
12 – Input Forms
Exercise 12.4 – Input Schedule Formatting
Tasks:
? Beyond your chosen format for the column and row axes, add the standard
formatting for an input schedule (Light Yellow cells for input, Green when a cell is changed, Dark Gray when a cell should not be input into). All should have a dotted line border.
Objectives:
? Demonstrate best practice formatting for input schedules
Step 1 – Click on View Formats to add EPM Formatting Sheet
Step 2 – Modify EPM Formatting sheet
12 – Input Forms
Step 3 – Refresh Report, enter new data. Changed cells will be green until you send the data.
Exercise 12.5 – Add a Send Button
Tasks:
? Add a button on the input schedule to allow the user to send and refresh data
without using the EPM add-in ribbon menus.
Objectives:
? Demonstrate best practice for adding buttons
12 – Input Forms
To add save and refresh buttons, you must first enable the developer tab in Excel Options.
Once you’ve enabled the developer toolbar, go to the Developer tab to insert a bu tton.
12 – Input Forms Select the button tool and then click an area under the page axis to place it. Assign Macro should display automatically or right click on the button and s elect “Assign Macro”. Enter Send as the Macro and click New to open the Visual Basic window.
Use the VB code below to create the “SEND” command.
12 – Input Forms Test button by sending data
Exercise 12.6 – Entering data using planning features Tasks:
?Enter Salary and Wages as a trend starting at $500 and increasing by $50 each month
?Key in the following values into Other Salaries and Wages (Oct – $2,500, Nov – $6,000, Dec – $1,500)
?Enter Overtime of $3,000 to spread over the fourth quarter based on Values in Other Salary and Wages.
Objectives:
?Understand how to use EPM Planning Features
Enter $500 into January Salaries and Wages
12 – Input Forms From the EPM menu choose Planning>Trend
Enter the criteria in the Trend dialog box.(You can enter the source vaue as B9 versus a value if you prefer)
Values will populate. Click Send.
12 – Input Forms
Enter the following values into Other Salaries and Wages (Oct – $2,500, Nov – $6,000, Dec – $1,500). Zero out any other values in other months. Choose Send.
12 – Input Forms Enter $3,000 in Overtime spread by the weighting of the enty in Other Salaries And Wages. Start by selecting EPM Planning>Spread and entering the following critera.
The values will spread over the three months in relation to the values in Other Salaries
and Wages. Click Send.
12 – Input Forms
Exercise 12.7 – Designating read-only data
Tasks:
? Set the Pension account to be read only and change the format to have a gray
background.
Objectives:
? Understand how to make an area in the report read-only.
Open the Report Editor and go the the Read-Only Data tab. Select Account, click the Select Members button and choose Pension, Member Only. Click OK.
Enter Data into a Pension account and choose Send. The system will state that there is no data to save as it will not try to send the change for the Pension account.
To make it easy for users to understand where they can and cannot input data change the formatting for the Pension acocunt on the EPMFormattingSheet to show a gray background.
12 – Input Forms Choose Lock for the Pension cells by right clicking on the value in the Data column and choosing EPM>Lock Selected Cells. (this option will lock the cells when we turn on protection)
12 – Input Forms Return back to your report and choose EPM>Sheet Options and open the Protection tab. Choose Protect Active Worksheet and make the Password “password”. Choose OK and Refresh your report.
Now attempt to enter data into the Pension account line. You should receive a warning that the cell is protected.
12 – Input Forms
Exercise 12.7 – Inserting a comment
Tasks: ? Use the EPM Comment functionality to insert a comment.
Objectives:
? Understand how to use EPM Comment functionality.
Select cell B9 in your report (Salaries And Wages, Jan 2011) and choose EPM>Comments>Add Comment.
Enter a comment for the Active Cell. Click Save.
You will receive notice of data sent.
12 – Input Forms To display comments:
Choose EPM>Options (you may have to enter your password). Check the box to
“Show as Microsoft Excel Comments”. Choose OK. Refresh your Report.