April 15, 2010 – Rev 1 Standard (Spot) PO
Document Owner: Manager, Purchasing Systems & Processes ii Creating a Blanket Purchase Order
This document provides step by step instructions on how to create a Blanket Purchase Agreement and includes information about the type of attachments that should be included in order to be
compliant with purchasing procedures.
Anyone issuing Purchase Orders must be setup as a buyer and must be in the Purchasing hierarchy.
NA: Purchasing User - XXX Purcha se Orders → Purchase Orders
EU: Purchasing – XXX Purcha se Orders → Purchase Orders
Blanket Purchase Agreements (BPA) are issued for repetitive purchases when the goods or services being purchased are known along with the pricing, but the quantity and delivery schedule is unknown.
Blanket Releases are associated with BPAs, and include shipment and distribution information.
As a practice at ArvinMeritor, BPAs issued for production purposes are managed by buyers in central purchasing, and releases are managed by material planners.
A Blanket PO has two sections to it – Headers and Lines, each of which has mandatory fields that
must be filled out prior to the PO being submitted for approval. Each of these sections will be further explained below.
Attachments may need to be added to the PO, as per purchasing policy. The attachments provide additional information to the supplier and support Purchasing’s case file documentation procedure.
Attachments can be in the form of Short text, which prints on the face plate of t he PO, Long text, which prints as a separate document, or files added to the PO from your computer.
This document has been created with the assumption that basic Oracle navigation is understood.
Navigate to the Purchase Order form: Purchase Orders → Purchase Orders. When the PO form opens, your cursor will be in the ‘Type’ field on the PO.
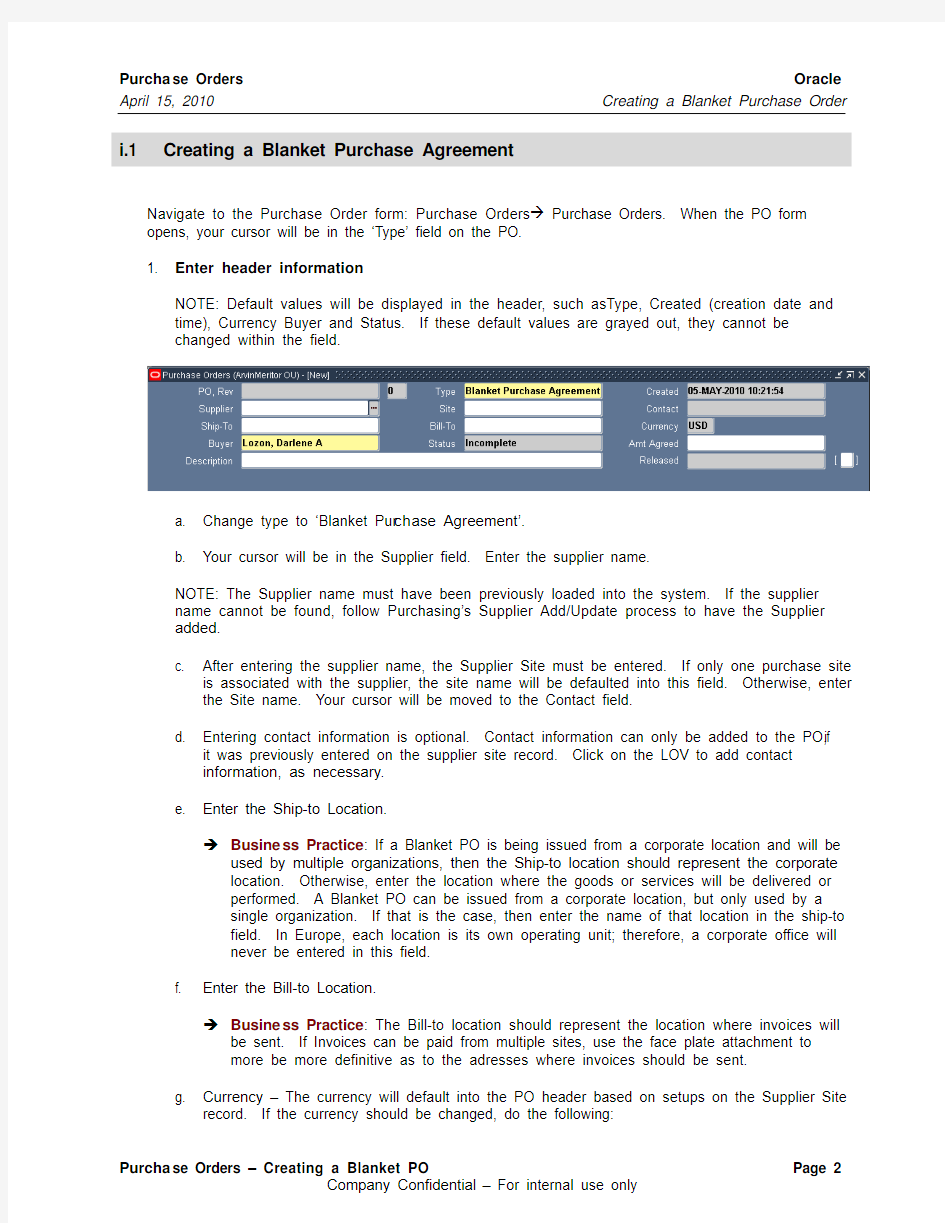
1. Enter header information:
NOTE: Default values will be displayed in the header, such asType, Created (creation date and time), Currency Buyer and Status. If these default values are grayed out, they cannot be
changed within the field.
a. Change type to ‘Blanket Pur ch ase Agreement’.
b. Your cursor will be in the Supplier field. Enter the supplier name.
NOTE: The Supplier name must have been previously loaded into the system. If the supplier name cannot be found, follow Purchasing’s Supplier Add/Update process to have the Supplier added.
c. After entering the supplier name, the Supplier Site must be entere
d. If only one purchase site
is associated with the supplier, the site name will be defaulted into this field. Otherwise, enter the Site name. Your cursor will be moved to the Contact field.
d. Entering contact information is optional. Contact information can only be added to the PO, if
it was previously entered on the supplier site record. Click on the LOV to add contact
information, as necessary.
e. Enter the Ship-to Location.
→Busine ss Practice: If a Blanket PO is being issued from a corporate location and will be used by multiple organizations, then the Ship-to location should represent the corporate
location. Otherwise, enter the location where the goods or services will be delivered or
performed. A Blanket PO can be issued from a corporate location, but only used by a
single organization. If that is the case, then enter the name of that location in the ship-to
field. In Europe, each location is its own operating unit; therefore, a corporate office will
never be entered in this field.
f. Enter the Bill-to Location.
→Busine ss Practice: The Bill-to location should represent the location where invoices will be sent. If Invoices can be paid from multiple sites, use the face plate attachment to
more be more definitive as to the adresses where invoices should be sent.
g. Currency – The currency will default into the PO header based on setups on the Supplier Site
record. If the currency should be changed, do the following:
i. Click on the ‘Currency’ button on the bottom of the form. The Currency window
opens.
ii. Change the currency.
iii. Enter the appro priate Rate Type. In NA, chosoe ‘Spot’, in EU choose ‘Corporate.
iv. The Rate Date defaults based on system (today’s) date, and upon choosing the rate type, the Rate will be defined.
v. Click ‘Done’. The Currency window will close and the new currency will be d isplayed in the header.
h. Your cursor will be in the Buyer field where your buyer name will default. Change as
necessary.
i. Enter the value of the PO in the Amt Agreed field.
→Busine ss Practice: Per purchasing procedure GP.P 7.4.08, A value must be entered in this field whenever a Blanket PO is first created, or when the PO is updated and the
value of the PO changes. The value entered here is the DOA amount and will determine
at what level the PO must be approved.
j. Tab to the Description field and enter appropriate information.
→Busine ss Practice: Though this field is not mandatory as per Oracle funcitonality, it is required according to purchasing policy. The description should include the name of the
Supplier, as well as brief information as to the purpose of the PO. Ex: ‘TEST SUPPLIER
–PO ISSUED FOR TRAINING DOCUMENTATION PURPOSES.’
k. After entering description information, tab out of this field until the PO Headers flexfield opens.
Additional fields of information must be entered here:
NA:
i. FDS Codes – Though not mandatory, FDS values must be entered here if the PO is
going to be used for Florence or Plainfield. The FDS Codes for Florence and
Plainfield are 252 and 256 respectively. Separate the values by a comma if both
values are entered.
ii. Choose the ‘Business Unit’ from the LOV. (Required) The value entered here will determine what Federal Tax I.D. prints on the PO.
iii. Choo se the ‘Purchase Type’ from the LOV. (Required)
iv. Business Process – This allows purchasing to track those POs that are issued as they related to specific business cycles or processes. Click on the LOV to determine
if any of the values apply to the PO, such as single-sourced, or customer directed.
NOTE: For customer directed purchases, additional information will be entered at the PO
line (see line level information below).
EU:
i. PO Type – Not a mandatory field and no data entry is required.
ii. Choose the appropriate ‘Business Unit’ from the LOV. (Required) XXXXXXX NOTE: When a PO is issued by an Amsterdam buyer, on behalf of a manufacturing
lo cation, then the entered Business Unit should be ‘Amsterdam B.V.’
iii. Choose the appropriate ‘P urchase Type from the LOV. (Required)
v. Business Process – This allows purchasing to track those POs that are issued as they related to specific business cycles or processes. Click on the LOV to determine
if any of the values apply to the PO, such as single-sourced, or customer directed.
NOTE: For customer directed purchases, additional information will be entered at the PO
line (see line level information below).
iv. Clic k ‘Ok’. The Flexfield form will close and your cursor will be moved to the lines section of the PO.
2. Enter or validate information in the Lines section of the PO.
The Lines section of the PO allows you to enter a detailed description of the goods or servic es being purchased, along with the agreed upon pricing.
Your cursor will be in the ‘Num’ (line number) field.
a. Tab to the ‘Type’ field. Click on the LOV at the end of the field and use the following
information as a guidline to determine the correct line type:
Busine s Practice [Item field]: After choosing line type, your cursor will be moved to the item field. The item field is used when the purchased goods or services are associated with an item, and the item has been previously entered in the Global Item Master. If no item is
associated with the purchase, then the goods or services being purchased will be defined in the description field. Items are primarily loaded into the item master for Production mateiral, but may also be added to support tool crib purposes.
b. Enter the item either by typing it into the field, or choosing it from the LOV. If the item has not
been added to the Global Item Master in Oracle, it will not be available for data entry on the PO form.
NOTE: If an item number is entered in the ‘Item’ field, the category, description and unit of
measure fields will be populated with default information. If that is the case, then the ‘price’ field will be entered next.
c. Tab to the ‘category’ fiel
d. This field is used to enter the purchasing category, a list of pre-
defined combinations. A valid combination must be chosen in this field. If you do not know one, click on the LOV and the PO Item Category form will open. Click on the LOV in the type field and choose one of the purchasing types. After choosing type, the LOV form closes.
Click the ‘combinations’ button. The fields will turn blue. Then click the ‘Ok’ button. A list of combinations will open. Choose a valid combination by highlighting the option. Click ‘Ok’.
d. Your cursor will be moved to the ‘description’ field. Enter description information for the
goods or services being purchased.
e. Tab to the ‘UOM’ field. Enter the un it of measure.
f. Tab to the ‘Price’ field. Enter the price.
g. Customer Directed Purcha se s: Click on the ‘More’ tab and place your cursor in the
‘Transaction Nature’ field. Click on the LOV at and choose the value ‘CUSTOMER
IMPOSED’. Because this is the last field on this tab, your cursor will automatically be moved to the ‘miminum release’ field on the ‘Agreement’ tab.
h. NA: ITAR/EAR purcha sed items:For those items that are under ITAR/EAR control, the
expiration date of the Supplier Acknowledgement form must be entered in the PO at the line level. On the Agreement tab, enter that date in the ‘Expiration Date’ field.
i. AMORTIZING TOOLING:When amortizing the cost of tooling into an item’s piece price, the
following information must be entered in the PO Lines flexfield:
1. Amortized Tooling –‘Y’ (yes).
2. Tooling Start Date – Enter date when tooling amortization begins, format DD-MON-
YYYY
3. Amortization Volume – Quantity required to fully pay for the tooling
4. Complete, Price Reduced – Leave blank until tooling has been fully paid for
5. Date Complete – Date when amortization volume has been reached, format DD-MON-
YYYY
6. Amoritzation Price Per Unit – Price for the amortization costs, this is the amount that
the unit price will be reduced once the amortization volume has bee n reached NOTE: An
3. Enter price Break information.
The Price Break form is used for two purposes, 1) to track historical price changes, and 2) to show true quantity price breaks.
a. Click on the ‘Price Breaks’ button on the bottom of the form.
b. Your cursor will be in the ‘Num’ (Shipment Number) field.
c. Tab to the ‘Quantity’ fiel
d. At a minimum, enter a value of ‘1’.
d. Tab to the ‘From’ field. Using the LOV, choose the date upon which the pricing becomes
effective. For new POs, the ‘From’ date most often is the same as PO creation date.
e. For NA, i f values are defaulted into the ‘Org’ or ‘Ship-To’ fields – delete them. Price Break
information should be accessible to all organizations within the same Operating Unit. In EU, if values default into these fields, it is acceptable to leave them. Each organization in EU is
its own Operating Unit.
f. Close the Price Breaks form.
g. Save your work.
NOTE: If additional lines need to be entered, repeat steps 2 and 3.
4. Enter or validate Terms information.
a. Click on the Terms button on the bottom of the PO form. The ‘Terms and Conditions’ window
opens. Information will be defaulted into the ‘Payment’ field in the Terms section and into the ‘Amount Limit’ field in the Agreement Controls section.
NOTE: The default value in th e ‘Payment’ field comes from setups on the Supplier Site record. If the default terms should be changed, contact a Purchasing administrator for help.
NOTE: The value defaulted into the ‘Amount Limit’ field comes from the value entered in the ‘Agreed Amount’ field on the header of the PO.
b. Your cursor is in the ‘Payment’ field. Change the terms as necessary.
Busine ss Practice: If terms need to be changed after the PO has been approved and the terms are contracted, then approval from the VP of Purchasing is required, and
evidence of approval must be attached to the PO.
c. Enter ‘Freight’, ‘Carrier’ and ‘FOB’ information as necessary.
NOTE: The FOB field determines Point of Title Transfer, which defines ownership of the purchased components.
d. NA:In the ‘Acceptance Required’ field, change the drop down value to ‘Document Only’. If
the supplier is registered to use iSupplier Portal, a notification will be sent to the supplier requesting them to acknowledge the PO.
e. NA:When the value is changed to ‘Document Only’, the ‘By’ field will be available for data
entry. Click on the LOV at the end of the field to choose a date by which the
acknowledgement should be done. Typically set the date to one week from the creation date of the PO.
f. If the Supplier Site is setu p for ERS (pay on receipt), then the value of ‘Receipt’ will default
into the ‘Pay On’ field.
g. Check the box ‘Supply Agreement’ when Supplier Schedules need to be communicated to
the supply base for the releases issued against this PO. This box must be checked for POs issued to production suppliers.
NOTE: If the Blanket PO is issued with such controls as effective dates or spending limits, then
the following fields should be poplulated:
h. Effective – Enter from and to dates in these fields, which represent the effective dates of the
PO.
i. Amount Limit – The value that defaults into this field comes from the Amount Agreed field on
the header of the blanket PO. If the Blanket PO does not have a spending limit, then delete the value here on the terms form.
j. Save your work.
k. Close the Terms and Conditions form.
5. Add attachments to the PO. See the Work Instruction for attachments, Adding Attachments to
a Purchase Order. Close the ‘Attachments’ window after all attachments have been added.
6. Submit the PO for approval.
a. Click on the ‘Approve’ button. The ‘Approval’ form opens.
b. Click the ‘Forward’ box to make sure the document is routed to the correct person. Change
the approver as needed by clicking on the LOV at the end of the field and choosing the
correct forward-to person.
c. Enter information in the ‘Note’ fiel
d.
Busine ss Practice: The information provided in this field gives the approver an indication as to why the PO was issued or updated, and appears in the subject line of the
email sent to the approver.
d. For any orders that require Global ASLs to be created, click on the Additional Options tab.
e. Check the box ‘Enable Automatic Sourcing’. When this box is checked, the ‘Release
Generation Method’ field is available for data entry. A default value will be shown, ‘A utomatic Release’. Unless otherwise notified by a planner, leave the default value.
f. Click the ‘Ok’ button on the bottom of the form. The PO will be submitted for approval.
— END OF PROCEDURE —